> ## Documentation Index
> Fetch the complete documentation index at: https://docs.domino.ai/llms.txt
> Use this file to discover all available pages before exploring further.
# Manage NetApp Volumes
> Domino Volumes for NetApp ONTAP store Project data on external NetApp-backed storage, provisioned through Trident and grouped into ONTAP filesystems.
Domino Volumes for NetApp ONTAP (NetApp Volumes) let practitioners share data across Projects by storing files on external NetApp-backed storage. They improve I/O performance, remove duplication, and support snapshot-based recovery, replacing scattered, Project-specific data solutions with one centralized system.
 ## How ONTAP filesystems work in Domino
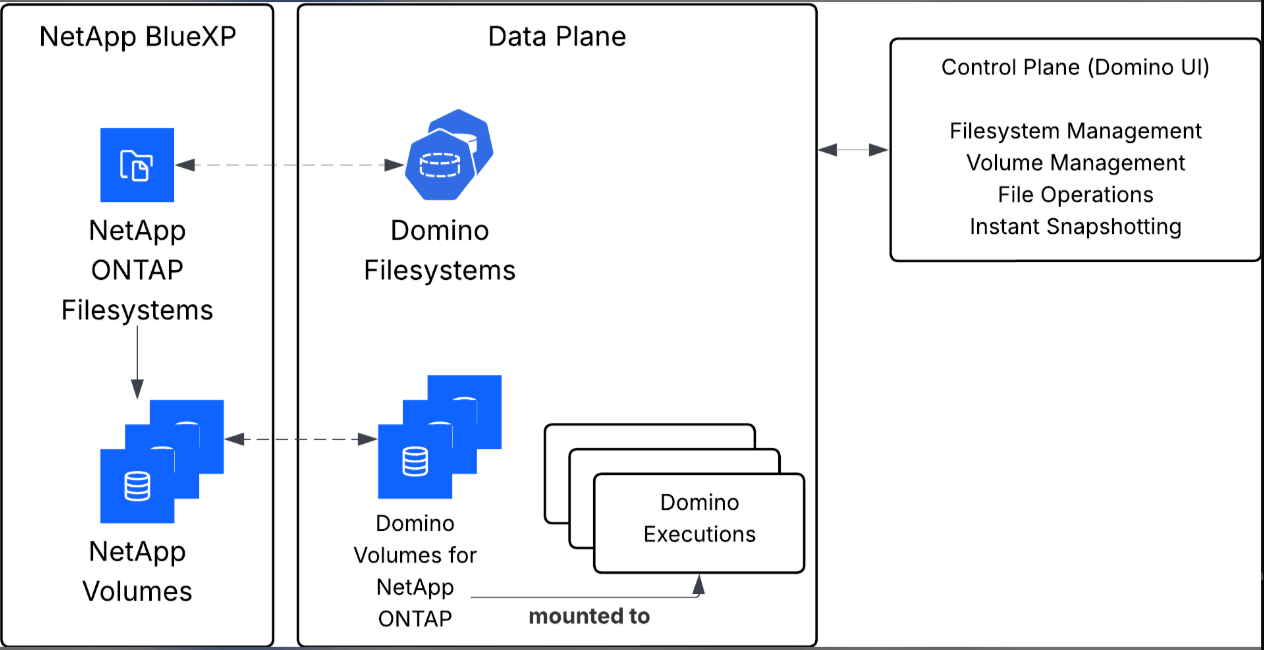
NetApp Volumes live inside ONTAP filesystems. A [NetApp ONTAP filesystem](https://docs.netapp.com/us-en/ontap/concepts/snapshot-copies-concept.html) defines where NetApp Volumes live by linking a Data Plane and a storage class to a named storage container. That binding gives you:
* Clear visibility into where each NetApp Volume is stored.
* Support for multiple accounts and Data Planes, which matters because NetApp Volume counts are capped per account.
* A deletion flow that moves a NetApp Volume to cold storage instead of destroying it, so retention policies are enforceable and accidental data loss is less likely.
Setting up NetApp Volumes is a manual, infrastructure-level task. It is intended for administrators who need complete control over the infrastructure and who deploy into AWS environments.
## Prerequisites
| Component | Requirement |
| ------------------------- | ---------------------------------------------------------------------------------------------------------------------------------- |
| **Domino** | A deployed and configured Domino. |
| **ONTAP filesystem** | A supported ONTAP filesystem. This is where the NetApp Volumes are made and how they interact with your underlying infrastructure. |
| **Trident** | Version **26.02** or above, installed and working with your filesystem. |
| **Communication** | Verified connectivity between Domino and ONTAP. |
| **Storage configuration** | The root system file name, the base of the ONTAP filesystem on which all other NetApp Volumes are mounted. |
| **Feature flag** | `EnableDominoNetAppVolumes` set to `true`. |
## Set up NetApp Volumes
A Kubernetes `Role` and `RoleBinding` let the microservice authenticate and communicate with Trident, and a `NetworkPolicy` allows the right Kubernetes resources to reach Trident.
```yaml theme={null}
# role.yaml
apiVersion: rbac.authorization.k8s.io/v1
kind: Role
metadata:
name: data-plane-agent
namespace: trident
rules:
- apiGroups: [""]
resources: ["secrets"]
verbs: ["get"]
```
```yaml theme={null}
# rolebinding.yaml
apiVersion: rbac.authorization.k8s.io/v1
kind: RoleBinding
metadata:
name: data-plane-agent
namespace: trident
roleRef:
apiGroup: rbac.authorization.k8s.io
kind: Role
name: data-plane-agent
subjects:
- kind: ServiceAccount
name: data-plane-agent
namespace: domino-compute
```
```yaml theme={null}
# networkpolicy.yaml
apiVersion: networking.k8s.io/v1
kind: NetworkPolicy
metadata:
name: trident-operator
namespace: trident
spec:
podSelector:
matchLabels:
app: controller.csi.trident.netapp.io
policyTypes:
- Ingress
- Egress
ingress:
- from: []
ports:
- protocol: TCP
port: 8443
- protocol: TCP
port: 8001
egress:
- to: []
```
Apply all three:
```bash theme={null}
kubectl apply -f role.yaml
kubectl apply -f rolebinding.yaml
kubectl apply -f networkpolicy.yaml
```
The `TridentBackendConfig` (TBC) custom resource tells Trident how to connect to your FSx for NetApp ONTAP filesystem. Create `trident-backend.yaml`, replacing the placeholders with the details from your Terraform output:
* `svm`: the name of the Storage Virtual Machine (SVM).
* `fsxFilesystemID`: the ID of the filesystem.
* `apiRegion`: the AWS region where your FSx filesystem is deployed.
* `credentials.name`: the `creds_secret_arn` for the SVM.
```yaml theme={null}
apiVersion: trident.netapp.io/v1
kind: TridentBackendConfig
metadata:
name: backend-tbc-ontap-nas
namespace: trident
spec:
version: 1
storageDriverName: ontap-nas
backendName: tbc-ontap-nas
svm: ""
aws:
fsxFilesystemID: ""
apiRegion: ""
credentials:
name: ""
type: awsarn
```
Apply it, then check that the backend is bound and online:
```bash theme={null}
kubectl apply -f trident-backend.yaml
kubectl -n trident get tbc,tbe
```
```console theme={null}
NAME BACKEND NAME BACKEND UUID PHASE STATUS
backend-tbc-ontap-nas tbc-ontap-nas xxxxxxxx-xxxx-xxxx-xxxx-xxxxxxxxxxxx Bound Success
NAME BACKEND BACKEND UUID
tbe-xxxxx tbc-ontap-nas xxxxxxxx-xxxx-xxxx-xxxx-xxxxxxxxxxxx
```
A storage class then lets users dynamically provision NetApp Volumes on that backend:
```yaml theme={null}
# storage-class.yaml
apiVersion: storage.k8s.io/v1
kind: StorageClass
metadata:
name: ontap-gold
provisioner: csi.trident.netapp.io
parameters:
backendType: "ontap-nas"
reclaimPolicy: Delete
allowVolumeExpansion: true
```
```bash theme={null}
kubectl apply -f storage-class.yaml
```
The filesystem you created in Amazon FSx or NetApp Cloud ONTAP includes a root ONTAP volume at the path `/`, the base on which all other NetApp Volumes are mounted. Domino reaches it through a Kubernetes `PersistentVolumeClaim` (PVC) that imports it.
```yaml theme={null}
# root-pvc.yaml
apiVersion: v1
kind: PersistentVolumeClaim
metadata:
name: fsx-imported-volume # Arbitrary name
namespace: domino-compute # Should always be the compute namespace
labels:
dominodatalab.com/netapp-storage: "true" # IMPORTANT. This is needed so the Root PVC can be found during Filesystem creation (in the next step)
annotations:
trident.netapp.io/importBackendUUID: "c9c51153-a02d-4f67-b3ca-6e11c8e80ee2" # This can be found by inspecting the tridentbackendconfig custom resource in the cluster, under the status.backendInfo.backendUUID field
trident.netapp.io/importOriginalName: demo_root # Name of the root volume in your Filesystem. Can be found in AWS FSx UI (The name is usually _svm_root)
trident.netapp.io/notManaged: "false"
spec:
accessModes:
- ReadWriteMany
resources:
requests:
storage: 953Mi
storageClassName: democlass # Use the storage class of the trident storage class in the cluster
volumeMode: Filesystem
```
Apply it and confirm that the returned message indicates `STATUS - Success`:
```bash theme={null}
kubectl apply -f root-pvc.yaml
kubectl get pvc fsx-imported-volume -n domino-compute
```
Your Domino deployment is now configured to use NetApp Volumes.
## Register an ONTAP filesystem
Registering a filesystem is what makes the storage usable from Domino. After that, the same area of the Admin application lets you view, audit, and manage individual NetApp Volumes.
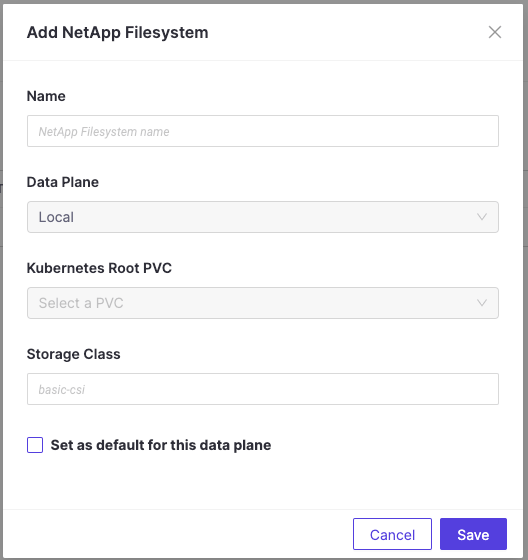
1. In the Admin panel, go to **Manage Resources** > **NetApp Volumes**, then select the **ONTAP** tab.
2. Click **Add Filesystem**.
3. Provide the following:
* **Name**: 1 to 250 characters, which can include letters, digits, underscores, hyphens, and spaces.
* **Data Plane**: select from existing Data Planes. This defines where the data resides.
* **Kubernetes Root PVC**: the name of the root PVC, which must exist in the selected Data Plane.
* **Storage Class**: the Kubernetes storage class name that uses Trident as the provisioner.
4. Click **Save**.
## How ONTAP filesystems work in Domino
NetApp Volumes live inside ONTAP filesystems. A [NetApp ONTAP filesystem](https://docs.netapp.com/us-en/ontap/concepts/snapshot-copies-concept.html) defines where NetApp Volumes live by linking a Data Plane and a storage class to a named storage container. That binding gives you:
* Clear visibility into where each NetApp Volume is stored.
* Support for multiple accounts and Data Planes, which matters because NetApp Volume counts are capped per account.
* A deletion flow that moves a NetApp Volume to cold storage instead of destroying it, so retention policies are enforceable and accidental data loss is less likely.
Setting up NetApp Volumes is a manual, infrastructure-level task. It is intended for administrators who need complete control over the infrastructure and who deploy into AWS environments.
## Prerequisites
| Component | Requirement |
| ------------------------- | ---------------------------------------------------------------------------------------------------------------------------------- |
| **Domino** | A deployed and configured Domino. |
| **ONTAP filesystem** | A supported ONTAP filesystem. This is where the NetApp Volumes are made and how they interact with your underlying infrastructure. |
| **Trident** | Version **26.02** or above, installed and working with your filesystem. |
| **Communication** | Verified connectivity between Domino and ONTAP. |
| **Storage configuration** | The root system file name, the base of the ONTAP filesystem on which all other NetApp Volumes are mounted. |
| **Feature flag** | `EnableDominoNetAppVolumes` set to `true`. |
## Set up NetApp Volumes
A Kubernetes `Role` and `RoleBinding` let the microservice authenticate and communicate with Trident, and a `NetworkPolicy` allows the right Kubernetes resources to reach Trident.
```yaml theme={null}
# role.yaml
apiVersion: rbac.authorization.k8s.io/v1
kind: Role
metadata:
name: data-plane-agent
namespace: trident
rules:
- apiGroups: [""]
resources: ["secrets"]
verbs: ["get"]
```
```yaml theme={null}
# rolebinding.yaml
apiVersion: rbac.authorization.k8s.io/v1
kind: RoleBinding
metadata:
name: data-plane-agent
namespace: trident
roleRef:
apiGroup: rbac.authorization.k8s.io
kind: Role
name: data-plane-agent
subjects:
- kind: ServiceAccount
name: data-plane-agent
namespace: domino-compute
```
```yaml theme={null}
# networkpolicy.yaml
apiVersion: networking.k8s.io/v1
kind: NetworkPolicy
metadata:
name: trident-operator
namespace: trident
spec:
podSelector:
matchLabels:
app: controller.csi.trident.netapp.io
policyTypes:
- Ingress
- Egress
ingress:
- from: []
ports:
- protocol: TCP
port: 8443
- protocol: TCP
port: 8001
egress:
- to: []
```
Apply all three:
```bash theme={null}
kubectl apply -f role.yaml
kubectl apply -f rolebinding.yaml
kubectl apply -f networkpolicy.yaml
```
The `TridentBackendConfig` (TBC) custom resource tells Trident how to connect to your FSx for NetApp ONTAP filesystem. Create `trident-backend.yaml`, replacing the placeholders with the details from your Terraform output:
* `svm`: the name of the Storage Virtual Machine (SVM).
* `fsxFilesystemID`: the ID of the filesystem.
* `apiRegion`: the AWS region where your FSx filesystem is deployed.
* `credentials.name`: the `creds_secret_arn` for the SVM.
```yaml theme={null}
apiVersion: trident.netapp.io/v1
kind: TridentBackendConfig
metadata:
name: backend-tbc-ontap-nas
namespace: trident
spec:
version: 1
storageDriverName: ontap-nas
backendName: tbc-ontap-nas
svm: ""
aws:
fsxFilesystemID: ""
apiRegion: ""
credentials:
name: ""
type: awsarn
```
Apply it, then check that the backend is bound and online:
```bash theme={null}
kubectl apply -f trident-backend.yaml
kubectl -n trident get tbc,tbe
```
```console theme={null}
NAME BACKEND NAME BACKEND UUID PHASE STATUS
backend-tbc-ontap-nas tbc-ontap-nas xxxxxxxx-xxxx-xxxx-xxxx-xxxxxxxxxxxx Bound Success
NAME BACKEND BACKEND UUID
tbe-xxxxx tbc-ontap-nas xxxxxxxx-xxxx-xxxx-xxxx-xxxxxxxxxxxx
```
A storage class then lets users dynamically provision NetApp Volumes on that backend:
```yaml theme={null}
# storage-class.yaml
apiVersion: storage.k8s.io/v1
kind: StorageClass
metadata:
name: ontap-gold
provisioner: csi.trident.netapp.io
parameters:
backendType: "ontap-nas"
reclaimPolicy: Delete
allowVolumeExpansion: true
```
```bash theme={null}
kubectl apply -f storage-class.yaml
```
The filesystem you created in Amazon FSx or NetApp Cloud ONTAP includes a root ONTAP volume at the path `/`, the base on which all other NetApp Volumes are mounted. Domino reaches it through a Kubernetes `PersistentVolumeClaim` (PVC) that imports it.
```yaml theme={null}
# root-pvc.yaml
apiVersion: v1
kind: PersistentVolumeClaim
metadata:
name: fsx-imported-volume # Arbitrary name
namespace: domino-compute # Should always be the compute namespace
labels:
dominodatalab.com/netapp-storage: "true" # IMPORTANT. This is needed so the Root PVC can be found during Filesystem creation (in the next step)
annotations:
trident.netapp.io/importBackendUUID: "c9c51153-a02d-4f67-b3ca-6e11c8e80ee2" # This can be found by inspecting the tridentbackendconfig custom resource in the cluster, under the status.backendInfo.backendUUID field
trident.netapp.io/importOriginalName: demo_root # Name of the root volume in your Filesystem. Can be found in AWS FSx UI (The name is usually _svm_root)
trident.netapp.io/notManaged: "false"
spec:
accessModes:
- ReadWriteMany
resources:
requests:
storage: 953Mi
storageClassName: democlass # Use the storage class of the trident storage class in the cluster
volumeMode: Filesystem
```
Apply it and confirm that the returned message indicates `STATUS - Success`:
```bash theme={null}
kubectl apply -f root-pvc.yaml
kubectl get pvc fsx-imported-volume -n domino-compute
```
Your Domino deployment is now configured to use NetApp Volumes.
## Register an ONTAP filesystem
Registering a filesystem is what makes the storage usable from Domino. After that, the same area of the Admin application lets you view, audit, and manage individual NetApp Volumes.
1. In the Admin panel, go to **Manage Resources** > **NetApp Volumes**, then select the **ONTAP** tab.
2. Click **Add Filesystem**.
3. Provide the following:
* **Name**: 1 to 250 characters, which can include letters, digits, underscores, hyphens, and spaces.
* **Data Plane**: select from existing Data Planes. This defines where the data resides.
* **Kubernetes Root PVC**: the name of the root PVC, which must exist in the selected Data Plane.
* **Storage Class**: the Kubernetes storage class name that uses Trident as the provisioner.
4. Click **Save**.
 ## Review NetApp Volumes
Go to **Admin panel** > **Manage Resources** > **NetApp Volumes**, then select the **Volumes** tab to see every configured NetApp Volume and its key details.
| Column | Description |
| ----------------------- | ------------------------------------------------------------------------- |
| **Name** | The name of the NetApp Volume as registered in Domino. |
| **Owner Name** | The user or Project that owns the NetApp Volume. |
| **ONTAP Filesystem** | The ONTAP filesystem in which this NetApp Volume resides. |
| **Status** | The current lifecycle state, for example Active, Deleted, or Error. |
| **Permissions** | Access level settings, for example read/write access by owner or Project. |
| **Size** | The allocated capacity. |
| **Number of Snapshots** | Total count of saved snapshots. |
## Related
* [Create NetApp Volumes](/6.3/platform-capabilities/core-concepts/data/netapp-volumes/create-netapp-volumes) covers what practitioners do once a filesystem is registered.
* [Domino Volumes API](/6.3/reference/api/domino-volumes-api) manages NetApp Volumes programmatically.
* [External Data Volumes](/6.3/admin/data-administration/external-data/external-data-volumes) mount storage that Domino does not manage, distinct from NetApp Volumes.
## Related topics
- [Work with NetApp Volumes](/6.3/platform-capabilities/core-concepts/data/netapp-volumes/index.md)
- [Create NetApp Volumes from Domino or a project](/6.3/platform-capabilities/core-concepts/data/netapp-volumes/create-netapp-volumes.md)
- [View and edit NetApp Volumes](/6.3/platform-capabilities/core-concepts/data/netapp-volumes/view-and-edit-netapp-volumes.md)
- [Domino NetApp Volumes API](/6.3/reference/api/domino-volumes-api.md)
## Review NetApp Volumes
Go to **Admin panel** > **Manage Resources** > **NetApp Volumes**, then select the **Volumes** tab to see every configured NetApp Volume and its key details.
| Column | Description |
| ----------------------- | ------------------------------------------------------------------------- |
| **Name** | The name of the NetApp Volume as registered in Domino. |
| **Owner Name** | The user or Project that owns the NetApp Volume. |
| **ONTAP Filesystem** | The ONTAP filesystem in which this NetApp Volume resides. |
| **Status** | The current lifecycle state, for example Active, Deleted, or Error. |
| **Permissions** | Access level settings, for example read/write access by owner or Project. |
| **Size** | The allocated capacity. |
| **Number of Snapshots** | Total count of saved snapshots. |
## Related
* [Create NetApp Volumes](/6.3/platform-capabilities/core-concepts/data/netapp-volumes/create-netapp-volumes) covers what practitioners do once a filesystem is registered.
* [Domino Volumes API](/6.3/reference/api/domino-volumes-api) manages NetApp Volumes programmatically.
* [External Data Volumes](/6.3/admin/data-administration/external-data/external-data-volumes) mount storage that Domino does not manage, distinct from NetApp Volumes.
## Related topics
- [Work with NetApp Volumes](/6.3/platform-capabilities/core-concepts/data/netapp-volumes/index.md)
- [Create NetApp Volumes from Domino or a project](/6.3/platform-capabilities/core-concepts/data/netapp-volumes/create-netapp-volumes.md)
- [View and edit NetApp Volumes](/6.3/platform-capabilities/core-concepts/data/netapp-volumes/view-and-edit-netapp-volumes.md)
- [Domino NetApp Volumes API](/6.3/reference/api/domino-volumes-api.md)