> ## Documentation Index
> Fetch the complete documentation index at: https://docs.domino.ai/llms.txt
> Use this file to discover all available pages before exploring further.
# Configure AWS credential propagation
If you enable SSO for Domino, you can configure Amazon Web Service (AWS) credential propagation. Use this to let Domino automatically assume temporary credentials for AWS roles that are based on roles assigned to users in the upstream identity provider.
To learn more about how to use a credential file with the AWS SDK, see the blog on [A new and standardized way to manage credentials in the AWS SDKs](https://aws.amazon.com/blogs/security/a-new-and-standardized-way-to-manage-credentials-in-the-aws-sdks/).
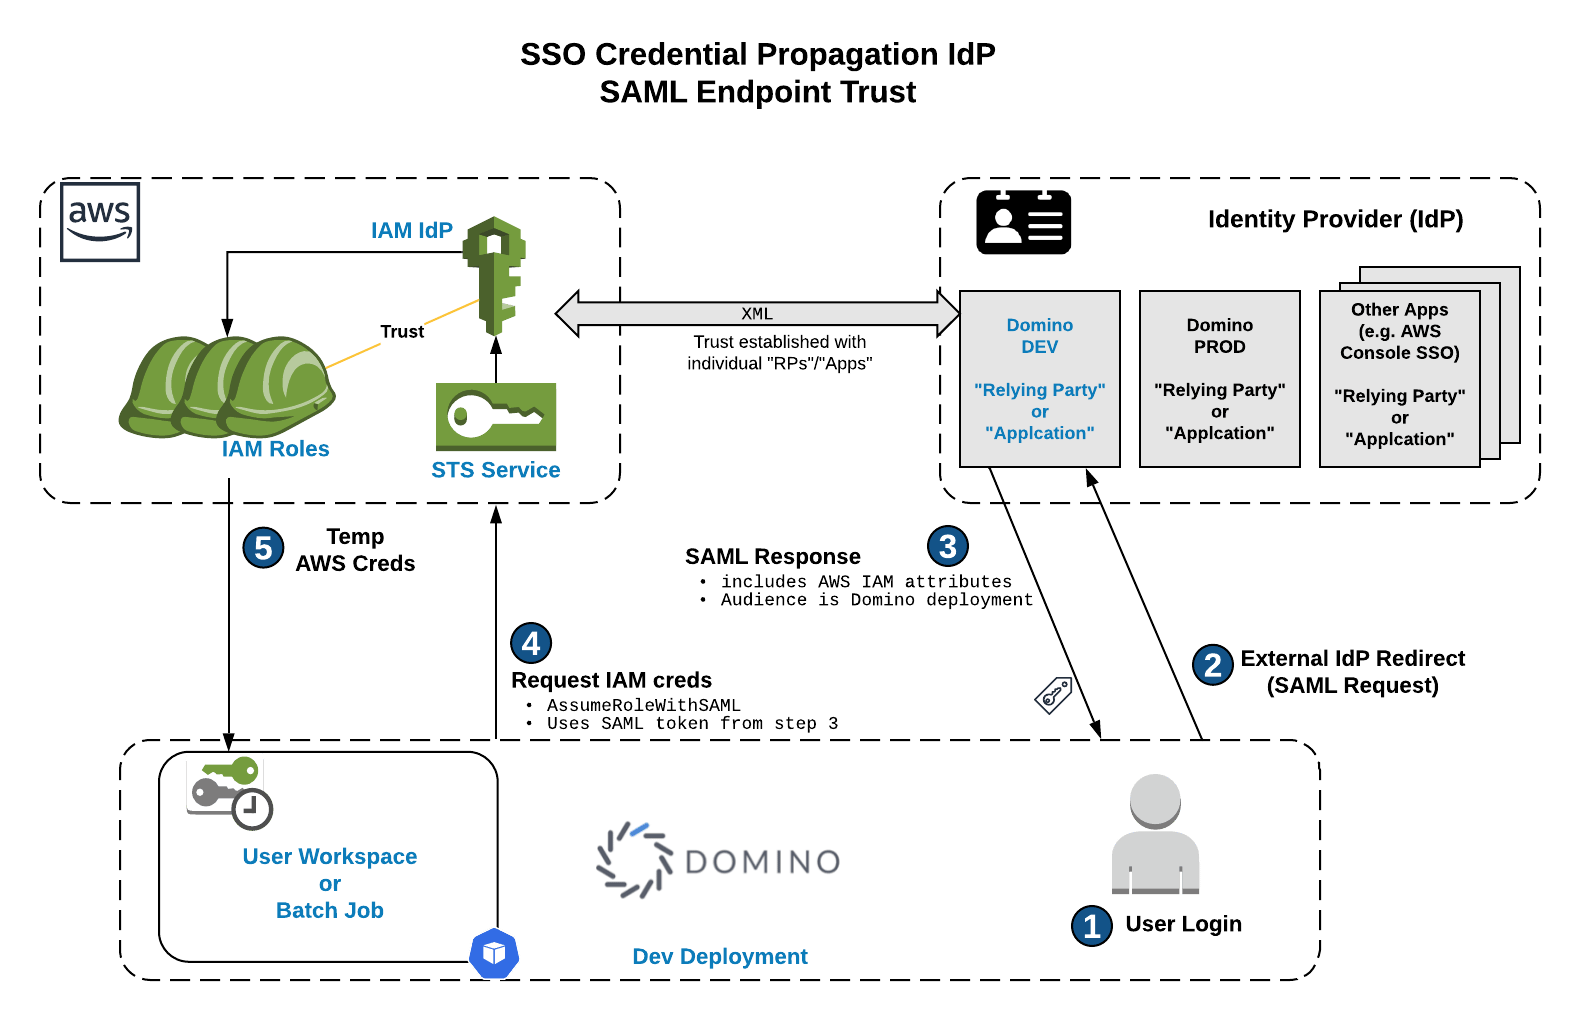
The following describes the overall workflow from user login to credential usage:
 ## Validations in the AssumeRoleWithSAML workflow
The Identity Provider Relying Party/Application validates the Issuer element in the AuthnRequest (SAML request) sent by Domino. . Domino validates the **Audience (Entity ID of the SP)** in the **SAML Response** sent by the **Identity Provider Relying Party/Application**. . **AWS AssumeRole** validates that the `Issuer` of the **SAML Response** passed on from Domino matches the `Issuer` of the **Identity Provider Relying Party/Application**. You can set up validations for other fields.
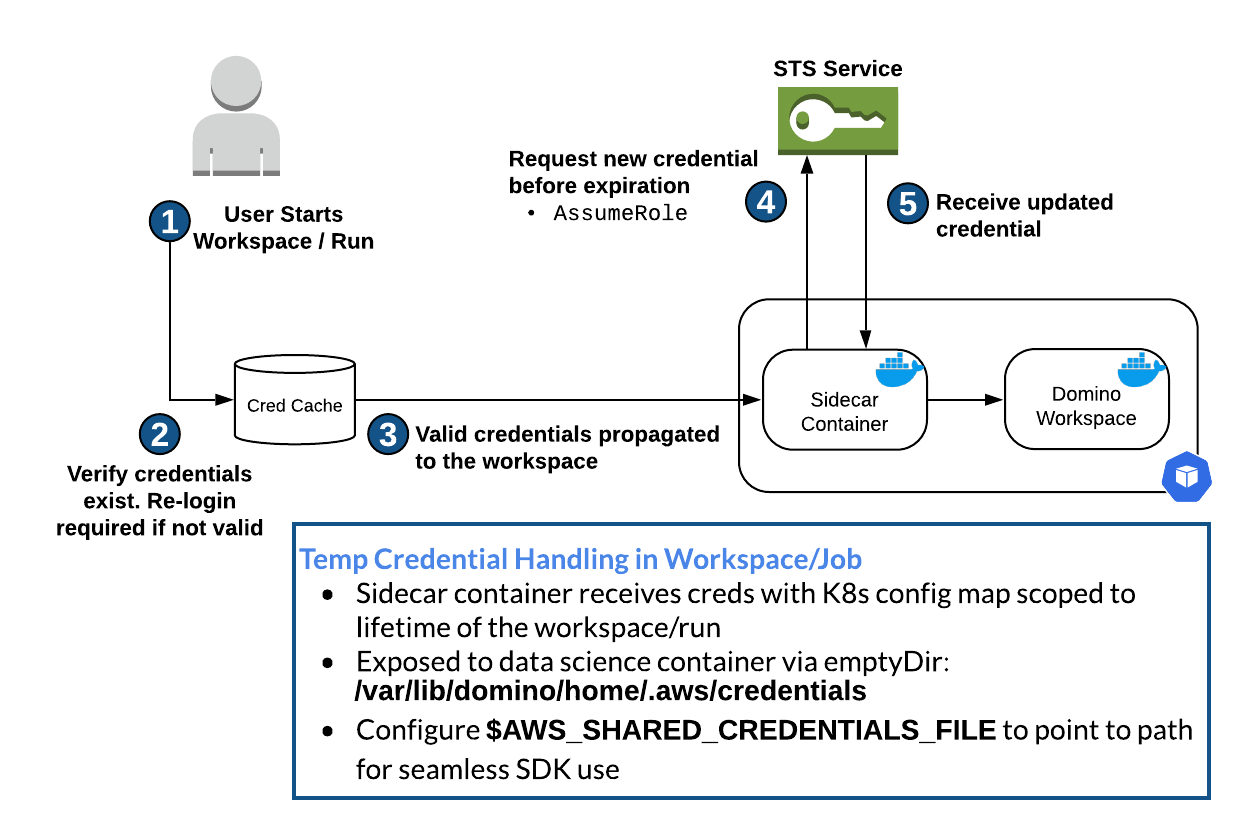
The following diagram describes the credential workflow when a user launches a Workspace:
## Validations in the AssumeRoleWithSAML workflow
The Identity Provider Relying Party/Application validates the Issuer element in the AuthnRequest (SAML request) sent by Domino. . Domino validates the **Audience (Entity ID of the SP)** in the **SAML Response** sent by the **Identity Provider Relying Party/Application**. . **AWS AssumeRole** validates that the `Issuer` of the **SAML Response** passed on from Domino matches the `Issuer` of the **Identity Provider Relying Party/Application**. You can set up validations for other fields.
The following diagram describes the credential workflow when a user launches a Workspace:
 ## SAML provider configuration prerequisites
You must configure federation between your AWS account and your identity provider independently of Domino. See [AWS Federated Authentication with Active Directory Federation Services (AD FS)](https://aws.amazon.com/blogs/security/aws-federated-authentication-with-active-directory-federation-services-ad-fs/) for an example.
The SAML provider application connected to Domino must include the appropriate AWS federation attributes based on the roles that each user will be allowed to assume.
## Create AWS IAM resources
* **Add an Identity Provider:**
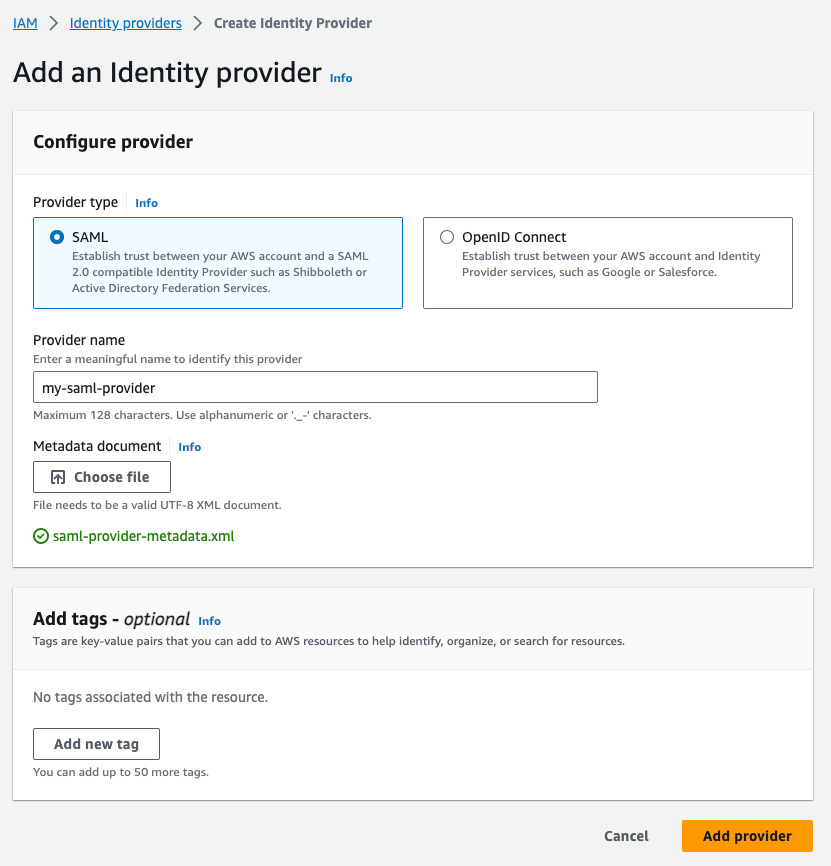
Select `SAML` as the provider type and add a preferred name for it. Then click **Choose file** under the Metadata document heading to upload the Federation Metadata file from your ADFS.
## SAML provider configuration prerequisites
You must configure federation between your AWS account and your identity provider independently of Domino. See [AWS Federated Authentication with Active Directory Federation Services (AD FS)](https://aws.amazon.com/blogs/security/aws-federated-authentication-with-active-directory-federation-services-ad-fs/) for an example.
The SAML provider application connected to Domino must include the appropriate AWS federation attributes based on the roles that each user will be allowed to assume.
## Create AWS IAM resources
* **Add an Identity Provider:**
Select `SAML` as the provider type and add a preferred name for it. Then click **Choose file** under the Metadata document heading to upload the Federation Metadata file from your ADFS.
 * **Create a role:**
Since Domino will refresh the user’s credentials during an active session, you must ensure that any IAM role that you propagate to a user has `assume-self` policy.
1. First create a role, selecting `SAML 2.0 federation` as the trusted entity type. In the SAML Federation config, select the IdP that was created in the previous step and select programmatic and console access. This will be the initial configuration that will need to be updated to reference itself.
* **Create a role:**
Since Domino will refresh the user’s credentials during an active session, you must ensure that any IAM role that you propagate to a user has `assume-self` policy.
1. First create a role, selecting `SAML 2.0 federation` as the trusted entity type. In the SAML Federation config, select the IdP that was created in the previous step and select programmatic and console access. This will be the initial configuration that will need to be updated to reference itself.
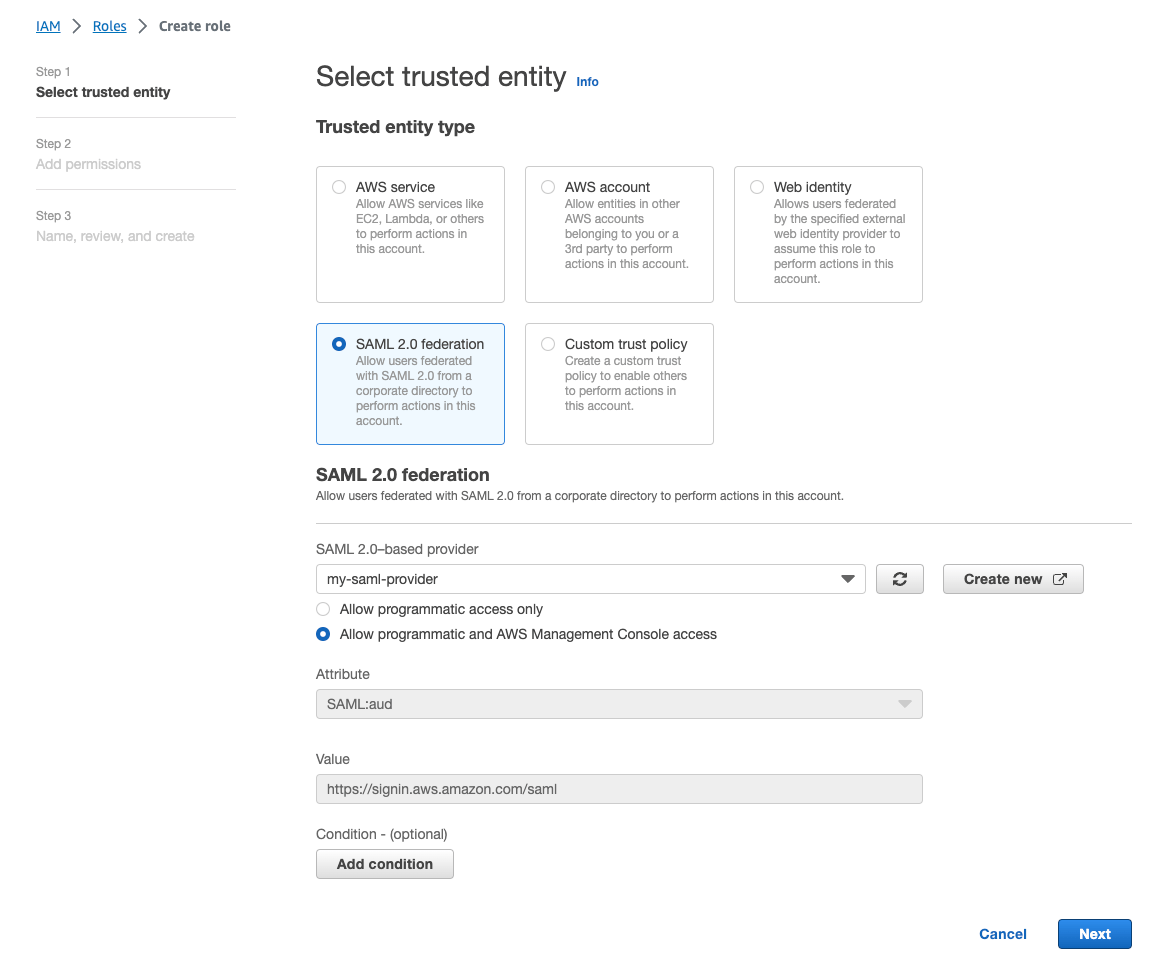 In the last step, provide a name for the role and finish its creation.
 2. Once the role is created, go into its definition, select **Trust relationships**, and edit its trust policy.
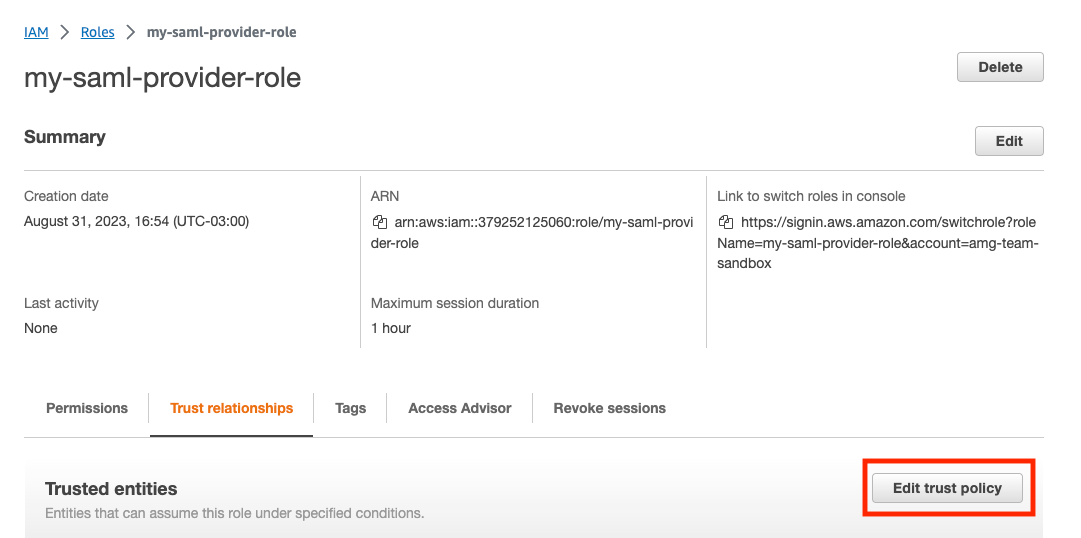 3. Override the current value with the following value:
```json theme={null}
{
"Version": "2012-10-17",
"Statement": [
{
"Effect": "Allow",
"Principal": {
"Federated": ""
},
"Action": "sts:AssumeRoleWithSAML"
},
{
"Effect": "Allow",
"Principal": {
"AWS": ""
},
"Action": "sts:AssumeRole"
}
]
}
```
* **Create a policy:**
1. To specify the permissions for the policy, in the first step of the policy creation, select the JSON editor, and add this value:
```json theme={null}
{
"Version": "2012-10-17",
"Statement": [
{
"Effect": "Allow",
"Action": [
"sts:AssumeRole",
"sts:AssumeRoleWithSAML"
],
"Resource": ""
}
]
}
```
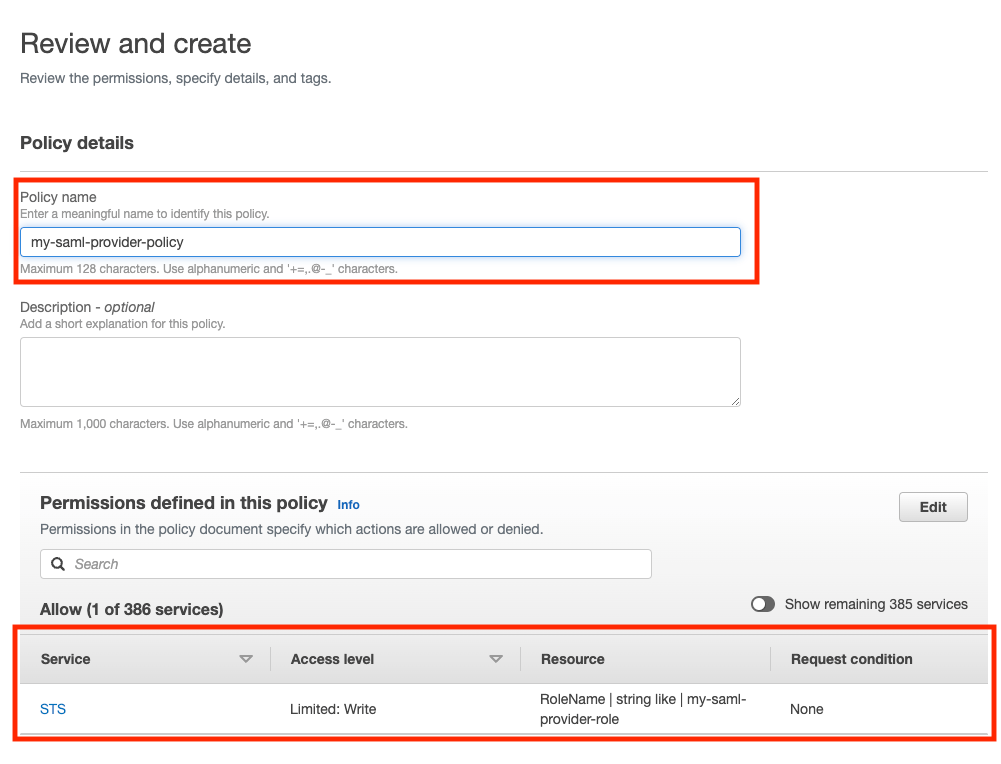
2. Next, provide a name for the policy and validate that the role is added to the permissions defined for the policy.
3. Override the current value with the following value:
```json theme={null}
{
"Version": "2012-10-17",
"Statement": [
{
"Effect": "Allow",
"Principal": {
"Federated": ""
},
"Action": "sts:AssumeRoleWithSAML"
},
{
"Effect": "Allow",
"Principal": {
"AWS": ""
},
"Action": "sts:AssumeRole"
}
]
}
```
* **Create a policy:**
1. To specify the permissions for the policy, in the first step of the policy creation, select the JSON editor, and add this value:
```json theme={null}
{
"Version": "2012-10-17",
"Statement": [
{
"Effect": "Allow",
"Action": [
"sts:AssumeRole",
"sts:AssumeRoleWithSAML"
],
"Resource": ""
}
]
}
```
2. Next, provide a name for the policy and validate that the role is added to the permissions defined for the policy.
 * **Attach the policy to the role:**
1. After the policy is created, go back to the role definition and select **Attach policies**.
* **Attach the policy to the role:**
1. After the policy is created, go back to the role definition and select **Attach policies**.
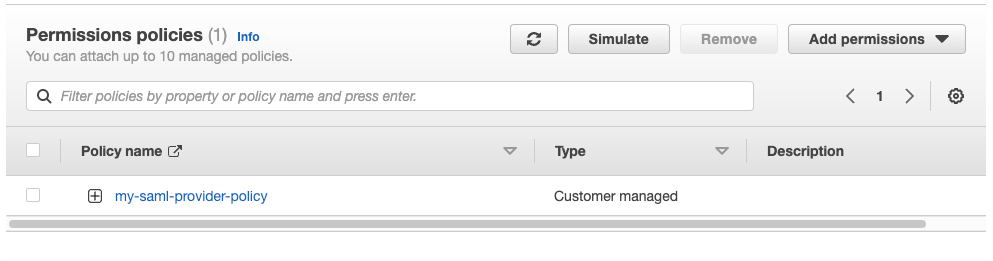
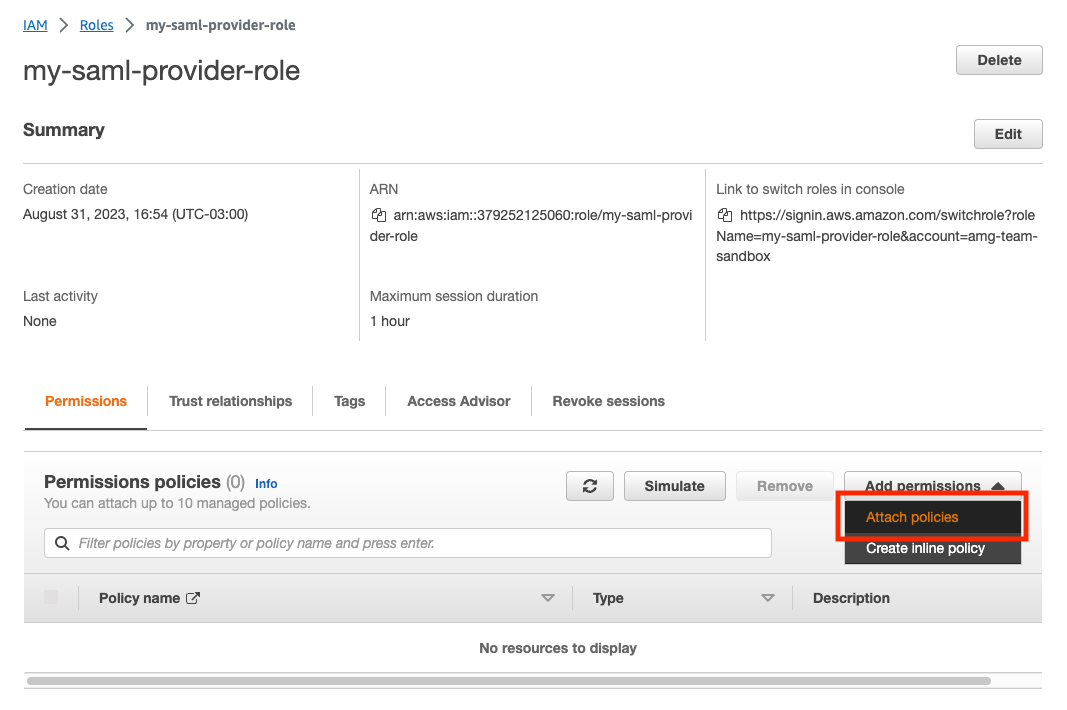 2. Look for the policy that was created in the previous step and add it to the role.
 ## Expected SAML attributes
* Attribute with Name `https://aws.amazon.com/SAML/Attributes/Role`
* **Multi-valued:** `Yes`
* **Value format:**
* Comma-separated key-value pair of provider and role.
* `,`
* `arn:aws:iam:::saml-provider/,arn:aws:iam:::role/`
* Attribute with Name `https://aws.amazon.com/SAML/Attributes/RoleSessionName`
* **Multi-valued:** `No`
* **Value:**
* String to be used as an identifier for the temporary credentials.
* Usually set to the email of the user.
* Attribute with Name `https://aws.amazon.com/SAML/Attributes/SessionDuration`
* **Multi-valued:** `No`
* **Value:**
* Duration in seconds of how long a user can stay logged in before the initial set of credentials for each of the roles is invalidated.
* The duration must be smaller than the maximum allowable duration for each of the roles made available for a given user.
To validate that you’ve established trust between AWS and the identity provider, sign in to Domino and check that the SAML response contains the expected SAML attributes. You can use the **SAML-tracer** extension available for [Chrome](https://chrome.google.com/webstore/detail/saml-tracer/mpdajninpobndbfcldcmbpnnbhibjmch?hl=en) and [Firefox](https://addons.mozilla.org/en-US/firefox/addon/saml-tracer/) to examine SAML requests and responses to see that the appropriate attributes appear.
Example:
```xml theme={null}
arn:aws:iam::123456789012:saml-provider/acme-saml,arn:aws:iam::123456789012:role/role1
arn:aws:iam::123456789012:saml-provider/acme-saml,arn:aws:iam::123456789012:role/role2
john.smith@acme.org
900
```
## Map AWS federation attributes
1. Go to the **Mappers** tab and configure an **Attribute Importer** mapper.
2. Go to **Identity providers** > Select the identity provider > **Mappers** > **Add mapper**.
* **AWS Roles**
* **Name:** AWS Roles
* **Mapper Type:** `Attribute Importer`
* **Attribute Name:** `https://aws.amazon.com/SAML/Attributes/Role`
* **Friendly Name:** \
* **User Attribute Name:** `aws-roles`
* **AWS Role Session Name**
* **Name:** AWS Role Session Name
* **Mapper Type:** `Attribute Importer`
* **Attribute Name:** \`[https://aws.amazon.com/SAML/Attributes/RoleSessionName](https://aws.amazon.com/SAML/Attributes/RoleSessionName)
* **Friendly Name:** \
* **User Attribute Name:** `aws-role-session-name`
* **AWS Session Duration**
* **Name:** AWS Session Duration
* **Mapper Type:** `Attribute Importer`
* **Attribute Name:** `https://aws.amazon.com/SAML/Attributes/SessionDuration`
* **Friendly Name:** \
* **User Attribute Name:** `aws-session-duration`
## Enable credential propagation in Domino
1. After these prerequisites are configured, enable credential propagation in the Admin application by clicking on **Platform Settings** > **Configuration Records** and set the following configuration values.
* **Key:** `com.cerebro.domino.auth.aws.sts.enabled`
**Value:** `true`
* **Key:** `com.cerebro.domino.auth.aws.sts.region`
**Value:** Short AWS region name where your Domino is deployed, such as `us-west-2`
* **Key:** `com.cerebro.domino.auth.aws.sts.defaultSessionDuration`
**Value:** Default session duration, such as `1h` for 1 hour
Example of a valid configuration:
## Expected SAML attributes
* Attribute with Name `https://aws.amazon.com/SAML/Attributes/Role`
* **Multi-valued:** `Yes`
* **Value format:**
* Comma-separated key-value pair of provider and role.
* `,`
* `arn:aws:iam:::saml-provider/,arn:aws:iam:::role/`
* Attribute with Name `https://aws.amazon.com/SAML/Attributes/RoleSessionName`
* **Multi-valued:** `No`
* **Value:**
* String to be used as an identifier for the temporary credentials.
* Usually set to the email of the user.
* Attribute with Name `https://aws.amazon.com/SAML/Attributes/SessionDuration`
* **Multi-valued:** `No`
* **Value:**
* Duration in seconds of how long a user can stay logged in before the initial set of credentials for each of the roles is invalidated.
* The duration must be smaller than the maximum allowable duration for each of the roles made available for a given user.
To validate that you’ve established trust between AWS and the identity provider, sign in to Domino and check that the SAML response contains the expected SAML attributes. You can use the **SAML-tracer** extension available for [Chrome](https://chrome.google.com/webstore/detail/saml-tracer/mpdajninpobndbfcldcmbpnnbhibjmch?hl=en) and [Firefox](https://addons.mozilla.org/en-US/firefox/addon/saml-tracer/) to examine SAML requests and responses to see that the appropriate attributes appear.
Example:
```xml theme={null}
arn:aws:iam::123456789012:saml-provider/acme-saml,arn:aws:iam::123456789012:role/role1
arn:aws:iam::123456789012:saml-provider/acme-saml,arn:aws:iam::123456789012:role/role2
john.smith@acme.org
900
```
## Map AWS federation attributes
1. Go to the **Mappers** tab and configure an **Attribute Importer** mapper.
2. Go to **Identity providers** > Select the identity provider > **Mappers** > **Add mapper**.
* **AWS Roles**
* **Name:** AWS Roles
* **Mapper Type:** `Attribute Importer`
* **Attribute Name:** `https://aws.amazon.com/SAML/Attributes/Role`
* **Friendly Name:** \
* **User Attribute Name:** `aws-roles`
* **AWS Role Session Name**
* **Name:** AWS Role Session Name
* **Mapper Type:** `Attribute Importer`
* **Attribute Name:** \`[https://aws.amazon.com/SAML/Attributes/RoleSessionName](https://aws.amazon.com/SAML/Attributes/RoleSessionName)
* **Friendly Name:** \
* **User Attribute Name:** `aws-role-session-name`
* **AWS Session Duration**
* **Name:** AWS Session Duration
* **Mapper Type:** `Attribute Importer`
* **Attribute Name:** `https://aws.amazon.com/SAML/Attributes/SessionDuration`
* **Friendly Name:** \
* **User Attribute Name:** `aws-session-duration`
## Enable credential propagation in Domino
1. After these prerequisites are configured, enable credential propagation in the Admin application by clicking on **Platform Settings** > **Configuration Records** and set the following configuration values.
* **Key:** `com.cerebro.domino.auth.aws.sts.enabled`
**Value:** `true`
* **Key:** `com.cerebro.domino.auth.aws.sts.region`
**Value:** Short AWS region name where your Domino is deployed, such as `us-west-2`
* **Key:** `com.cerebro.domino.auth.aws.sts.defaultSessionDuration`
**Value:** Default session duration, such as `1h` for 1 hour
Example of a valid configuration:
 2. To make the changes take effect, restart the services.
### Validate credential propagation
1. Once configured properly the first time, you must log out and log back into Domino.
2. To confirm that credentials are propagating correctly to users, start a Workspace and check the Environment variable `AWS_SHARED_CREDENTIALS_FILE` and that your credential file appears at `/var/lib/domino/home/.aws/credentials`.
3. To test your configuration outside Domino, perform an `AssumeRoleWithSAML` call with the SAML token provided to Domino by your identity provider.
Example:
```bash theme={null}
aws sts assume-role-with-saml
--role-arn arn:aws:iam::521624712688:role/DataScientist-dev
--principal-arn arn:aws:iam::521624712688:saml-provider/ADFS-DOMINO
--saml-assertion "PHNhb.......VzcG9uc2U+"
```
This should be sufficient for a user to connect to AWS resources without further configuration. See this example of how to [connect to S3](/6.3/platform-capabilities/core-concepts/data/data-source-connectors/connect-to-amazon-s3).
Learn more about [using a credential file with AWS SDK](https://aws.amazon.com/blogs/security/a-new-and-standardized-way-to-manage-credentials-in-the-aws-sdks/).
## Additional provider configuration
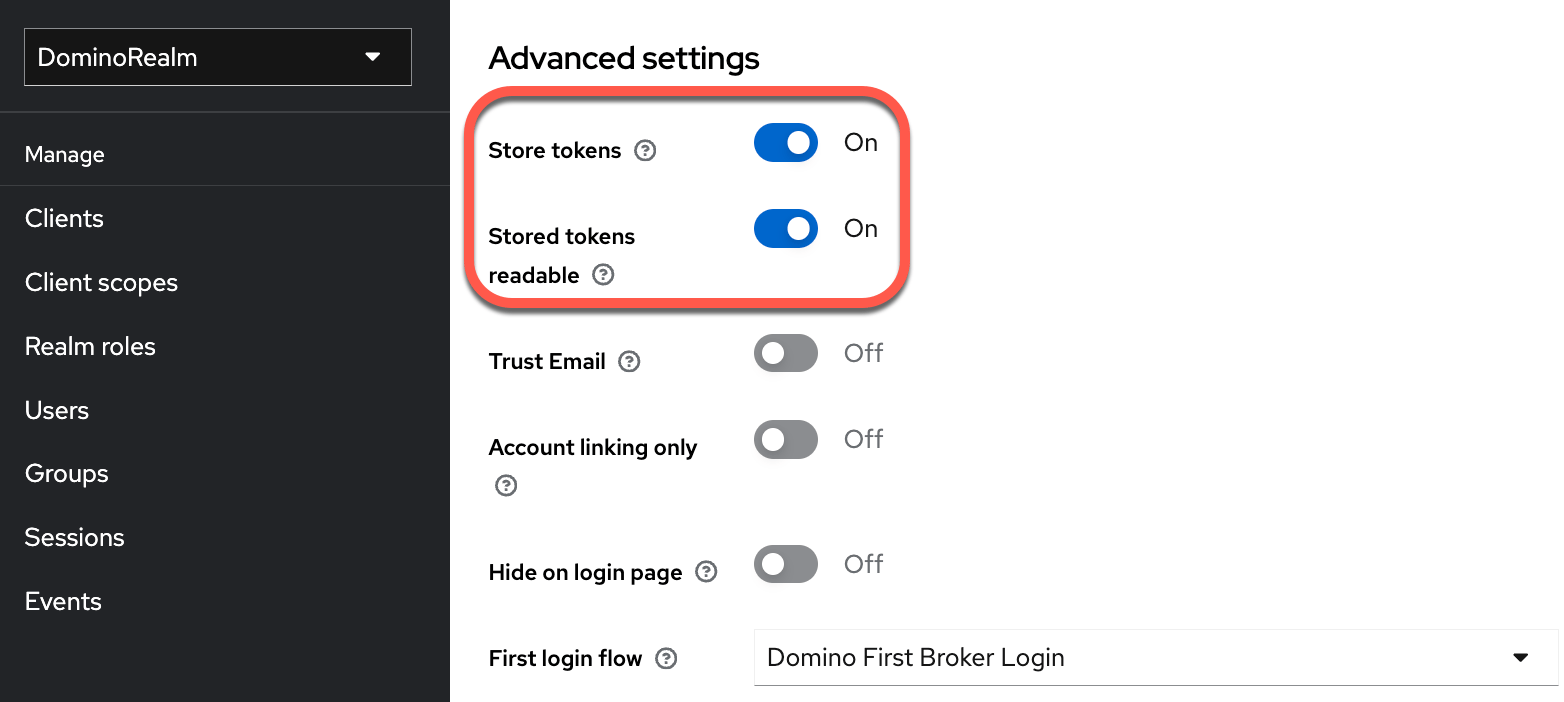
To give Domino access to users' SAML assertions, enable the following settings for the identity provider:
* **Store Tokens:** On
* **Store Tokens Readable:** On
2. To make the changes take effect, restart the services.
### Validate credential propagation
1. Once configured properly the first time, you must log out and log back into Domino.
2. To confirm that credentials are propagating correctly to users, start a Workspace and check the Environment variable `AWS_SHARED_CREDENTIALS_FILE` and that your credential file appears at `/var/lib/domino/home/.aws/credentials`.
3. To test your configuration outside Domino, perform an `AssumeRoleWithSAML` call with the SAML token provided to Domino by your identity provider.
Example:
```bash theme={null}
aws sts assume-role-with-saml
--role-arn arn:aws:iam::521624712688:role/DataScientist-dev
--principal-arn arn:aws:iam::521624712688:saml-provider/ADFS-DOMINO
--saml-assertion "PHNhb.......VzcG9uc2U+"
```
This should be sufficient for a user to connect to AWS resources without further configuration. See this example of how to [connect to S3](/6.3/platform-capabilities/core-concepts/data/data-source-connectors/connect-to-amazon-s3).
Learn more about [using a credential file with AWS SDK](https://aws.amazon.com/blogs/security/a-new-and-standardized-way-to-manage-credentials-in-the-aws-sdks/).
## Additional provider configuration
To give Domino access to users' SAML assertions, enable the following settings for the identity provider:
* **Store Tokens:** On
* **Store Tokens Readable:** On
 ## Domino-client configuration
The **domino-play** OpenID Connect (OIDC) client is pre-populated with client mappers, so that identity provider-mapped SAML information will flow into Domino.
To see the **Mappers**:
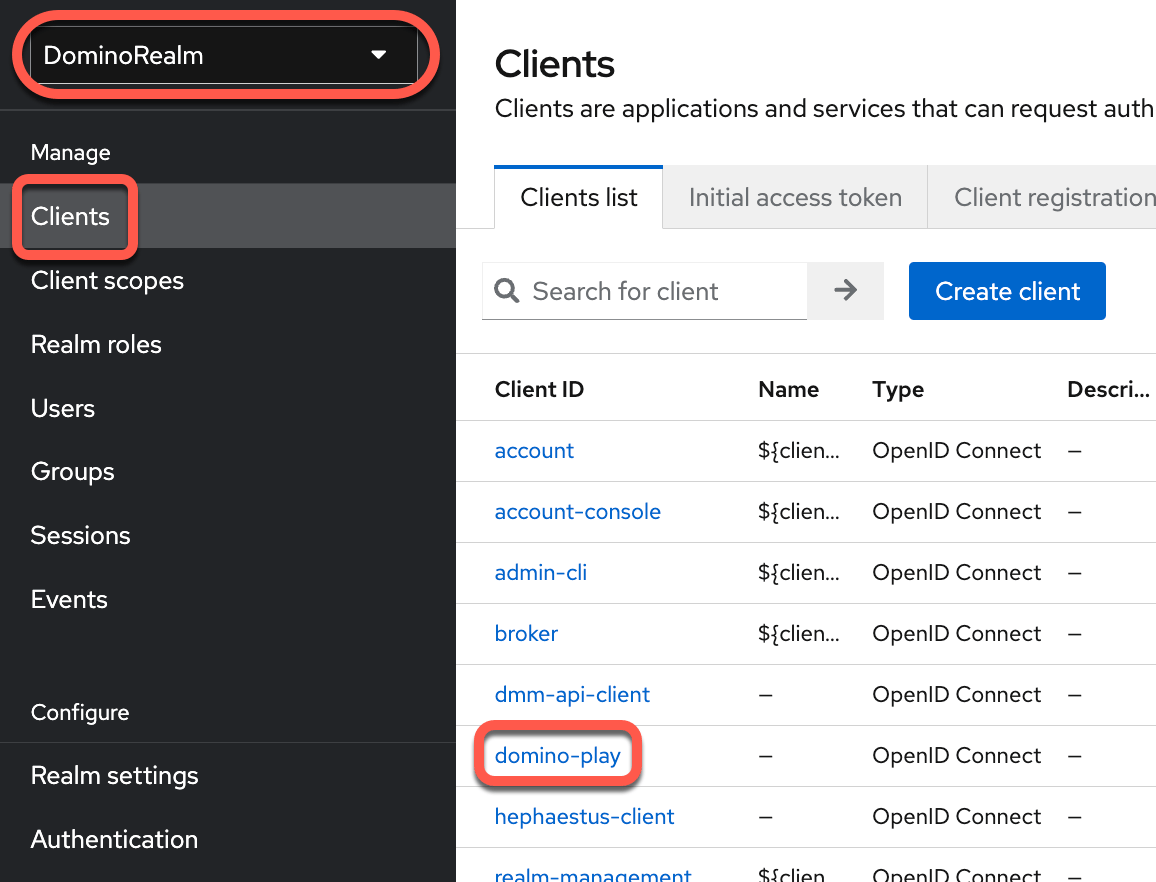
1. Go to **Clients** > **domino-play**.
## Domino-client configuration
The **domino-play** OpenID Connect (OIDC) client is pre-populated with client mappers, so that identity provider-mapped SAML information will flow into Domino.
To see the **Mappers**:
1. Go to **Clients** > **domino-play**.
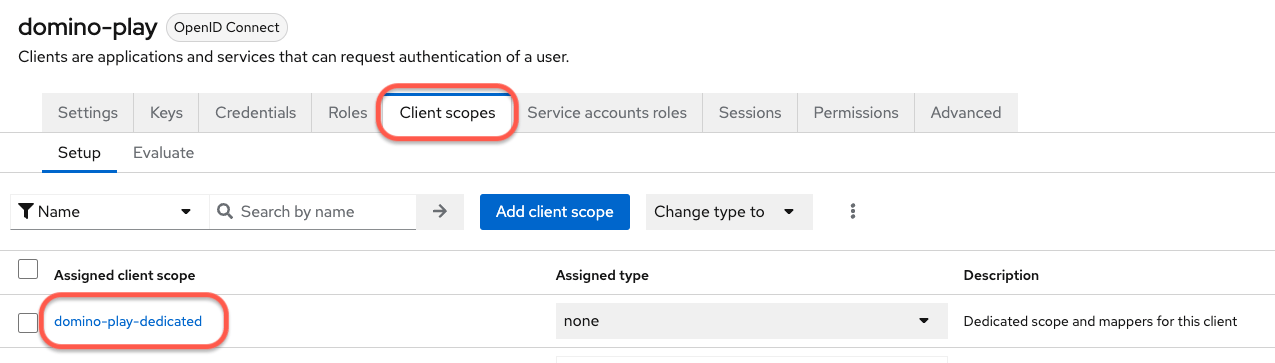
 2. Select the **Client Scopes** tab and click **domino-play-dedicated**.
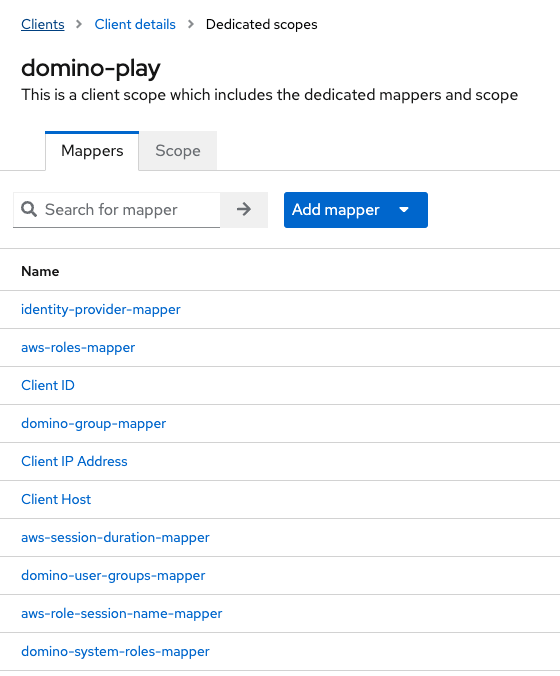
 The following are the default **domino-play client mappers**:
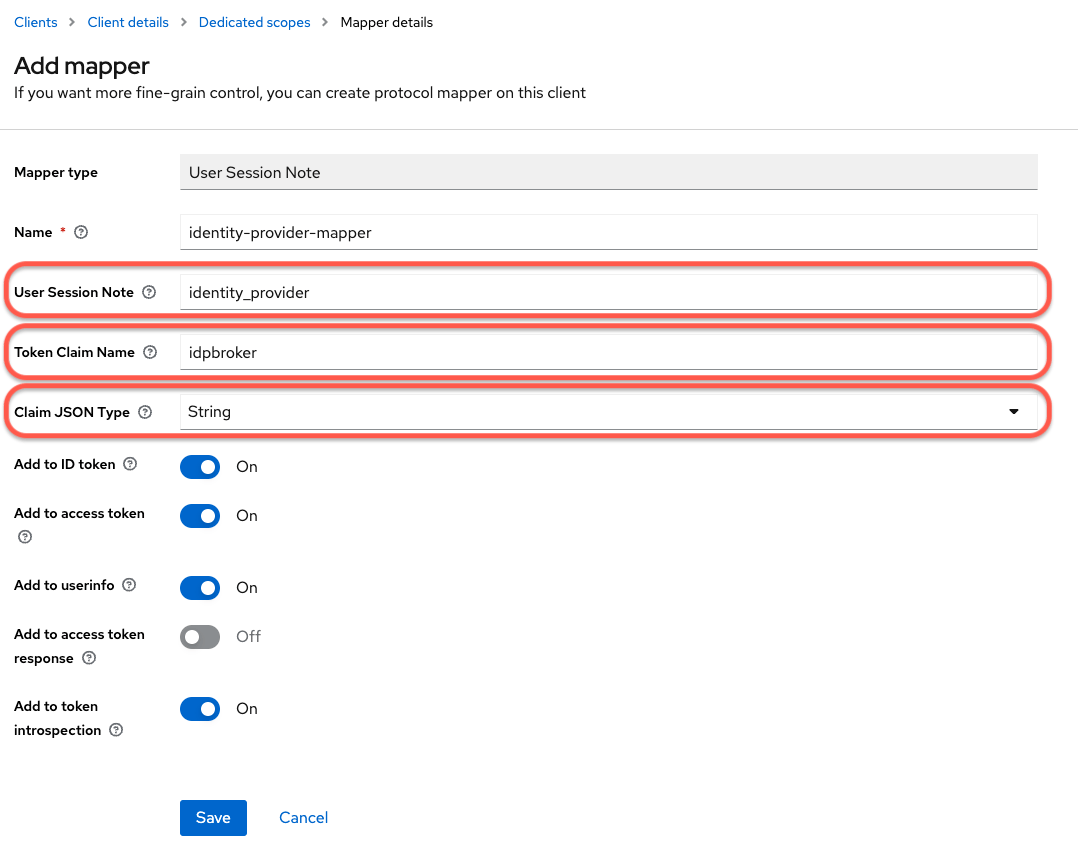
 3. Create a new mapper with type **User Session Note** and the following settings:
* **Name:** `identity-provider-mapper`
* **Mapper Type:** `User Session Note`
* **User Session Note:** `identity_provider`
* **Token Claim Name:** `idpbroker`
* **Claim JSON Type:** `string`
* **Add to ID token:** `On`
* **Add to access token:** `On`
3. Create a new mapper with type **User Session Note** and the following settings:
* **Name:** `identity-provider-mapper`
* **Mapper Type:** `User Session Note`
* **User Session Note:** `identity_provider`
* **Token Claim Name:** `idpbroker`
* **Claim JSON Type:** `string`
* **Add to ID token:** `On`
* **Add to access token:** `On`
 4. To make the changes take effect, sign out and sign back into Domino.
## Next steps
Learn how to [limit concurrent user sessions](/6.3/admin/identity-and-access/authentication/limit-sessions).
4. To make the changes take effect, sign out and sign back into Domino.
## Next steps
Learn how to [limit concurrent user sessions](/6.3/admin/identity-and-access/authentication/limit-sessions).