> ## Documentation Index
> Fetch the complete documentation index at: https://docs.domino.ai/llms.txt
> Use this file to discover all available pages before exploring further.
# Configure single sign-on (SSO)
When you choose SSO authentication, you can integrate Domino with a SAML 2.0 or OpenID Connect (OIDC) identity provider. SSO delegates authentication to the identity provider, so users don’t have to create a username and password specific to Domino.
Domino can integrate with a SAML 2.0 or OIDC identity provider for single sign-on (SSO) with the steps outlined below.
## Create a Domino SAML service provider (SP)
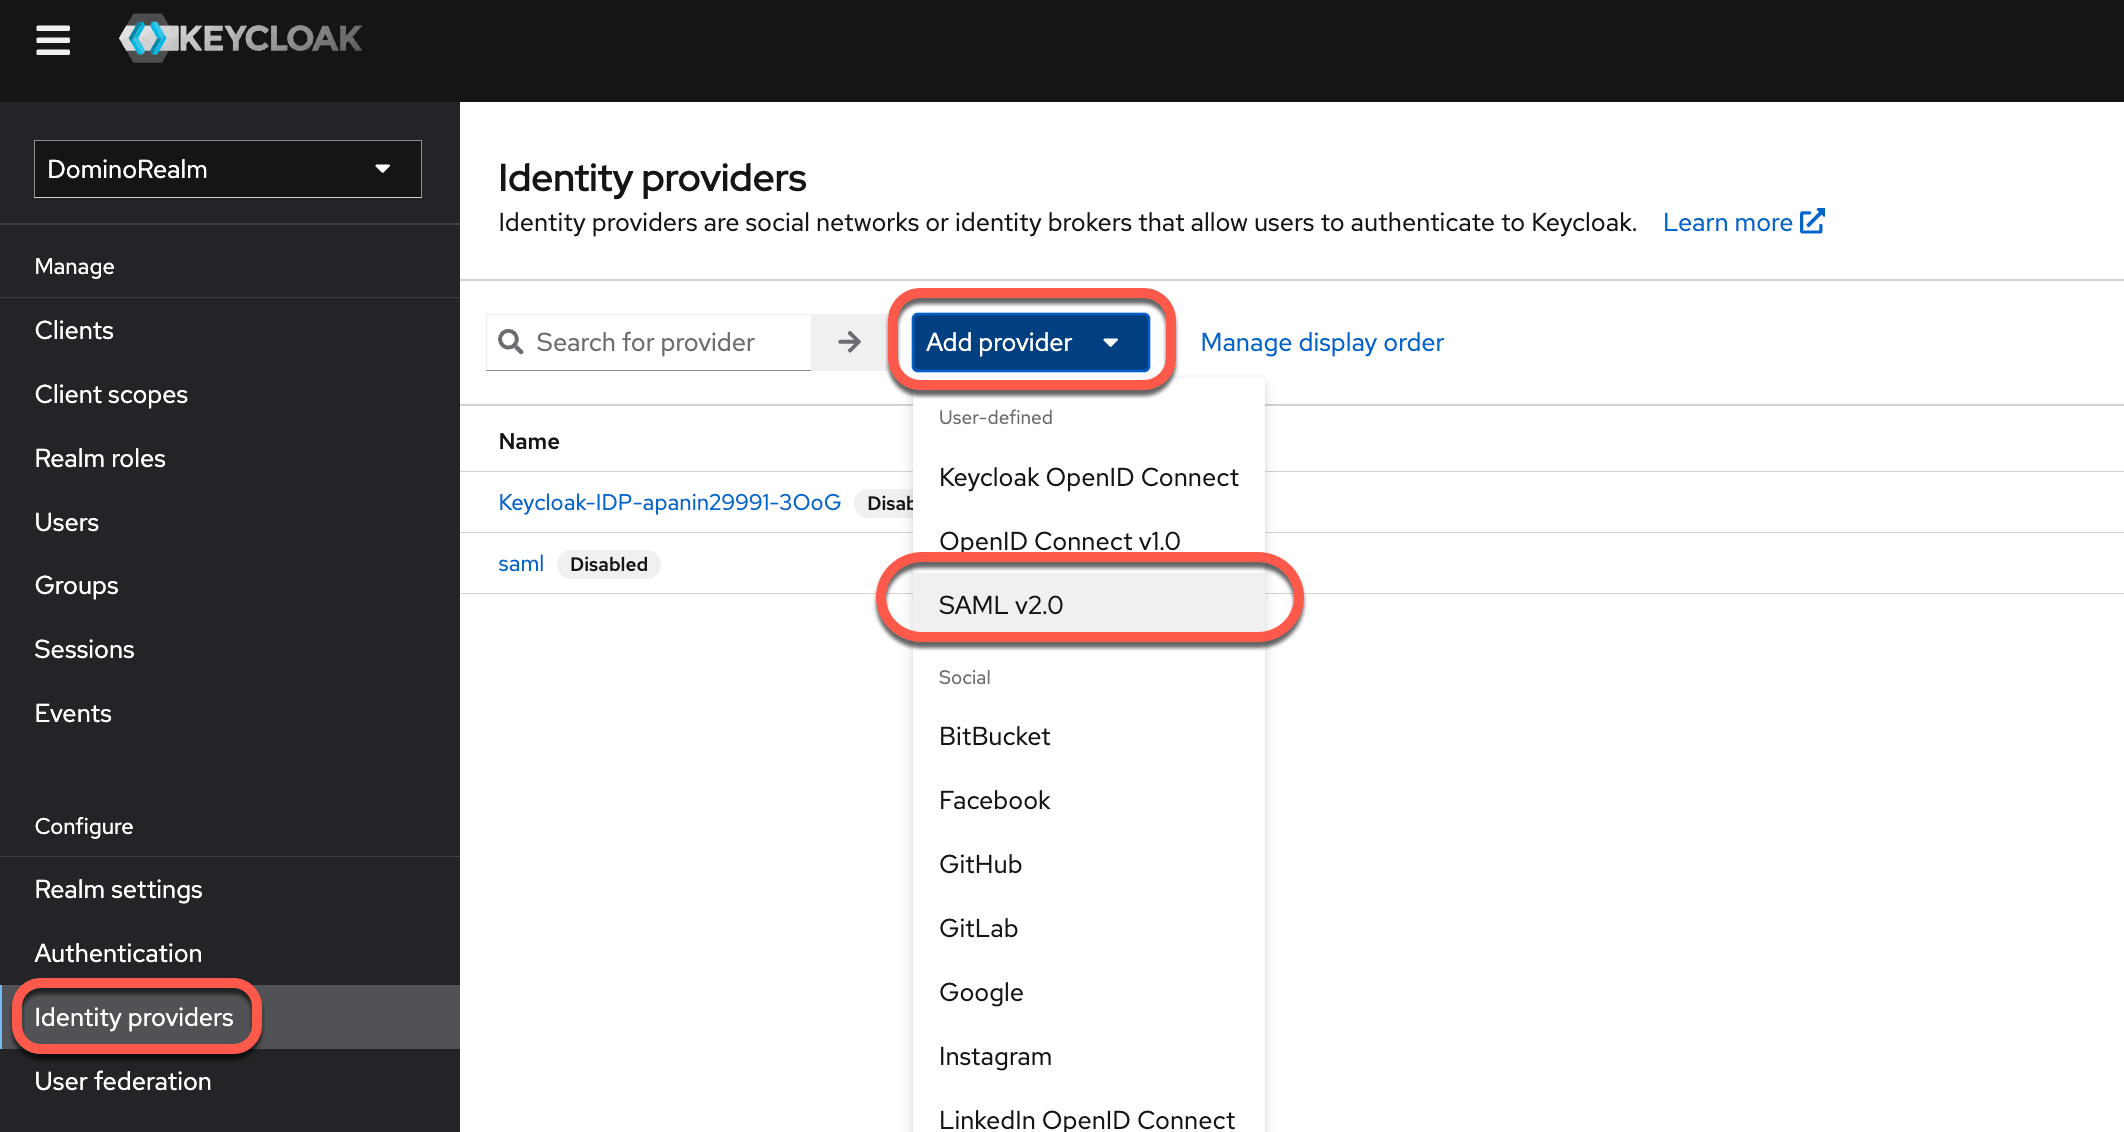
From the Keycloak sidebar menu, click **Identity providers** > **Add provider** > **SAML v2.0**.
 ## Configure alias and redirect URI
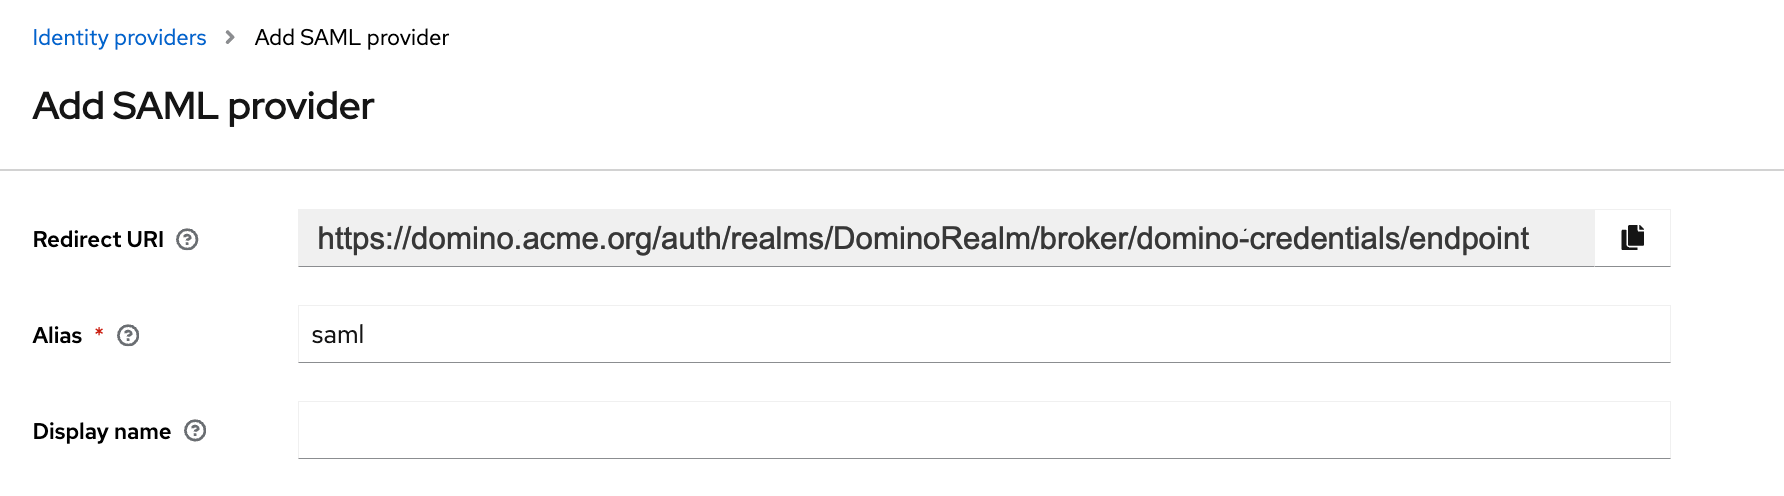
Provide an **Alias** for the newly created provider. The **alias** field is a unique name for the provider in Keycloak. It’s part of the **Redirect URI** used by the provider service to route SAML responses and redirect users after their account is authenticated.
The redirect URI is case-sensitive. It takes the following form:
```shell theme={null}
`https:///auth/realms/DominoRealm/broker//endpoint`
```
For example, if the deployment’s domain is **domino.acme.org** and the provider’s alias is **domino-credentials**, the redirect URL will be:
```shell theme={null}
https://domino.acme.org/auth/realms/DominoRealm/broker/domino-credentials/endpoint
```
## Configure alias and redirect URI
Provide an **Alias** for the newly created provider. The **alias** field is a unique name for the provider in Keycloak. It’s part of the **Redirect URI** used by the provider service to route SAML responses and redirect users after their account is authenticated.
The redirect URI is case-sensitive. It takes the following form:
```shell theme={null}
`https:///auth/realms/DominoRealm/broker//endpoint`
```
For example, if the deployment’s domain is **domino.acme.org** and the provider’s alias is **domino-credentials**, the redirect URL will be:
```shell theme={null}
https://domino.acme.org/auth/realms/DominoRealm/broker/domino-credentials/endpoint
```
 Don’t save the identity provider entry yet, as you can’t import your provider settings after it is saved.
## Create a SAML endpoint in your upstream identity provider
1. Create a SAML application in the identity provider that will be integrated with Domino. To create the application you need the **Redirect URI** from the previous step.
The specific procedure to create the SAML endpoint depends on your identity provider. Domino can integrate through SAML with Okta, Azure AD, Ping, and any other provider that implements SAML v2.0.
2. After you create and configure the SAML endpoint, you must export an XML metadata file to complete the configuration of the provider in Keycloak. The following are important properties of the SAML endpoint you will create in the provider.
### NameID policy format
`NameID` controls the format of the `` element in the SAML response. This is used to derive the SSO username in Domino.
**Option 1**\
`urn:oasis:names:tc:SAML:1.1:nameid-format:emailAddress`
Users are uniquely identified by their email, and their username will be automatically derived from it.
Example:
```xml theme={null}
john.smith@acme.org
```
**Option 2**\
`urn:oasis:names:tc:SAML:1.1:nameid-format:unspecified`
The SAML endpoint must respond with a string that can be used as a username without any modification.
Example:
```xml theme={null}
jsmith
```
**Option 3**\
`urn:oasis:names:tc:SAML:1.1:nameid-format:persistent`
Typically, the SAML endpoint returns a NameID which is a GUID that is not suitable for a username. If the endpoint must use this format, then an additional attribute that contains the username must be returned.
### Assertion attributes
To automatically populate the user’s Domino profile, the SAML response must contain the following attributes. Without these attributes, the user will be prompted to complete the required elements of their user profile.
The required attributes are:
* `firstName`
* `lastName`
* `email`
* `username` (if `nameId` is not an email or does not represent the username).
* `destination`
No specific attribute names are expected as these can be mapped in Keycloak.
The SAML response must contain signed assertions.
## Import metadata
Use the metadata file from the previous step to complete the provider configuration in Keycloak.
### Import IdP metadata
1. While creating the SAML provider, turn off **Use entity descriptor** to reveal the options to import config files.
2. Choose the file to import.
Most of the provider settings are configured automatically.
3. Save the configuration.
### Additional settings
After you’ve completed the initial configuration, confirm the following settings are configured correctly.
#### Email settings
**Trust Email** - `Yes`
Ensures that emails supplied by IdP are trusted even if Email Verification is enabled for DominoRealm.
#### Sync mode settings
**Sync Mode** - `force`
Ensures that user data is updated during every login with the identity provider, allowing Keycloak to pick up changes from the upstream identity provider.
#### Username settings
**NameID Policy Format**
This was configured on import, but verify that it matches the option configured on the external endpoint.
#### Authentication settings
* **Want Assertions Signed** - `Yes`
* **Validate Signature** - `Yes`
* **Want AuthnRequests signed** - `Yes`
* **Want Assertions signed** - `Yes`
* **Want Assertions encrypted** - `Yes`
The respective signature field must already be populated based on the metadata you imported when you set up SSO authentication.
See [Keycloak SAML v2 Identity Providers](https://www.keycloak.org/docs/latest/server_admin/#_identity_broker) for more documentation about all supported SAML settings.
#### Export metadata from Keycloak
After you save the provider in Keycloak, you get the XML metadata for the provider to automatically configure an external endpoint:
1. In Keycloak go to **Identify providers** > select your provider > **Settings**.
2. Click on **SAML 2.0 Service Provider Metadata**.
The metadata will also be available at:
```console theme={null}
https:///auth/realms/DominoRealm/broker//endpoint/descriptor
```
## Configure attribute mappers
To make the experience of new users signing in for the first time seamless, and not require them to complete their profile on initial login, you must pass several SAML attributes in the SAML response, and ensure these are correctly mapped to Domino user attributes.
If the attributes are not properly mapped, upon first login users will be prompted to complete the empty fields in their profile.
### Map first name, last name, and email
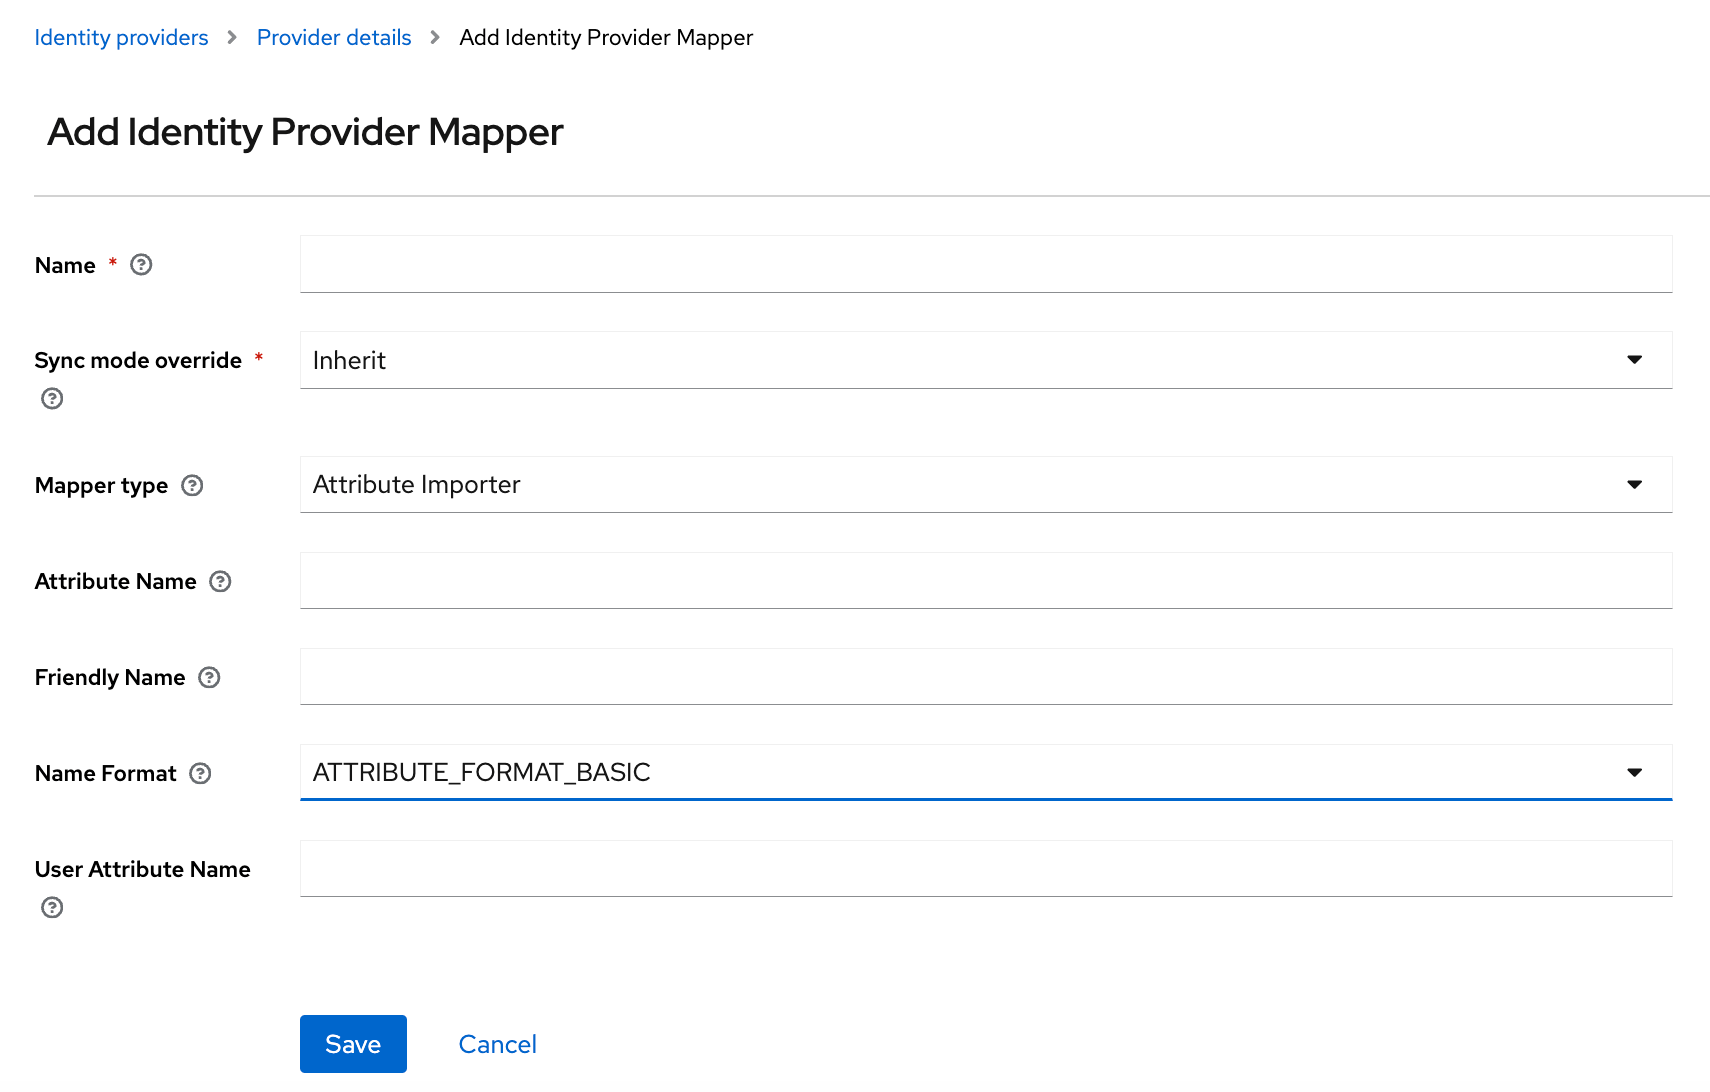
To map these values from the SAML assertion attributes to the user profile model, you must configure an **Attribute Importer** mapper from the **Mappers** tab.
Don’t save the identity provider entry yet, as you can’t import your provider settings after it is saved.
## Create a SAML endpoint in your upstream identity provider
1. Create a SAML application in the identity provider that will be integrated with Domino. To create the application you need the **Redirect URI** from the previous step.
The specific procedure to create the SAML endpoint depends on your identity provider. Domino can integrate through SAML with Okta, Azure AD, Ping, and any other provider that implements SAML v2.0.
2. After you create and configure the SAML endpoint, you must export an XML metadata file to complete the configuration of the provider in Keycloak. The following are important properties of the SAML endpoint you will create in the provider.
### NameID policy format
`NameID` controls the format of the `` element in the SAML response. This is used to derive the SSO username in Domino.
**Option 1**\
`urn:oasis:names:tc:SAML:1.1:nameid-format:emailAddress`
Users are uniquely identified by their email, and their username will be automatically derived from it.
Example:
```xml theme={null}
john.smith@acme.org
```
**Option 2**\
`urn:oasis:names:tc:SAML:1.1:nameid-format:unspecified`
The SAML endpoint must respond with a string that can be used as a username without any modification.
Example:
```xml theme={null}
jsmith
```
**Option 3**\
`urn:oasis:names:tc:SAML:1.1:nameid-format:persistent`
Typically, the SAML endpoint returns a NameID which is a GUID that is not suitable for a username. If the endpoint must use this format, then an additional attribute that contains the username must be returned.
### Assertion attributes
To automatically populate the user’s Domino profile, the SAML response must contain the following attributes. Without these attributes, the user will be prompted to complete the required elements of their user profile.
The required attributes are:
* `firstName`
* `lastName`
* `email`
* `username` (if `nameId` is not an email or does not represent the username).
* `destination`
No specific attribute names are expected as these can be mapped in Keycloak.
The SAML response must contain signed assertions.
## Import metadata
Use the metadata file from the previous step to complete the provider configuration in Keycloak.
### Import IdP metadata
1. While creating the SAML provider, turn off **Use entity descriptor** to reveal the options to import config files.
2. Choose the file to import.
Most of the provider settings are configured automatically.
3. Save the configuration.
### Additional settings
After you’ve completed the initial configuration, confirm the following settings are configured correctly.
#### Email settings
**Trust Email** - `Yes`
Ensures that emails supplied by IdP are trusted even if Email Verification is enabled for DominoRealm.
#### Sync mode settings
**Sync Mode** - `force`
Ensures that user data is updated during every login with the identity provider, allowing Keycloak to pick up changes from the upstream identity provider.
#### Username settings
**NameID Policy Format**
This was configured on import, but verify that it matches the option configured on the external endpoint.
#### Authentication settings
* **Want Assertions Signed** - `Yes`
* **Validate Signature** - `Yes`
* **Want AuthnRequests signed** - `Yes`
* **Want Assertions signed** - `Yes`
* **Want Assertions encrypted** - `Yes`
The respective signature field must already be populated based on the metadata you imported when you set up SSO authentication.
See [Keycloak SAML v2 Identity Providers](https://www.keycloak.org/docs/latest/server_admin/#_identity_broker) for more documentation about all supported SAML settings.
#### Export metadata from Keycloak
After you save the provider in Keycloak, you get the XML metadata for the provider to automatically configure an external endpoint:
1. In Keycloak go to **Identify providers** > select your provider > **Settings**.
2. Click on **SAML 2.0 Service Provider Metadata**.
The metadata will also be available at:
```console theme={null}
https:///auth/realms/DominoRealm/broker//endpoint/descriptor
```
## Configure attribute mappers
To make the experience of new users signing in for the first time seamless, and not require them to complete their profile on initial login, you must pass several SAML attributes in the SAML response, and ensure these are correctly mapped to Domino user attributes.
If the attributes are not properly mapped, upon first login users will be prompted to complete the empty fields in their profile.
### Map first name, last name, and email
To map these values from the SAML assertion attributes to the user profile model, you must configure an **Attribute Importer** mapper from the **Mappers** tab.
 #### First Name mapper
* **Name:** `First Name`
* **Sync Mode Override:** `inherit`
* **Mapper Type:** `Attribute Importer`
* **Attribute Name:** Name attribute for the `` element that contains the value to be mapped to `First Name`.
* **Friendly Name:** `FriendlyName` attribute (optionally available) for the `` element that contains the value to be mapped to `First Name`.
* **User Attribute Name:** `firstName`
#### Last Name mapper
* **Name:** `Last Name`
* **Sync Mode Override:** `inherit`
* **Mapper Type:** `Attribute Importer`
* **Attribute Name:** Name attribute for the element that contains the value for `Last Name`.
* **Friendly Name:** `FriendlyName` attribute for the `` element that contains the value for `Last Name`.
* **User Attribute Name:** `lastName`
#### Email mapper
* **Name:** `Email`
* **Sync Mode Override:** `inherit`
* **Mapper Type:** `Attribute Importer`
* **Attribute Name:** Name attribute for the element that contains the value for `Email`
* **Friendly Name:** `FriendlyName` attribute for the `` element that contains the value for `Email`.
* **User Attribute Name:** `email`
Setting the **Sync Mode Override** property to `inherit` has the same effect as setting it to `force` if the identity provider is configured as recommended above.
The following example illustrates how to map `First Name` from an assertion with the following payload:
```xml theme={null}
John
```
You can map this with:
* **Name**: `First name`
* **Sync mode override**: `inherit`
* **Mapper type**: `Attribute importer`
* **Attribute Name**: `CustomSAMLFirstName`
* **Friendly Name**:
* **User Attribute Name**: `firstName`
Alternatively, you can map this with:
* **Name**: `First name`
* **Sync mode override**: `inherit`
* **Mapper type**: `Attribute importer`
* **Attribute Name**:
* **Friendly Name**: `friendlyFirstName`
* **User Attribute Name**: `firstName`
### Map username
The mapper configuration for the username depends on how the external endpoint is configured with respect to NameID Policy options.
* **Option 1:** `urn:oasis:names:tc:SAML:1.1:nameid-format:emailAddress`
* Use `Email Prefix as UserName Importer`
* Example:
```xml theme={null}
john.smith@acme.org
```
Map as shown:\\
#### First Name mapper
* **Name:** `First Name`
* **Sync Mode Override:** `inherit`
* **Mapper Type:** `Attribute Importer`
* **Attribute Name:** Name attribute for the `` element that contains the value to be mapped to `First Name`.
* **Friendly Name:** `FriendlyName` attribute (optionally available) for the `` element that contains the value to be mapped to `First Name`.
* **User Attribute Name:** `firstName`
#### Last Name mapper
* **Name:** `Last Name`
* **Sync Mode Override:** `inherit`
* **Mapper Type:** `Attribute Importer`
* **Attribute Name:** Name attribute for the element that contains the value for `Last Name`.
* **Friendly Name:** `FriendlyName` attribute for the `` element that contains the value for `Last Name`.
* **User Attribute Name:** `lastName`
#### Email mapper
* **Name:** `Email`
* **Sync Mode Override:** `inherit`
* **Mapper Type:** `Attribute Importer`
* **Attribute Name:** Name attribute for the element that contains the value for `Email`
* **Friendly Name:** `FriendlyName` attribute for the `` element that contains the value for `Email`.
* **User Attribute Name:** `email`
Setting the **Sync Mode Override** property to `inherit` has the same effect as setting it to `force` if the identity provider is configured as recommended above.
The following example illustrates how to map `First Name` from an assertion with the following payload:
```xml theme={null}
John
```
You can map this with:
* **Name**: `First name`
* **Sync mode override**: `inherit`
* **Mapper type**: `Attribute importer`
* **Attribute Name**: `CustomSAMLFirstName`
* **Friendly Name**:
* **User Attribute Name**: `firstName`
Alternatively, you can map this with:
* **Name**: `First name`
* **Sync mode override**: `inherit`
* **Mapper type**: `Attribute importer`
* **Attribute Name**:
* **Friendly Name**: `friendlyFirstName`
* **User Attribute Name**: `firstName`
### Map username
The mapper configuration for the username depends on how the external endpoint is configured with respect to NameID Policy options.
* **Option 1:** `urn:oasis:names:tc:SAML:1.1:nameid-format:emailAddress`
* Use `Email Prefix as UserName Importer`
* Example:
```xml theme={null}
john.smith@acme.org
```
Map as shown:\\
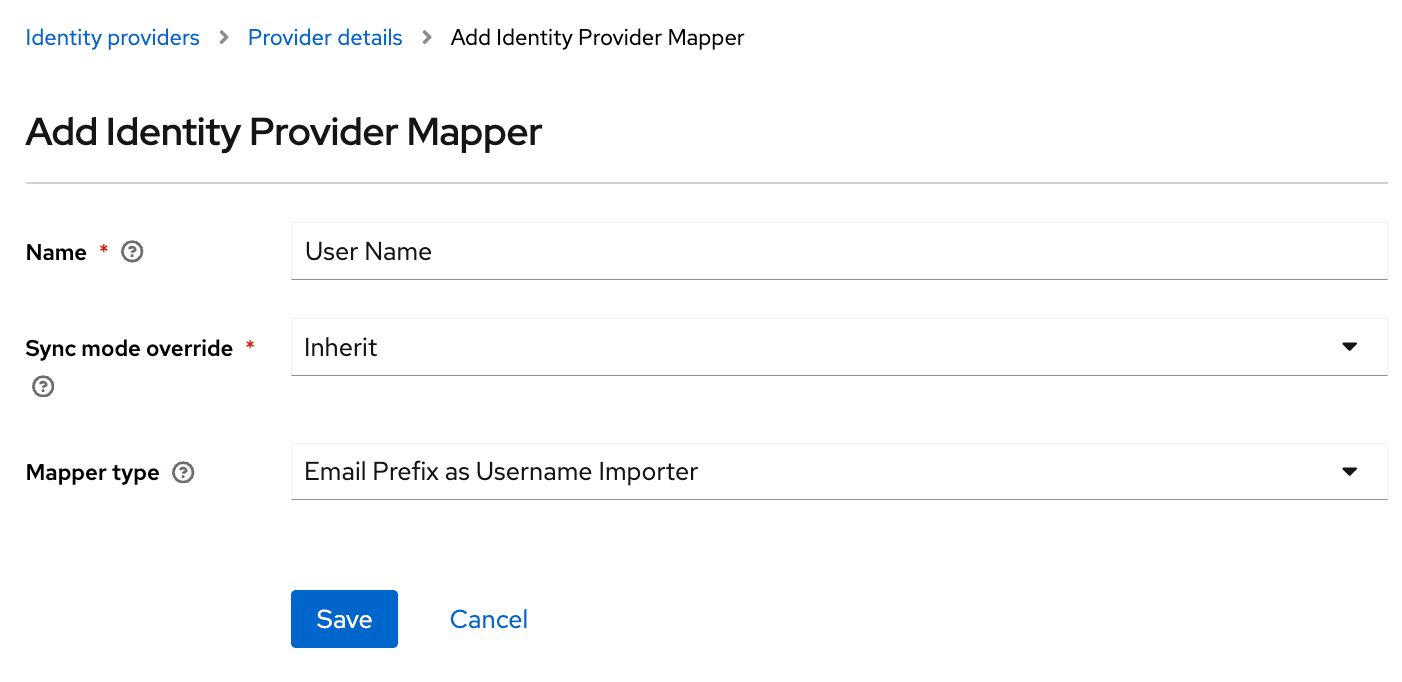 * **Name**: `User Name`
* **Sync mode override**: `Inherit`
* **Mapper type** `Email Prefix as Username Importer`
* **Option 2:** `urn:oasis:names:tc:SAML:1.1:nameid-format:unspecified`
* **No need to do an importer.** The username will be mapped automatically to the `NameID` value
* Example:
```xml theme={null}
jsmith
```
* **Option 3:** `urn:oasis:names:tc:SAML:1.1:nameid-format:persistent`
* Use `Username Template Importer` with Template of `${ATTRIBUTE.}` or `${ATTRIBUTE.}`
* Example:
```xml theme={null}
jsmith
jsmith
```
Map as follows:\\
* **Name**: `User Name`
* **Sync mode override**: `Inherit`
* **Mapper type** `Email Prefix as Username Importer`
* **Option 2:** `urn:oasis:names:tc:SAML:1.1:nameid-format:unspecified`
* **No need to do an importer.** The username will be mapped automatically to the `NameID` value
* Example:
```xml theme={null}
jsmith
```
* **Option 3:** `urn:oasis:names:tc:SAML:1.1:nameid-format:persistent`
* Use `Username Template Importer` with Template of `${ATTRIBUTE.}` or `${ATTRIBUTE.}`
* Example:
```xml theme={null}
jsmith
jsmith
```
Map as follows:\\
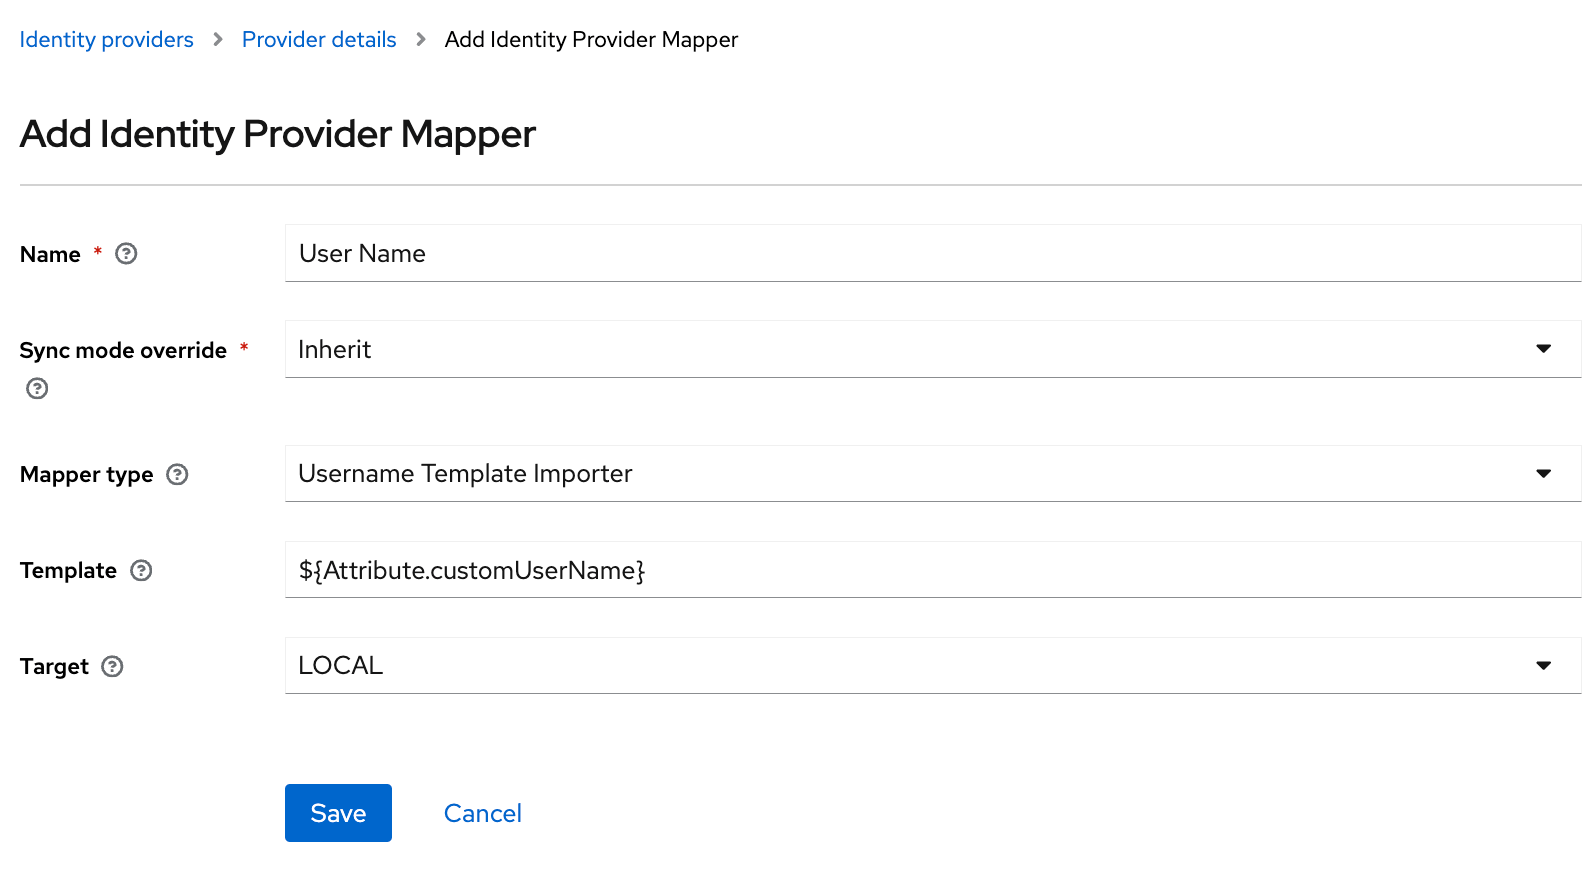 * **Name**: `User Name`
* **Sync mode override**: `Inherit`
* **Mapper type**: `Username Template Importer`
* **Template**: `${Attribute.customUserName}`
* **Target**: `LOCAL`
### Attribute mapping documentation
See [Mapping claims and assertions](https://www.keycloak.org/docs/latest/server_admin/#_protocol-mappers) for additional information on attribute mapping.
### Email Prefix as Username Importer
When you use the **Email Prefix as Username Importer** mapper as illustrated previously ([Option 1](#option-1)), the generated username will be the email prefix, stripped of all characters except alphanumeric and underscores. Special characters will be converted to underscores. Characters with diacritics will be converted to their ascii base.
If a username from an external system is already present, the same transformation rules will be applied to it.
For example, a username `$jöhn.smîth#home$` or an email address `$jöhn.smîth#home$@somehost.com` would both be mapped to the username `john_smith_home`.
### Troubleshoot attribute mapping
When you troubleshoot SAML attribute mapping, refer to a specification for the SAML response that your identity provider endpoint sends back to Keycloak after authentication. A thorough specification will detail the `NameID` policy format and attributes sent in the response.
If such a specification is not available, or the attribute mapping does not function as expected, you might have to examine a SAML response that is returned from a login attempt. One way to do this is to use the **SAML-tracer** extension available for [Chrome](https://chrome.google.com/webstore/detail/saml-tracer/mpdajninpobndbfcldcmbpnnbhibjmch?hl=en) and [Firefox](https://addons.mozilla.org/en-US/firefox/addon/saml-tracer/). This allows you to examine decoded SAML requests and responses to:
* See the returned attributes (and whether any are missing).
* Verify that the names or formats are as expected.
## Domino First Broker Login authentication flow
To configure the recommended login authentication flow, click the `Domino First Broker Login` flow:
* **Name**: `User Name`
* **Sync mode override**: `Inherit`
* **Mapper type**: `Username Template Importer`
* **Template**: `${Attribute.customUserName}`
* **Target**: `LOCAL`
### Attribute mapping documentation
See [Mapping claims and assertions](https://www.keycloak.org/docs/latest/server_admin/#_protocol-mappers) for additional information on attribute mapping.
### Email Prefix as Username Importer
When you use the **Email Prefix as Username Importer** mapper as illustrated previously ([Option 1](#option-1)), the generated username will be the email prefix, stripped of all characters except alphanumeric and underscores. Special characters will be converted to underscores. Characters with diacritics will be converted to their ascii base.
If a username from an external system is already present, the same transformation rules will be applied to it.
For example, a username `$jöhn.smîth#home$` or an email address `$jöhn.smîth#home$@somehost.com` would both be mapped to the username `john_smith_home`.
### Troubleshoot attribute mapping
When you troubleshoot SAML attribute mapping, refer to a specification for the SAML response that your identity provider endpoint sends back to Keycloak after authentication. A thorough specification will detail the `NameID` policy format and attributes sent in the response.
If such a specification is not available, or the attribute mapping does not function as expected, you might have to examine a SAML response that is returned from a login attempt. One way to do this is to use the **SAML-tracer** extension available for [Chrome](https://chrome.google.com/webstore/detail/saml-tracer/mpdajninpobndbfcldcmbpnnbhibjmch?hl=en) and [Firefox](https://addons.mozilla.org/en-US/firefox/addon/saml-tracer/). This allows you to examine decoded SAML requests and responses to:
* See the returned attributes (and whether any are missing).
* Verify that the names or formats are as expected.
## Domino First Broker Login authentication flow
To configure the recommended login authentication flow, click the `Domino First Broker Login` flow:
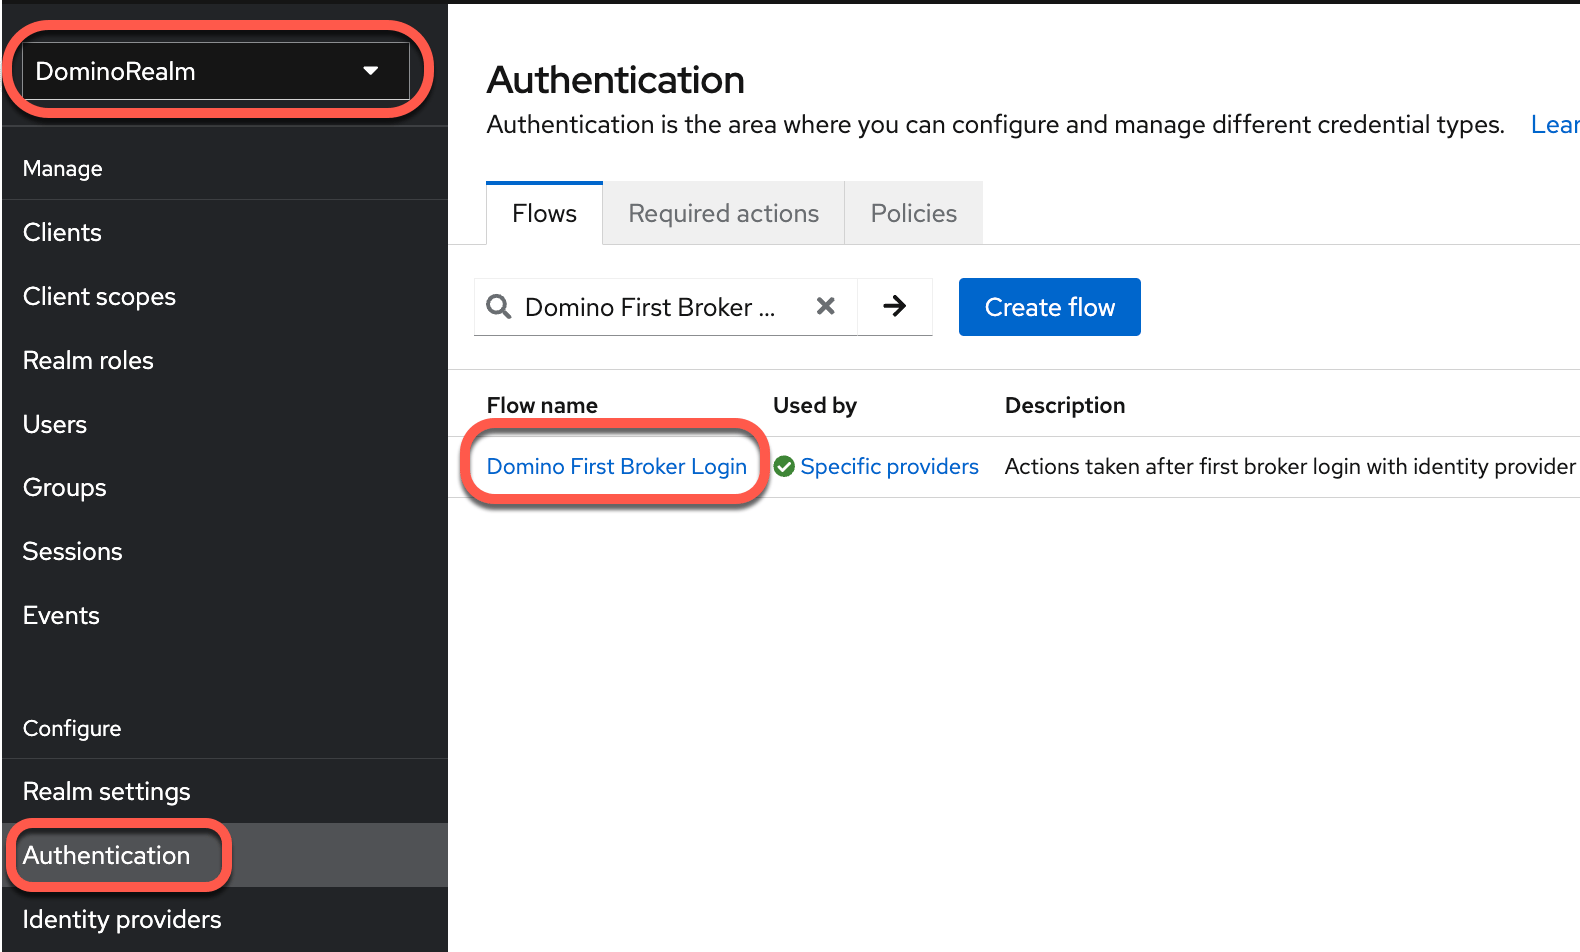 See [authentication flows](https://wjw465150.gitbooks.io/keycloak-documentation/content/server_admin/topics/authentication/flows.html) for more information.
## Restrict access for SSO users to Domino
Typically, when you configure the SAML endpoint that will provide SSO authentication for Domino, the provider administrator restricts the endpoint to a subset of users who are allowed to authenticate through it.
This is the preferred method to restrict access to a subset of users with valid enterprise credentials.
In rare cases, where limitations in the provider software don’t allow you to constrain the set of users who can authenticate against the endpoint, the provider must pass an additional SAML attribute. This attribute specifies if a user is allowed to access Domino. The value of that attribute depends on a specific rule for each user. Usually, it is based on membership in a group in your identity provider.
Use the following as a last resort, if all identity provider restriction options are exhausted.
### Prerequisites
The Domino Keycloak instance must have `keycloak.profile.feature.scripts` enabled.
### Expected SAML attributes
An attribute must indicate whether a properly authenticated user can log in to Domino.
AttributeName
* Suggested: **rolesForDomino**
* Can be anything as this is mapped.
Multi-valued: `Yes`; Value
* Contains one or more values that can be used to gate access. Typically, these values are roles or groups.
### Attribute mapper
You must add an additional mapper to your provider configuration in Keycloak.
Use an **Attribute Importer** mapper type.
* **Sync mode override** `inherit`
* **Name:** `Allow in Domino`
* **Mapper Type:** `Attribute Importer`
* **Attribute Name:** `Name` attribute for the element that contains the flag.
* **Friendly Name:** `FriendlyName` attribute for the element that contains the groups for the user.
* **User Attribute Name:** `accessforDomino`
Example:
```xml theme={null}
dave-users
it-users
```
#### Create the post-login authentication flow
By default, Domino doesn’t provide a post login flow so you must add one.
#### Add a post-login flow
1. Create a Javascript file (such as `authenticator.js`) using the following script as an example.
```javascript theme={null}
/*
* Template for JavaScript-based authenticators.
* See org.keycloak.authentication.authenticators.browser.ScriptBasedAuthenticatorFactory
*/
// import enum for error lookup
AuthenticationFlowError = Java.type("org.keycloak.authentication.AuthenticationFlowError");
/**
* An example authenticate function.
*
* The following variables are available for convenience:
* user - current user {@see org.keycloak.models.UserModel}
* realm - current realm {@see org.keycloak.models.RealmModel}
* session - current KeycloakSession {@see org.keycloak.models.KeycloakSession}
* httpRequest - current HttpRequest {@see org.jboss.resteasy.spi.HttpRequest}
* script - current script {@see org.keycloak.models.ScriptModel}
* authenticationSession - current authentication session {@see org.keycloak.sessions.AuthenticationSessionModel}
* LOG - current logger {@see org.jboss.logging.Logger}
*
* You one can extract current HTTP request headers through:
* httpRequest.getHttpHeaders().getHeaderString("Forwarded")
*
* @param context {@see org.keycloak.authentication.AuthenticationFlowContext}
*/
function authenticate(context) {
//name of the attribute that needs to be 'true' to allow a user to authenticate in Domino
var requiredAttrMustContain = "dave-users";
var errorMessageId = "userNotAssignedToDominoInIdp";
var errorPageTemplate = "error.ftl";
if (user === null) {
context.success();
return;
}
LOG.info(script.name +
" trace script auth for: " +
user.username);
var requiredAttrValues = user.getAttributes().accessforDomino;
LOG.info("User gated on attribute: " + requiredAttrName);
LOG.info("Attribute values from SSO: " + requiredAttrValues)
LOG.info("Attribute must contain: " + requiredAttrMustContain);
if (requiredAttrValues === null ||
requiredAttrValues.size() === 0 ||
requiredAttrValues.contains(requiredAttrMustContain)) {
//user is explicitly allowed in Domino
LOG.info("User is allowed in Domino.");
context.success();
return;
}
//user is not authorized to access Domino
LOG.info("User is not allowed in Domino.");
context.failure(AuthenticationFlowError.IDENTITY_PROVIDER_DISABLED, context.form().setError(errorMessageId, null).createForm(errorPageTemplate));
}
```
2. Create a JAR file with the following structure:
```shell theme={null}
META-INF/keycloak-scripts.json
authenticator.js
```
The `META-INF/keycloak-scripts.json` is a file descriptor that provides metadata information about the scripts you want to deploy. It is a JSON file with the following structure:
```shell theme={null}
{
"authenticators": [
{
"name": "Your Custom Authenticator",
"fileName": "authenticator.js",
"description": "Authenticator from a JS file"
}
]
}
```
3. Deploy the JAR file to the Keycloak server. Make sure to not accidentally overwrite existing files. Assuming the JAR file is called `script.jar`, run the following command:
```shell theme={null}
kubectl cp ./script.jar /keycloakv22-0:/domino/shared/custom-resources/providers
```
After running this command, restart each Keycloak replica pod.
4. Go to **Authentication** > **Flows** > **Create Flow**.
5. Create a new flow with the following information:
* **Name**: `Post Login Flow`
* **Flow type**: `Basic flow`
See [authentication flows](https://wjw465150.gitbooks.io/keycloak-documentation/content/server_admin/topics/authentication/flows.html) for more information.
## Restrict access for SSO users to Domino
Typically, when you configure the SAML endpoint that will provide SSO authentication for Domino, the provider administrator restricts the endpoint to a subset of users who are allowed to authenticate through it.
This is the preferred method to restrict access to a subset of users with valid enterprise credentials.
In rare cases, where limitations in the provider software don’t allow you to constrain the set of users who can authenticate against the endpoint, the provider must pass an additional SAML attribute. This attribute specifies if a user is allowed to access Domino. The value of that attribute depends on a specific rule for each user. Usually, it is based on membership in a group in your identity provider.
Use the following as a last resort, if all identity provider restriction options are exhausted.
### Prerequisites
The Domino Keycloak instance must have `keycloak.profile.feature.scripts` enabled.
### Expected SAML attributes
An attribute must indicate whether a properly authenticated user can log in to Domino.
AttributeName
* Suggested: **rolesForDomino**
* Can be anything as this is mapped.
Multi-valued: `Yes`; Value
* Contains one or more values that can be used to gate access. Typically, these values are roles or groups.
### Attribute mapper
You must add an additional mapper to your provider configuration in Keycloak.
Use an **Attribute Importer** mapper type.
* **Sync mode override** `inherit`
* **Name:** `Allow in Domino`
* **Mapper Type:** `Attribute Importer`
* **Attribute Name:** `Name` attribute for the element that contains the flag.
* **Friendly Name:** `FriendlyName` attribute for the element that contains the groups for the user.
* **User Attribute Name:** `accessforDomino`
Example:
```xml theme={null}
dave-users
it-users
```
#### Create the post-login authentication flow
By default, Domino doesn’t provide a post login flow so you must add one.
#### Add a post-login flow
1. Create a Javascript file (such as `authenticator.js`) using the following script as an example.
```javascript theme={null}
/*
* Template for JavaScript-based authenticators.
* See org.keycloak.authentication.authenticators.browser.ScriptBasedAuthenticatorFactory
*/
// import enum for error lookup
AuthenticationFlowError = Java.type("org.keycloak.authentication.AuthenticationFlowError");
/**
* An example authenticate function.
*
* The following variables are available for convenience:
* user - current user {@see org.keycloak.models.UserModel}
* realm - current realm {@see org.keycloak.models.RealmModel}
* session - current KeycloakSession {@see org.keycloak.models.KeycloakSession}
* httpRequest - current HttpRequest {@see org.jboss.resteasy.spi.HttpRequest}
* script - current script {@see org.keycloak.models.ScriptModel}
* authenticationSession - current authentication session {@see org.keycloak.sessions.AuthenticationSessionModel}
* LOG - current logger {@see org.jboss.logging.Logger}
*
* You one can extract current HTTP request headers through:
* httpRequest.getHttpHeaders().getHeaderString("Forwarded")
*
* @param context {@see org.keycloak.authentication.AuthenticationFlowContext}
*/
function authenticate(context) {
//name of the attribute that needs to be 'true' to allow a user to authenticate in Domino
var requiredAttrMustContain = "dave-users";
var errorMessageId = "userNotAssignedToDominoInIdp";
var errorPageTemplate = "error.ftl";
if (user === null) {
context.success();
return;
}
LOG.info(script.name +
" trace script auth for: " +
user.username);
var requiredAttrValues = user.getAttributes().accessforDomino;
LOG.info("User gated on attribute: " + requiredAttrName);
LOG.info("Attribute values from SSO: " + requiredAttrValues)
LOG.info("Attribute must contain: " + requiredAttrMustContain);
if (requiredAttrValues === null ||
requiredAttrValues.size() === 0 ||
requiredAttrValues.contains(requiredAttrMustContain)) {
//user is explicitly allowed in Domino
LOG.info("User is allowed in Domino.");
context.success();
return;
}
//user is not authorized to access Domino
LOG.info("User is not allowed in Domino.");
context.failure(AuthenticationFlowError.IDENTITY_PROVIDER_DISABLED, context.form().setError(errorMessageId, null).createForm(errorPageTemplate));
}
```
2. Create a JAR file with the following structure:
```shell theme={null}
META-INF/keycloak-scripts.json
authenticator.js
```
The `META-INF/keycloak-scripts.json` is a file descriptor that provides metadata information about the scripts you want to deploy. It is a JSON file with the following structure:
```shell theme={null}
{
"authenticators": [
{
"name": "Your Custom Authenticator",
"fileName": "authenticator.js",
"description": "Authenticator from a JS file"
}
]
}
```
3. Deploy the JAR file to the Keycloak server. Make sure to not accidentally overwrite existing files. Assuming the JAR file is called `script.jar`, run the following command:
```shell theme={null}
kubectl cp ./script.jar /keycloakv22-0:/domino/shared/custom-resources/providers
```
After running this command, restart each Keycloak replica pod.
4. Go to **Authentication** > **Flows** > **Create Flow**.
5. Create a new flow with the following information:
* **Name**: `Post Login Flow`
* **Flow type**: `Basic flow`
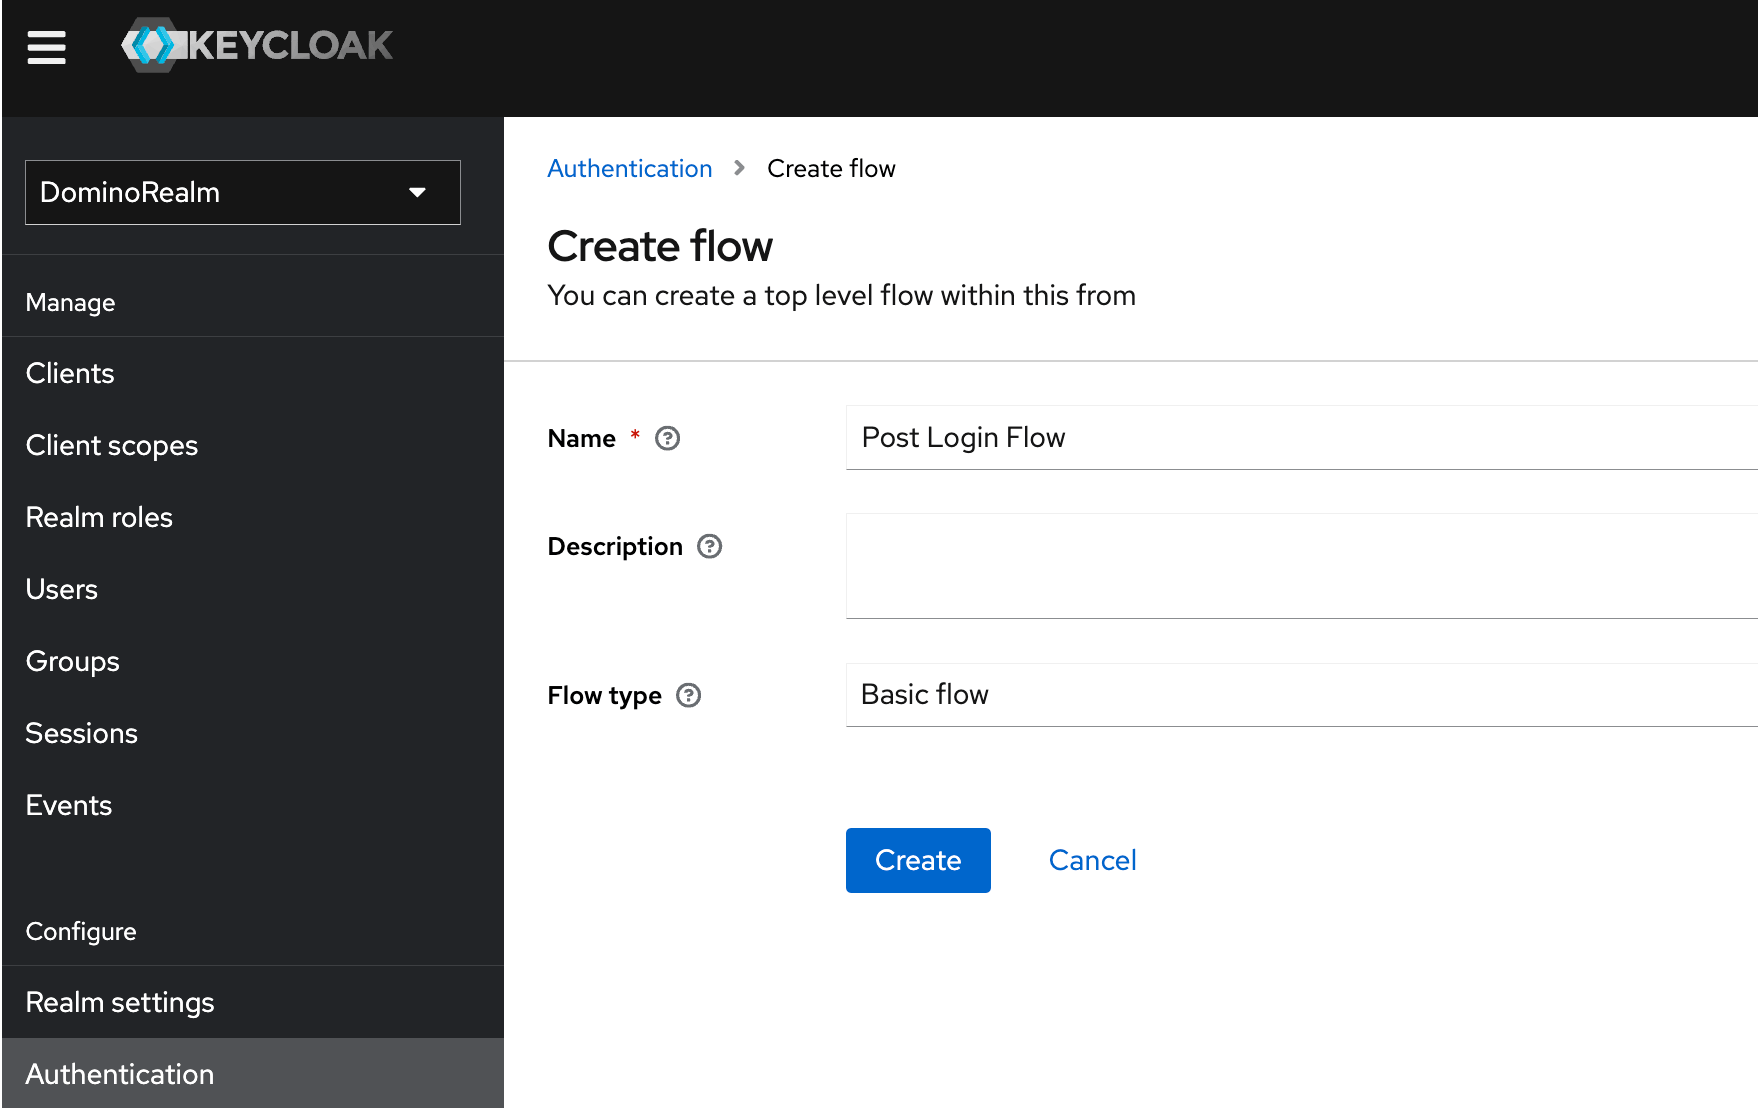 6. Click **Add execution** > Select your Authenticator, in this example, **My Custom Authenticator**.
See [JavaScript providers](https://www.keycloak.org/docs/latest/server_development/#_script_providers) for more information.
### Customize the SSO button
1. In Keycloak, go to the default `domino-theme`.
2. Update the **Display text**.
If **Display text** is blank or corresponds to the identity provider’s **Alias**, the button shows the default text, **Continue with Single Sign On**.
If any text other than the value of the **Alias** field is used, that value is used as the text on the button.
## Test and troubleshoot
If you encounter errors from the Keycloak service when you attempt an SSO login, you can view the Keycloak request logs through `kubectl`. Run the following:
```shell theme={null}
kubectl -n logs keycloak-0
```
## Session and token timeouts
Domino interacts with Keycloak through the [OpenID Connect protocol](https://openid.net/connect/), which uses two JWT tokens:
* Access token gives its bearer access to the secured resource (can be used to authenticate requests).
* Refresh token is not recognized by the secured resources, but it is used to request a fresh valid access token from the identity provider (Keycloak).
When the user authenticates with Keycloak and gets redirected to Domino, both tokens are saved in the Domino server-side session. Every time a request from the user’s browser is made to Domino, the server-side session is checked. If the access token is about to expire or has expired, Domino attempts a background call to Keycloak to request another access token. If this call is successful, the user’s request is served, otherwise the user is logged out. If the refresh token is expired, the user is logged out.
Keycloak has several timeouts that affect this behavior:
Access Token Lifespan\
This defines how long an access token is valid. Domino will not re-check the validity of the user’s authentication with Keycloak until this token expires. The default value is 5 minutes.
SSO Session Max\
This setting has no effect on the lifespan of any tokens, but it limits the maximum length of the user’s session with Keycloak. Even if the user refreshes their tokens and actively uses Domino, they will be logged out at the end of this period. The default value is 60 days.
SSO Session Idle\
This defines the maximum period of time in which the user’s session on Keycloak must be refreshed, otherwise it will be terminated. It defines the lifespan of the refresh token. This period must be longer than Access Token Lifespan, and not longer than SSO Session Max.
If the user leaves their browser window open with Domino, the background requests keep the session alive. The idle countdown only starts if the user closes the window or navigates away from the Domino application.
If the **Offline Session Idle** value is too low, your users might encounter intermittent failures such as scheduled Jobs failing and Workspaces not starting. Domino recommends that you don’t change the default that we set.
See the [Keycloak documentation](https://wjw465150.gitbooks.io/keycloak-documentation/content/server_admin/topics/sessions/timeouts.html) for more information about timeouts.
## SSO attributes
You must have the following attributes to establish single sign-on between Domino and your identity provider:
* Username
* `NameID` (In Subject element)
* Preferred format: `urn:oasis:names:tc:SAML:1.1:nameid-format:email`
* First Name
* Attribute name: Can be any name since Domino allows attribute mapping.
* Last Name
* Attribute name: Can be any name since Domino allows attribute mapping.
* Email
* Attribute name: Can be any name since Domino allows attribute mapping.
* Destination
Example:
```xml theme={null}
john.smith@acme.org
...
john.smith@acme.org
John
Smith
```
## Administrative role synchronization attributes
You must include the following attributes if you sync administrative roles in Domino:
* Domino System Roles
* **Name:** Can be any name since Domino can map attributes.
* **Multi-valued:** Yes
* **Values:**
* One or more values that are an exact, case-sensitive match to one of the Domino administrative roles.
* Practitioner
* SysAdmin
* Librarian
* ReadOnlySupportStaff
* SupportStaff
* ProjectManager
Example:
```xml theme={null}
SysAdmin
Librarian
```
## Next steps
Learn how to [synchronize groups and roles](/6.3/admin/identity-and-access/authentication/sso/group-role-synchronization).
6. Click **Add execution** > Select your Authenticator, in this example, **My Custom Authenticator**.
See [JavaScript providers](https://www.keycloak.org/docs/latest/server_development/#_script_providers) for more information.
### Customize the SSO button
1. In Keycloak, go to the default `domino-theme`.
2. Update the **Display text**.
If **Display text** is blank or corresponds to the identity provider’s **Alias**, the button shows the default text, **Continue with Single Sign On**.
If any text other than the value of the **Alias** field is used, that value is used as the text on the button.
## Test and troubleshoot
If you encounter errors from the Keycloak service when you attempt an SSO login, you can view the Keycloak request logs through `kubectl`. Run the following:
```shell theme={null}
kubectl -n logs keycloak-0
```
## Session and token timeouts
Domino interacts with Keycloak through the [OpenID Connect protocol](https://openid.net/connect/), which uses two JWT tokens:
* Access token gives its bearer access to the secured resource (can be used to authenticate requests).
* Refresh token is not recognized by the secured resources, but it is used to request a fresh valid access token from the identity provider (Keycloak).
When the user authenticates with Keycloak and gets redirected to Domino, both tokens are saved in the Domino server-side session. Every time a request from the user’s browser is made to Domino, the server-side session is checked. If the access token is about to expire or has expired, Domino attempts a background call to Keycloak to request another access token. If this call is successful, the user’s request is served, otherwise the user is logged out. If the refresh token is expired, the user is logged out.
Keycloak has several timeouts that affect this behavior:
Access Token Lifespan\
This defines how long an access token is valid. Domino will not re-check the validity of the user’s authentication with Keycloak until this token expires. The default value is 5 minutes.
SSO Session Max\
This setting has no effect on the lifespan of any tokens, but it limits the maximum length of the user’s session with Keycloak. Even if the user refreshes their tokens and actively uses Domino, they will be logged out at the end of this period. The default value is 60 days.
SSO Session Idle\
This defines the maximum period of time in which the user’s session on Keycloak must be refreshed, otherwise it will be terminated. It defines the lifespan of the refresh token. This period must be longer than Access Token Lifespan, and not longer than SSO Session Max.
If the user leaves their browser window open with Domino, the background requests keep the session alive. The idle countdown only starts if the user closes the window or navigates away from the Domino application.
If the **Offline Session Idle** value is too low, your users might encounter intermittent failures such as scheduled Jobs failing and Workspaces not starting. Domino recommends that you don’t change the default that we set.
See the [Keycloak documentation](https://wjw465150.gitbooks.io/keycloak-documentation/content/server_admin/topics/sessions/timeouts.html) for more information about timeouts.
## SSO attributes
You must have the following attributes to establish single sign-on between Domino and your identity provider:
* Username
* `NameID` (In Subject element)
* Preferred format: `urn:oasis:names:tc:SAML:1.1:nameid-format:email`
* First Name
* Attribute name: Can be any name since Domino allows attribute mapping.
* Last Name
* Attribute name: Can be any name since Domino allows attribute mapping.
* Email
* Attribute name: Can be any name since Domino allows attribute mapping.
* Destination
Example:
```xml theme={null}
john.smith@acme.org
...
john.smith@acme.org
John
Smith
```
## Administrative role synchronization attributes
You must include the following attributes if you sync administrative roles in Domino:
* Domino System Roles
* **Name:** Can be any name since Domino can map attributes.
* **Multi-valued:** Yes
* **Values:**
* One or more values that are an exact, case-sensitive match to one of the Domino administrative roles.
* Practitioner
* SysAdmin
* Librarian
* ReadOnlySupportStaff
* SupportStaff
* ProjectManager
Example:
```xml theme={null}
SysAdmin
Librarian
```
## Next steps
Learn how to [synchronize groups and roles](/6.3/admin/identity-and-access/authentication/sso/group-role-synchronization).