> ## Documentation Index
> Fetch the complete documentation index at: https://docs.domino.ai/llms.txt
> Use this file to discover all available pages before exploring further.
# Manage a hardware tier
> Create, edit, and archive hardware tiers.
## Overview
Hardware tiers let you define the CPU, memory, and GPU resources available to a Domino execution, so users can pick the right amount of compute without managing the underlying infrastructure themselves. Use this page to create a hardware tier when you need a new resource combination, edit one as your cluster or team's needs change, and archive one you no longer want available for selection.
## Create a Hardware Tier
Users select a hardware tier when launching an execution, which determines the available resources and the node type for the execution.
1. Go to **Manage Resources** > **Hardware Tiers**.
2. Click **New**.
3. Set the following fields to configure the resource requests and limits for execution pods:
* **Name**\
The name of the hardware tier that shows to users.
Name each hardware tier as descriptively as possible so users can identify the underlying compute resources, for example `GPU (g5.4xlarge)`.
* **Cores Requested**\
The number of requested CPUs.
* **Memory Requested (GiB)**\
The amount of requested memory.
* **Memory Limit (GiB)**\
The maximum amount of memory. Domino recommends that this is the same as the request.
If **Allow executions memory limit to exceed request** is not selected, Domino automatically applies a memory limit equal to the request.
Use the option to allow the memory limit to exceed the request with caution since it can make executions more likely to be evicted under memory pressure. See [the Kubernetes documentation](https://kubernetes.io/docs/tasks/configure-pod-container/assign-memory-resource/) to learn how memory requests and limits influence Kubernetes eviction decisions.
* **Cores Limit**\
The maximum number of CPUs. Domino recommends that this is the same as the request.
If **Allow executions to exceed request when unused CPU is available** is not selected, Domino automatically applies a CPU limit equal to the request.
* **Number of GPUs**\
The number of requested GPUs. The request values, CPU Cores, Memory, and GPUs, are thresholds used to determine whether a node has the capacity to host an execution pod. These requested resources are effectively reserved for the pod. The limit values control the amount of resources a pod can use above and beyond the amount requested. If there’s additional headroom on the node, the pod can use resources up to this limit.
However, if resources are in contention, and a pod is using resources beyond those it requested and thereby causing excess demand on a node, the offending pod might be evicted from the node by Kubernetes, and the associated Domino Run is terminated. For this reason, Domino recommends that you set the requests and limits to the same values.
Ensure that the CPU, memory, and GPU requests in your hardware tier do not exceed the available resources in the target node pool, considering overhead. Otherwise, an execution using such a hardware tier never starts. If you need more resources than are available on existing nodes, you might have to add a new node pool with different specifications. This might mean adding individual nodes to a static cluster or configuring new auto-scaling components that provision new nodes with the required specifications and labels.
* **Cents Per Minute Per Run**\
Enter how much it costs (in cents) per minute to run each machine in the hardware tier. You might notice that when users select a hardware tier, they see the cost in dollars. The cost is converted from cents to dollars (rounded to the fourth floating digit).
* **Node Pool**\
Specify the underlying machine type on which a Domino execution runs.
Nodes that have the same value for the `dominodatalab.com/node-pool` [Kubernetes node label](https://kubernetes.io/docs/concepts/configuration/assign-pod-node/) form a **Node Pool**. Executions with a matching value in the **Node Pool** field then run on these nodes. [Configure spot instances](/6.3/admin/infrastructure-and-compute/manage-compute-resources/configure-spot-instances) has information on creating node pools with spot instances.
For example, you can set a hardware tier named `large-k8s` to use the `default` node pool.
The following diagram shows a cluster configured with two node pools for Domino, one named `default` and one named `default-gpu`. You can label node pools with the same scheme `dominodatalab.com/node-pool=` to make additional node pools available to Domino. The arrows in the diagram represent Domino requesting that a node with a given label be assigned to an execution. Kubernetes then assigns the execution to a node in the specified pool that has sufficient resources.
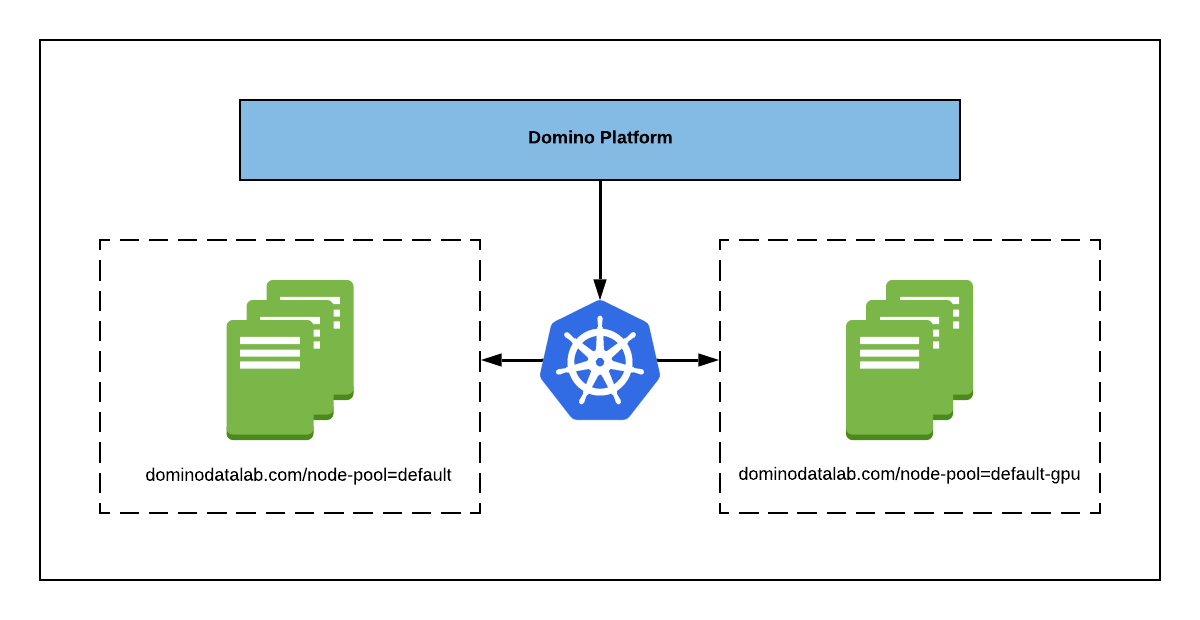 By default, Domino creates a node pool with the label `dominodatalab.com/node-pool=default` and all compute nodes Domino creates in cloud environments are assumed to be in this pool. In cloud environments with automatic node scaling, you configure scaling components like AWS Auto Scaling Groups or Azure Scale Sets with these labels to create elastic node pools.
* Data Plane\
In a [Domino Nexus](/6.3/admin/architecture-and-deployment/architecture/nexus-hybrid-architecture) deployment, the form also carries a dropdown for the Data Plane this hardware tier runs workloads on. Each hardware tier is assigned to one Data Plane, so this dropdown decides where executions using the tier run.
Confirm that the resources the tier requests are available on the nodes in the chosen Data Plane, that those nodes carry the `dominodatalab.com/node-pool` label, and that the label value matches the **Node Pool** you set above.
4. Click **Insert**.
To add a tier for a Data Plane you just registered, go to **Manage resources** > **Hardware tiers**, click **Clone** next to an existing tier, and change its Data Plane, rather than building one from scratch. Cloning a "small" tier is an easy way to test a new Data Plane.
See [Advanced hardware tier settings](/6.3/admin/infrastructure-and-compute/manage-compute-resources/hardware-tiers/advanced-hardware-tier-settings)
## Restrict access to a Hardware Tier
Clearing **Is Globally Available** limits who can run on the resources a hardware tier defines, and in a Domino Nexus deployment that also limits who can run workloads on its Data Plane.
1. In the admin portal, go to **Manage resources** > **Hardware tiers**.
2. Next to the hardware tier, click **Edit**.
3. Clear **Is Globally Available** at the bottom of the form.
4. Go to the **Hardware tiers** tab on the organization's page and select the restricted hardware tier.
## Define a Hardware Tier as a Domino Endpoint
You can define specific hardware tiers for machine learning models deployed as [Domino endpoints](/6.3/admin/platform-configuration/manage-model-deployments#domino-endpoint-hardware-tiers). This allows you to cater your hardware tiers to the unique demands of machine learning model deployment.
Domino endpoint tiers and regular hardware tiers cannot be interchanged, meaning Domino endpoints can only use Domino endpoint tiers, and Domino endpoint tiers cannot be used outside of Domino endpoints.
To learn more, see [Scale models with Domino endpoint hardware tiers](/6.3/admin/platform-configuration/manage-model-deployments#domino-endpoint-hardware-tiers).
## Edit a Hardware Tier
1. In the admin panel, go to **Manage Resources** > **Hardware Tiers**.
2. Click **Edit**.
3. Make the changes needed and click **Update**.
## Archive a Hardware Tier
An archived hardware tier cannot be un-archived.
1. In the admin panel, go to **Manage Resources** > **Hardware Tiers**.
2. Click **Archive** next to the hardware tier you want to archive.
3. Click **Archive Hardware Tier**.
## Related topics
- [Manage hardware tiers](/6.3/admin/infrastructure-and-compute/manage-compute-resources/hardware-tiers/index.md)
- [Create a hardware tier](/6.3/api-reference/hardwaretier/create-a-hardware-tier.md)
- [Update a hardware tier](/6.3/api-reference/hardwaretier/update-a-hardware-tier.md)
- [Archive a hardware tier](/6.3/api-reference/hardwaretier/archive-a-hardware-tier.md)
By default, Domino creates a node pool with the label `dominodatalab.com/node-pool=default` and all compute nodes Domino creates in cloud environments are assumed to be in this pool. In cloud environments with automatic node scaling, you configure scaling components like AWS Auto Scaling Groups or Azure Scale Sets with these labels to create elastic node pools.
* Data Plane\
In a [Domino Nexus](/6.3/admin/architecture-and-deployment/architecture/nexus-hybrid-architecture) deployment, the form also carries a dropdown for the Data Plane this hardware tier runs workloads on. Each hardware tier is assigned to one Data Plane, so this dropdown decides where executions using the tier run.
Confirm that the resources the tier requests are available on the nodes in the chosen Data Plane, that those nodes carry the `dominodatalab.com/node-pool` label, and that the label value matches the **Node Pool** you set above.
4. Click **Insert**.
To add a tier for a Data Plane you just registered, go to **Manage resources** > **Hardware tiers**, click **Clone** next to an existing tier, and change its Data Plane, rather than building one from scratch. Cloning a "small" tier is an easy way to test a new Data Plane.
See [Advanced hardware tier settings](/6.3/admin/infrastructure-and-compute/manage-compute-resources/hardware-tiers/advanced-hardware-tier-settings)
## Restrict access to a Hardware Tier
Clearing **Is Globally Available** limits who can run on the resources a hardware tier defines, and in a Domino Nexus deployment that also limits who can run workloads on its Data Plane.
1. In the admin portal, go to **Manage resources** > **Hardware tiers**.
2. Next to the hardware tier, click **Edit**.
3. Clear **Is Globally Available** at the bottom of the form.
4. Go to the **Hardware tiers** tab on the organization's page and select the restricted hardware tier.
## Define a Hardware Tier as a Domino Endpoint
You can define specific hardware tiers for machine learning models deployed as [Domino endpoints](/6.3/admin/platform-configuration/manage-model-deployments#domino-endpoint-hardware-tiers). This allows you to cater your hardware tiers to the unique demands of machine learning model deployment.
Domino endpoint tiers and regular hardware tiers cannot be interchanged, meaning Domino endpoints can only use Domino endpoint tiers, and Domino endpoint tiers cannot be used outside of Domino endpoints.
To learn more, see [Scale models with Domino endpoint hardware tiers](/6.3/admin/platform-configuration/manage-model-deployments#domino-endpoint-hardware-tiers).
## Edit a Hardware Tier
1. In the admin panel, go to **Manage Resources** > **Hardware Tiers**.
2. Click **Edit**.
3. Make the changes needed and click **Update**.
## Archive a Hardware Tier
An archived hardware tier cannot be un-archived.
1. In the admin panel, go to **Manage Resources** > **Hardware Tiers**.
2. Click **Archive** next to the hardware tier you want to archive.
3. Click **Archive Hardware Tier**.
## Related topics
- [Manage hardware tiers](/6.3/admin/infrastructure-and-compute/manage-compute-resources/hardware-tiers/index.md)
- [Create a hardware tier](/6.3/api-reference/hardwaretier/create-a-hardware-tier.md)
- [Update a hardware tier](/6.3/api-reference/hardwaretier/update-a-hardware-tier.md)
- [Archive a hardware tier](/6.3/api-reference/hardwaretier/archive-a-hardware-tier.md)