> ## Documentation Index
> Fetch the complete documentation index at: https://docs.domino.ai/llms.txt
> Use this file to discover all available pages before exploring further.
# Create a Domino Environment
This guide shows you three ways to create a new Domino Environment, whether you want to make a core Domino environment, base it on an existing environment, or start from a custom setup.
## Tour the New Environment window
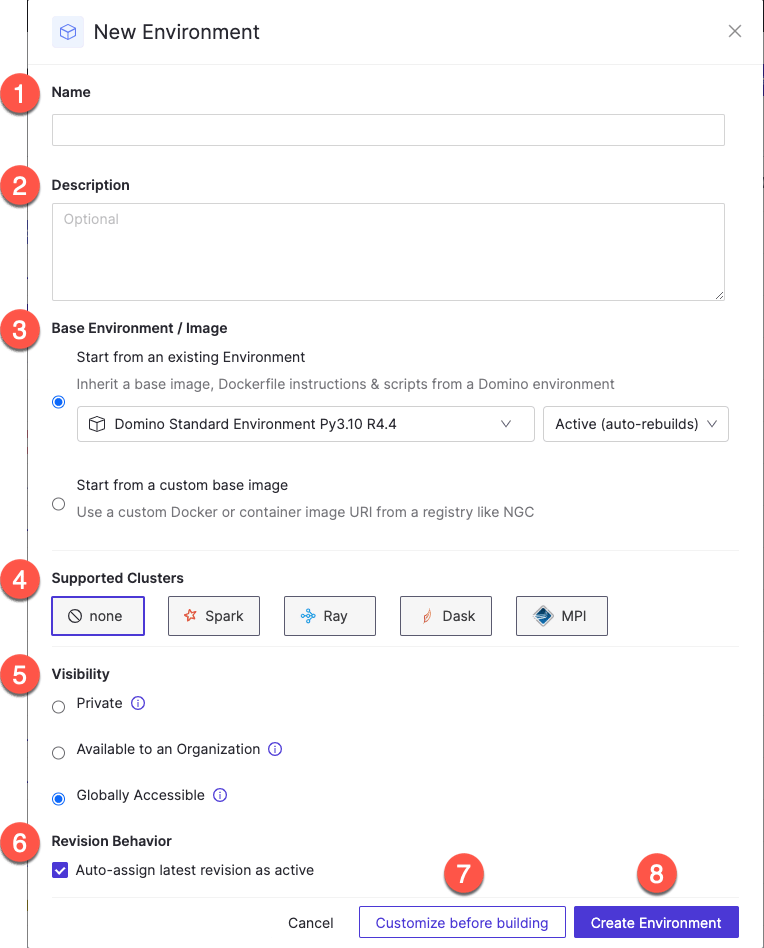 1. **Name**: The name you give your environment.
2. **Description (Optional)**: Use this to record details about your environment.
3. **Base Environment / Image**: These are the options for a base environment/image:
1. **Start from an existing Environment**: Base your new environment on an existing Domino environment.
2. **Active (auto-rebuilds)**: For an existing environment, keep this selected, or choose a specific revision from the menu.
3. **Start from a custom base image**: Input a URI to build a custom environment.
4. **Supported Clusters**: Lists the currently supported types of clusters.
5. **Visibility**: Choose a visibility level: Private, Available to an Organization, or Globally Accessible (admin only).
6. **Revision Behavior**: Auto-assigns the latest revision as active.
7. **Customize before building**: Use this to add custom features to your environment.
8. **Create Environment**: Validates and creates your new environment.
## Create environment based on Domino Core Environment
Domino comes with the [Domino Core Environment](/cloud/platform-capabilities/core-concepts/compute-environments/manage-compute-environments/2-domino-standard-environments) installed, but you can create a new Domino Environment using the available environment images.
1. Go to **Govern** > **Environments** and click **+ Create Environment**.
2. Fill in the following fields:
1. **Name**: Name your environment according to the naming convention of your organization.
2. **Description (Optional)**: Enter a meaningful description of the environment. For example, you could add details like the OS, Python version, and whether the environment uses Jupyter, JupyterLab, VS Code, etc.
3. Choose **Start from an existing Environment** for your **Base Environment / Image**.
1. The global default for your environment is pre-selected.
2. Scroll until you can select the **Domino Core Environment**.
3. **Active (auto-rebuilds)**: keep this selected, or choose a specific revision from the menu.
4. Choose an option for any **Supported Clusters**.
5. Decide on your environment’s **Visibility** level: **Private**, **Available to an Organization**, or **Globally Accessible** (admin only).
6. Click **Create Environment**. The **Revisions** tab for the environment opens.
To customize the environment to enable tools, run scripts, or manage environment variables, click **Customize before Building** and use the [Customize your Environment](/cloud/platform-capabilities/core-concepts/compute-environments/manage-compute-environments/5-edit-environment-definition) guide.
You can also click **Edit Definition** to customize the environment later.
## Create environment based on existing environment
You can create a new Domino Environment by duplicating existing environments, or by choosing a base environment from the **Start from existing environment** menu.
After building or editing an environment, use the **Auto-assign next new revision as Active** toggle in the **Revisions** tab to control which revision is active. When enabled, the latest successful build becomes **Active** automatically. When disabled, the environment stays on the current **Active** revision, even as new ones are built.
1. **Name**: The name you give your environment.
2. **Description (Optional)**: Use this to record details about your environment.
3. **Base Environment / Image**: These are the options for a base environment/image:
1. **Start from an existing Environment**: Base your new environment on an existing Domino environment.
2. **Active (auto-rebuilds)**: For an existing environment, keep this selected, or choose a specific revision from the menu.
3. **Start from a custom base image**: Input a URI to build a custom environment.
4. **Supported Clusters**: Lists the currently supported types of clusters.
5. **Visibility**: Choose a visibility level: Private, Available to an Organization, or Globally Accessible (admin only).
6. **Revision Behavior**: Auto-assigns the latest revision as active.
7. **Customize before building**: Use this to add custom features to your environment.
8. **Create Environment**: Validates and creates your new environment.
## Create environment based on Domino Core Environment
Domino comes with the [Domino Core Environment](/cloud/platform-capabilities/core-concepts/compute-environments/manage-compute-environments/2-domino-standard-environments) installed, but you can create a new Domino Environment using the available environment images.
1. Go to **Govern** > **Environments** and click **+ Create Environment**.
2. Fill in the following fields:
1. **Name**: Name your environment according to the naming convention of your organization.
2. **Description (Optional)**: Enter a meaningful description of the environment. For example, you could add details like the OS, Python version, and whether the environment uses Jupyter, JupyterLab, VS Code, etc.
3. Choose **Start from an existing Environment** for your **Base Environment / Image**.
1. The global default for your environment is pre-selected.
2. Scroll until you can select the **Domino Core Environment**.
3. **Active (auto-rebuilds)**: keep this selected, or choose a specific revision from the menu.
4. Choose an option for any **Supported Clusters**.
5. Decide on your environment’s **Visibility** level: **Private**, **Available to an Organization**, or **Globally Accessible** (admin only).
6. Click **Create Environment**. The **Revisions** tab for the environment opens.
To customize the environment to enable tools, run scripts, or manage environment variables, click **Customize before Building** and use the [Customize your Environment](/cloud/platform-capabilities/core-concepts/compute-environments/manage-compute-environments/5-edit-environment-definition) guide.
You can also click **Edit Definition** to customize the environment later.
## Create environment based on existing environment
You can create a new Domino Environment by duplicating existing environments, or by choosing a base environment from the **Start from existing environment** menu.
After building or editing an environment, use the **Auto-assign next new revision as Active** toggle in the **Revisions** tab to control which revision is active. When enabled, the latest successful build becomes **Active** automatically. When disabled, the environment stays on the current **Active** revision, even as new ones are built.
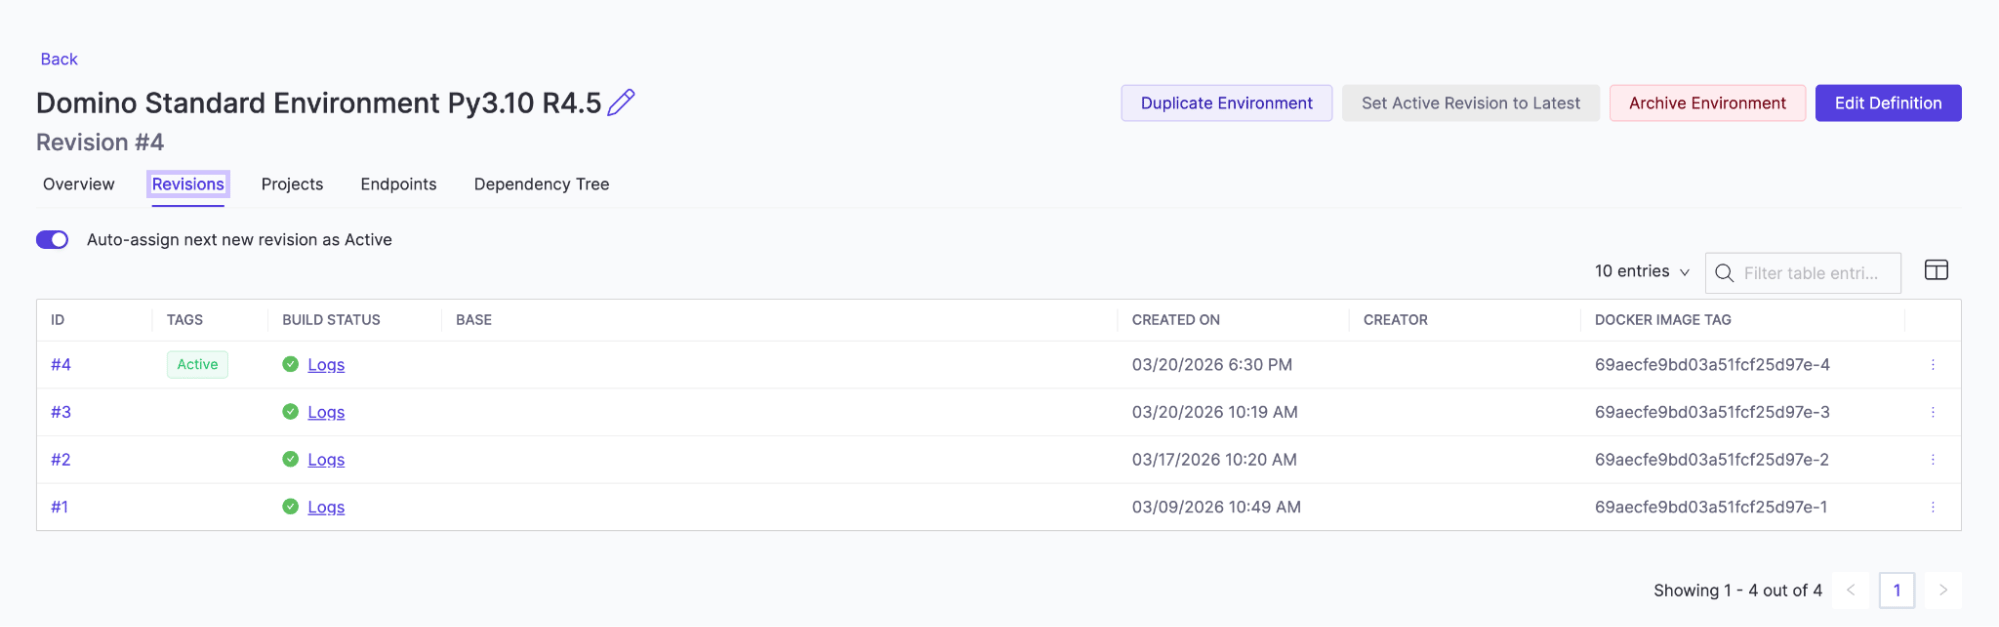 Suppose your environment updates automatically due to a subscription, but you have locked its **Active** revision to a specific version. In that case, you will see a notice when the base environment’s **Active** revision changes. This reminds you to consider updating your environment’s revision.
You can keep a chosen version of your environment as **Active** while still receiving updates on the base environment. This lets you test the new version before connecting your Jobs, Apps, and Model Endpoints to it.
Please note that archived images will not be rebuilt automatically.
### Create environment by duplication
To create a new environment by duplicating an existing environment:
1. Go to **Govern** > **Environments**.
2. Choose the environment you want to copy and click the three dots on the right.
3. Choose **Duplicate Environment** from the menu.
4. Rename it by clicking the edit icon and then entering when done.
5. You can edit other fields quickly to customize them:
1. **Edit Description**: Click **Update** when you are done with the description.
2. **Edit Visibility**: Click **Update Visibility** when finished.
6. Click **Customize before building** or **Create Environment**.
Use the [Customize your Environment](/cloud/platform-capabilities/core-concepts/compute-environments/manage-compute-environments/5-edit-environment-definition) article for guidance to enable tools, run scripts, or manage environment variables.
### Create environment from existing environment
When you create a new environment based on an existing one or change the settings of an environment, you have two options for building it:
* You can create it based on a specific version of the base environment. You can change this on a later revision of your own.
* You can set it to update automatically by linking it to changes in the base environment’s **Active** revision. If the base environment changes its **Active** revision, your environment automatically builds a new revision based off of it.
To create a new environment by using an existing environment as the base:
1. Go to **Govern** > **Environments**.
2. Select **Create Environment**.
3. Choose the environment you want to use as the base from the menu.
1. **Active (auto-rebuilds)**: keep this selected, or choose a specific revision from the menu.
4. Name your new environment.
5. **Description (Optional)**: Enter a description of the environment.
6. Choose a **Visibility** level for your environment.
7. Click **Create Environment**. The **Revisions** tab for the environment opens.
Use the [Customize your Environment](/cloud/platform-capabilities/core-concepts/compute-environments/manage-compute-environments/5-edit-environment-definition) article for guidance to enable tools, run scripts, or manage environment variables.
## Create environment based on custom images
Choose your [custom Docker or container image](/cloud/getting-started/domino-overview) before creating a new environment and copy the URI.
1. Go to **Govern** > **Environments** and click **+Create Environment**.
2. Fill in the following fields:
1. **Name**: Name your environment according to the naming convention of your organization.
2. **Description (Optional)**: Enter a meaningful description of the environment. For example, you could add details like the OS, Python version, and whether the environment uses Jupyter, JupyterLab, VS Code, etc.
3. Choose **Start from a custom base image** for your **Base Environment / Image**.
1. **FROM**: Paste the custom Docker or container image URI here.
2. **Optional**: Review the information about the **Automatically make compatible** field.
4. Choose an option for any **Supported Clusters**.
5. Decide on your environment’s **Visibility** level: **Private**, **Available to an Organization**, or **Globally Accessible** (admin only).
6. Click **Create Environment**. The **Revisions** tab for the environment opens.
To customize the environment to enable tools, run scripts, or manage environment variables, click **Customize before Building** and use the [Customize your Environment](/cloud/platform-capabilities/core-concepts/compute-environments/manage-compute-environments/5-edit-environment-definition) guide.
You can also click **Edit Definition** to customize the environment later.
## Archive an environment
You can archive environments as long as they are not the default environment for a project. Archiving an environment does not affect reproducibility; executions based on it will still run.
1. Go to **Govern** > **Environments**.
2. Choose an environment from the list.
3. There are two ways to archive an environment quickly:
1. You can click the 3 dots within the list and choose **Archive Environment**.
2. Choose **Archive Environment** from the menu. You can also archive from any tab within the **Environment** details.
## Next Steps
* [Customize your Environment](/cloud/platform-capabilities/core-concepts/compute-environments/manage-compute-environments/5-edit-environment-definition) to enable tools, run scripts, or manage environment variables.
* [Set default Environments](/cloud/platform-capabilities/core-concepts/compute-environments/manage-compute-environments/6-set-a-default-environment) establishes a starting point for all new projects or an environment for a specific project.
* [Our Best Practices](/cloud/platform-capabilities/core-concepts/compute-environments/manage-compute-environments/1-best-practices-domino-environments) will guide you in setting up and maintaining your Domino environments.
* [Use AI coding assistants](/cloud/solution-guides/coding-assistants) to enhance your coding in a Domino Environment.
Suppose your environment updates automatically due to a subscription, but you have locked its **Active** revision to a specific version. In that case, you will see a notice when the base environment’s **Active** revision changes. This reminds you to consider updating your environment’s revision.
You can keep a chosen version of your environment as **Active** while still receiving updates on the base environment. This lets you test the new version before connecting your Jobs, Apps, and Model Endpoints to it.
Please note that archived images will not be rebuilt automatically.
### Create environment by duplication
To create a new environment by duplicating an existing environment:
1. Go to **Govern** > **Environments**.
2. Choose the environment you want to copy and click the three dots on the right.
3. Choose **Duplicate Environment** from the menu.
4. Rename it by clicking the edit icon and then entering when done.
5. You can edit other fields quickly to customize them:
1. **Edit Description**: Click **Update** when you are done with the description.
2. **Edit Visibility**: Click **Update Visibility** when finished.
6. Click **Customize before building** or **Create Environment**.
Use the [Customize your Environment](/cloud/platform-capabilities/core-concepts/compute-environments/manage-compute-environments/5-edit-environment-definition) article for guidance to enable tools, run scripts, or manage environment variables.
### Create environment from existing environment
When you create a new environment based on an existing one or change the settings of an environment, you have two options for building it:
* You can create it based on a specific version of the base environment. You can change this on a later revision of your own.
* You can set it to update automatically by linking it to changes in the base environment’s **Active** revision. If the base environment changes its **Active** revision, your environment automatically builds a new revision based off of it.
To create a new environment by using an existing environment as the base:
1. Go to **Govern** > **Environments**.
2. Select **Create Environment**.
3. Choose the environment you want to use as the base from the menu.
1. **Active (auto-rebuilds)**: keep this selected, or choose a specific revision from the menu.
4. Name your new environment.
5. **Description (Optional)**: Enter a description of the environment.
6. Choose a **Visibility** level for your environment.
7. Click **Create Environment**. The **Revisions** tab for the environment opens.
Use the [Customize your Environment](/cloud/platform-capabilities/core-concepts/compute-environments/manage-compute-environments/5-edit-environment-definition) article for guidance to enable tools, run scripts, or manage environment variables.
## Create environment based on custom images
Choose your [custom Docker or container image](/cloud/getting-started/domino-overview) before creating a new environment and copy the URI.
1. Go to **Govern** > **Environments** and click **+Create Environment**.
2. Fill in the following fields:
1. **Name**: Name your environment according to the naming convention of your organization.
2. **Description (Optional)**: Enter a meaningful description of the environment. For example, you could add details like the OS, Python version, and whether the environment uses Jupyter, JupyterLab, VS Code, etc.
3. Choose **Start from a custom base image** for your **Base Environment / Image**.
1. **FROM**: Paste the custom Docker or container image URI here.
2. **Optional**: Review the information about the **Automatically make compatible** field.
4. Choose an option for any **Supported Clusters**.
5. Decide on your environment’s **Visibility** level: **Private**, **Available to an Organization**, or **Globally Accessible** (admin only).
6. Click **Create Environment**. The **Revisions** tab for the environment opens.
To customize the environment to enable tools, run scripts, or manage environment variables, click **Customize before Building** and use the [Customize your Environment](/cloud/platform-capabilities/core-concepts/compute-environments/manage-compute-environments/5-edit-environment-definition) guide.
You can also click **Edit Definition** to customize the environment later.
## Archive an environment
You can archive environments as long as they are not the default environment for a project. Archiving an environment does not affect reproducibility; executions based on it will still run.
1. Go to **Govern** > **Environments**.
2. Choose an environment from the list.
3. There are two ways to archive an environment quickly:
1. You can click the 3 dots within the list and choose **Archive Environment**.
2. Choose **Archive Environment** from the menu. You can also archive from any tab within the **Environment** details.
## Next Steps
* [Customize your Environment](/cloud/platform-capabilities/core-concepts/compute-environments/manage-compute-environments/5-edit-environment-definition) to enable tools, run scripts, or manage environment variables.
* [Set default Environments](/cloud/platform-capabilities/core-concepts/compute-environments/manage-compute-environments/6-set-a-default-environment) establishes a starting point for all new projects or an environment for a specific project.
* [Our Best Practices](/cloud/platform-capabilities/core-concepts/compute-environments/manage-compute-environments/1-best-practices-domino-environments) will guide you in setting up and maintaining your Domino environments.
* [Use AI coding assistants](/cloud/solution-guides/coding-assistants) to enhance your coding in a Domino Environment.