> ## Documentation Index
> Fetch the complete documentation index at: https://docs.domino.ai/llms.txt
> Use this file to discover all available pages before exploring further.
# Create and manage Datasets
Domino Datasets provides high-performance, versioned, and structured filesystem storage in Domino. You can use Datasets to build multiple curated collections of data in one Project and share them with your collaborators to use in their Projects. Likewise, you can mount Datasets from other Projects in your own Project if they are shared with you. You can modify the contents of a Dataset through the Domino application or through workload executions.
A Dataset always reflects the most recent version of the data. For reproducibility, you can create read-only snapshots of your Dataset at any moment in time. Snapshots are associated with the Dataset they version.
## Create a new Dataset
If the Dataset you need is not yet in Domino, you can create it in your Project:
1. In your Project, go to **Data** > **Domino Datasets** > **Create New Dataset**.
2. Enter a **Dataset Name** and **Description**, then click **Next**.
3. Enter the users or organizations to give them permission to the Dataset.
To give all Project members access to the Dataset, click the **Add all project members** link.
4. Specify the user or organization's [role](/cloud/platform-capabilities/core-concepts/data/sharing-and-security/share-datasets).
5. Click **Add**.
6. Repeat steps 6-8 as needed.
In the **Current Permissions** area, you can modify the [role](/cloud/platform-capabilities/core-concepts/data/sharing-and-security/share-datasets) as needed, or click the trash icon to delete permissions.
7. Click **Finish**.
You can use the [python-domino library](/cloud/reference/python-sdk/python-domino) to create a Dataset using `datasets_create`:
```python theme={null}
datasets_create(dataset_name, dataset_description)
```
* `dataset_name`: Name of the new Dataset. The name must be unique.
* `dataset_description`: Description of the Dataset.
Endpoint:
```
/api/datasetrw/v1/datasets
```
Body:
```json theme={null}
{
"name": "",
"description": "",
"projectId": "",
"grants": []
}
```
Example:
Example request:
```python theme={null}
import requests
import json
url = "test14995.test-api.tech/api/datasetrw/v1/datasets"
payload = json.dumps({
"name": "test-dataset4",
"description": "A new dataset",
"projectId": "649cb3b0dab75c31b6e9daf6",
"grants": []
})
headers = {
'X-Domino-Api-Key': 'a944d3612a76f6c44ad9c680c25234b2ef580ac6b5d2649fd3fc0a259cb62255',
'Content-Type': 'application/json'
}
response = requests.request("POST", url, headers=headers, data=payload)
print(response.text)
```
Example response:
```json theme={null}
{
"dataset": {
"id": "649cb4dedeb75c31b6e7dafc",
"name": "test-dataset4",
"description": "A new dataset",
"projectId": "649cb3b0dab75c31b6e9daf6",
"createdAt": "2023-06-28T22:31:58.042Z",
"snapshotIds": [
"649cb4dedeb75c31b6e7dafb"
],
"tags": {}
},
"metadata": {
"requestId": "956ef589-8f4d-4c6d-b7f3-1c28d0201248",
"notices": []
}
}
```
### Create a new Dataset from a snapshot
You can create as many snapshots as you need, but you cannot modify existing snapshots. Instead, you can create a Dataset from an existing snapshot, modify the new Dataset, and then create a new snapshot:
1. Go to the existing snapshot.
2. Click **Copy to New Dataset**.
3. Complete the fields as needed.
4. Click **Upload files** to add files to the Dataset.
5. Click **Take Snapshot** > **Include all files**.
Syntax:
```shell theme={null}
domino create-dataset-from-snapshot //
```
Endpoint:
```
/api/datasetrw/v1/datasets
```
Body:
```json theme={null}
{
"name": "test-dataset5",
"description": "A new dataset based on a snapshot",
"grants": [],
"snapshotId": "649cbe38fe7c5443a9cb1b62"
}
```
Example: Create a new Dataset from a snapshot
Example request:
```python theme={null}
import requests
import json
url = "test14995.test-api.tech/api/datasetrw/v1/datasets"
payload = json.dumps({
"name": "test-dataset5",
"description": "A new dataset based on a snapshot",
"grants": [],
"snapshotId": "649cbe38fa7c5443a7cb1b62"
})
headers = {
'X-Domino-Api-Key': 'a944d3612a76f6c44ad9c680c25234b2ef580ac6b5d2649fd3fc0a259cb62255',
'Content-Type': 'application/json'
}
response = requests.request("POST", url, headers=headers, data=payload)
print(response.text)
```
Example response:
```json theme={null}
{
"dataset": {
"id": "649cb689deb75c31b6e7dafe",
"name": "test-dataset5",
"description": "A new dataset based on a snapshot",
"projectId": "649cb2b0deb75c31b6e7daf6",
"createdAt": "2023-06-28T22:39:05.788Z",
"snapshotIds": [
"649cb689deb75c31b6e7dafd"
],
"tags": {}
},
"metadata": {
"requestId": "3d87b111-8052-4965-9044-0531ba49a93a",
"notices": []
}
}
```
### Upload files to a Dataset
Use the Domino UI to upload up to 50GB or 50,000 individual files. For larger uploads, use the Domino CLI for your upload.
1. In your Project, go to **Data** > **Domino Datasets**.
2. Open the Dataset to which you want to add files, then click **Upload files**:
 You can browse your local filesystem or drag and drop files to upload.
To preserve the filesystem structure of your uploads, use the drag-and-drop option. You can pause and resume the upload as needed.
Uploading to a folder can fail if you do not have permissions to write to it. For example, a folder created from a Workspace might not be writable through the UI without appropriate changes to permissions.
Upload all the files in a folder from your local machine to an existing dataset.
This command overwrites existing files unless you use the `‑‑fileUploadSetting` option.
Syntax:
```shell theme={null}
domino [--fileUploadSetting Ignore|Overwrite|Rename] [--targetRelativePath ] //
```
The optional `fileUploadSetting` flag handles path collisions:
* `Ignore`: If a file already exists in the Dataset, ignore the new file.
* `Overwrite`: If a file already exists in the Dataset, overwrite the existing file with the new file.
* `Rename`: If a file already exists in the Dataset, append `_1` to the uploaded filename. For example, if `/Users/myUser/data/file.txt` already exists then the newly-uploaded file becomes `/Users/myUser/data/file_1.txt`.
The optional `targetRelativePath` flag enables uploading to a subdirectory in the Dataset:
* ``: This is the path, relative to the root directory of the Dataset, where files will be uploaded. Note that other users with access to the Dataset can alter the file structure, which may require you to modify the destination path accordingly.
If `targetRelativePath` is not specified, files will be uploaded to the root directory of the Dataset.
`fileUploadSetting`, `targetRelativePath`, and their values are case-sensitive.
Example:
```shell theme={null}
domino upload-dataset --fileUploadSetting Overwrite --targetRelativePath Experiments/Run1/Analysis jsmith/global-predictions/global-data /Users/myUser/data
```
If you don't have the CLI installed, see [Install the Domino Command Line (CLI)](/cloud/reference/cli/install-the-cli) for instructions.
### Download files from Datasets
Use the Domino UI or CLI to download files and folders from your Projects.
1. In your Project, go to **Data** > **Domino Datasets**.
2. Open the Dataset you want to download files from.
3. Navigate to the directory where your files are located.
4. Either:
* Click on the vertical dots next to the file or folder you want to download. Click **Download**. If you are downloading a folder, the downloaded file will be a ZIP or TAR archive, which can be toggled via the `com.cerebro.domino.dataset.batchDownloadArchiveFormat` configuration record key. Otherwise, the file downloads directly.
* Click on the checkboxes to the left of the files and directories you want to download, and then click **Download Selected Items**. If you are downloading a folder or multiple files, the downloaded file will be a ZIP file (default) or TAR archive, which can be toggled via the `com.cerebro.domino.dataset.batchDownloadArchiveFormat` configuration record key. Otherwise, the file downloads directly.
`download` will download the latest copy of your files from the cloud into your current project folder. If you have made changes that conflict with changes in the cloud, you will see both versions of the conflicting file side-by-side.
There are two reasons files in the cloud might change: first, your collaborators on a Project might make changes; second, you might have executed a run that produced new output files.
Example
```shell theme={null}
domino download
```
To download the output files of the given run, please see the [Download files with the CLI](/cloud/reference/cli/download-files-with-the-cli) page.
If you don't have the CLI installed, see [Install the Domino Command Line (CLI)](/cloud/reference/cli/install-the-cli) for instructions.
## Modify Datasets
You can always modify the contents of a Dataset or rename the Dataset.
Always create a snapshot before modifying the contents of a Dataset so that you can always return to the previous version of the data.
### Rename a Dataset
You can change the name of a Dataset.
1. In the navigation pane, click **Data**.
2. Click **Domino Datasets**.
3. Click the Dataset to rename.
4. Go to **More Actions > Rename Dataset**.
5. Enter a **New Name** and click **Rename**.
### Delete a Dataset
If you no longer need the entire Dataset, you can mark it for deletion. When you mark a Dataset for deletion, it removes the Dataset and its associated snapshots from the originating Project and from all projects that it was shared with. Domino executions will not be able to use the Dataset. A Domino administrator must perform the final deletion.
1. In the navigation pane, click **Data**.
2. Click **Domino Datasets**.
3. Click the name of the Dataset to delete.
4. Go to **More Actions** > Click **Delete Dataset**.
5. Click **Delete Dataset** to confirm that you want to mark the Dataset for deletion. Your administrator will permanently [delete the Dataset](/cloud/admin/data-administration/datasets#delete-datasets-and-snapshots).
### Add or remove files
You can add or delete files in a Dataset using the Domino UI. With the CLI, you can add all the files in a folder to a Dataset.
In the navigation pane, click **Data**, then click the name of the Dataset to change.
* To add files, click **Upload files**.
* To delete files, select the files to delete, then click **Delete Selected Items**.
* To rename the Dataset, click **Rename Dataset**, enter the new name, then click **Rename**.
Before deleting a file with a special character like a backslash () in its name, you need to rename it first. You can use a tilde (\~) or colon (:) anywhere in a filename, except at the beginning. If the file that you want to delete has a tilde or colon at the beginning of its name, rename it.
Upload all the files in a folder from your local machine to an existing dataset.
This command overwrites existing files unless you use the `‑‑fileUploadSetting` option.
Syntax:
```shell theme={null}
domino [--fileUploadSetting Ignore|Overwrite|Rename] [--targetRelativePath ] //
```
The optional `fileUploadSetting` flag handles path collisions:
* `Ignore`: If a file already exists in the Dataset, ignore the new file.
* `Overwrite`: If a file already exists in the Dataset, overwrite the existing file with the new file.
* `Rename`: If a file already exists in the Dataset, append `_1` to the uploaded filename. For example, if `/Users/myUser/data/file.txt` already exists then the newly-uploaded file becomes `/Users/myUser/data/file_1.txt`.
The optional `targetRelativePath` flag enables uploading to a subdirectory in the Dataset:
* ``: This is the path, relative to the root directory of the Dataset, where files will be uploaded. Note that other users with access to the Dataset can alter the file structure, which may require you to modify the destination path accordingly.
If `targetRelativePath` is not specified, files will be uploaded to the root directory of the Dataset.
`fileUploadSetting`, `targetRelativePath`, and their values are case-sensitive.
Example:
```shell theme={null}
domino upload-dataset --fileUploadSetting Overwrite --targetRelativePath Experiments/Run1/Analysis jsmith/global-predictions/global-data /Users/myUser/data
```
### Rename files and folders
You can change the name of the latest version of a file or folder in a Dataset. Domino also does not rename files or folders in snapshots.
You must update references to the original file or folder. If you don't, your Project might not work. For example, you might see inconsistencies in text files and documentation.
1. Go to a Project that uses a Dataset.
2. In the navigation pane, click **Data**.
3. To rename the file or folder, go to the end of the row and click the three vertical dots.
4. Click **Rename**.
5. In the Rename window, enter the **New Name** and click **Rename**.
## Schedule Jobs to update a Dataset
If you have data in an external source from which you want to periodically fetch and load into Domino, you can set up [scheduled jobs](/cloud/platform-capabilities/core-concepts/jobs/schedule-a-job) to write to Datasets.
Suppose you have data stored in an [external Data Source](/cloud/platform-capabilities/features/monitoring/4-set-up-model-monitor/2-connect-a-data-source) that is periodically updated. If you wanted to fetch the latest state of that file once a week and load it into a Domino Dataset, you could set up a scheduled Run:
1. Create a Dataset to store the data from the external source.
2. Write a script that fetches the data and writes it to the Dataset.
3. Create a scheduled Job to run your script with the new Dataset configuration.
The following is a detailed example showing how to fetch a large, dynamic data file from a [private S3 bucket](/cloud/platform-capabilities/core-concepts/data/data-source-connectors/connect-to-generic-s3) with a scheduled Run once a week.
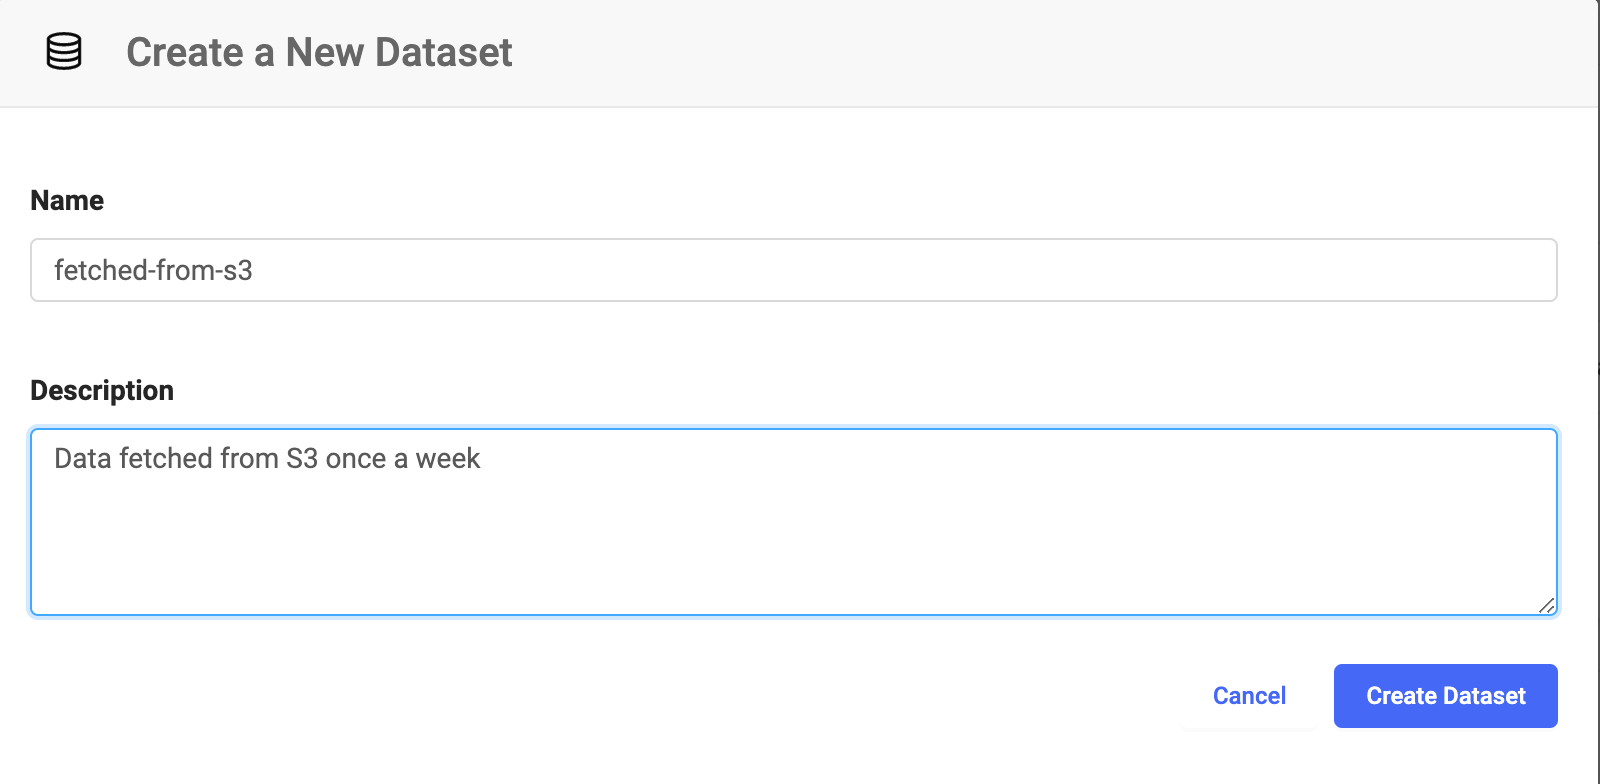
4. Create a Dataset to hold the file. This example shows the Dataset named `fetched-from-s3`.
You can browse your local filesystem or drag and drop files to upload.
To preserve the filesystem structure of your uploads, use the drag-and-drop option. You can pause and resume the upload as needed.
Uploading to a folder can fail if you do not have permissions to write to it. For example, a folder created from a Workspace might not be writable through the UI without appropriate changes to permissions.
Upload all the files in a folder from your local machine to an existing dataset.
This command overwrites existing files unless you use the `‑‑fileUploadSetting` option.
Syntax:
```shell theme={null}
domino [--fileUploadSetting Ignore|Overwrite|Rename] [--targetRelativePath ] //
```
The optional `fileUploadSetting` flag handles path collisions:
* `Ignore`: If a file already exists in the Dataset, ignore the new file.
* `Overwrite`: If a file already exists in the Dataset, overwrite the existing file with the new file.
* `Rename`: If a file already exists in the Dataset, append `_1` to the uploaded filename. For example, if `/Users/myUser/data/file.txt` already exists then the newly-uploaded file becomes `/Users/myUser/data/file_1.txt`.
The optional `targetRelativePath` flag enables uploading to a subdirectory in the Dataset:
* ``: This is the path, relative to the root directory of the Dataset, where files will be uploaded. Note that other users with access to the Dataset can alter the file structure, which may require you to modify the destination path accordingly.
If `targetRelativePath` is not specified, files will be uploaded to the root directory of the Dataset.
`fileUploadSetting`, `targetRelativePath`, and their values are case-sensitive.
Example:
```shell theme={null}
domino upload-dataset --fileUploadSetting Overwrite --targetRelativePath Experiments/Run1/Analysis jsmith/global-predictions/global-data /Users/myUser/data
```
If you don't have the CLI installed, see [Install the Domino Command Line (CLI)](/cloud/reference/cli/install-the-cli) for instructions.
### Download files from Datasets
Use the Domino UI or CLI to download files and folders from your Projects.
1. In your Project, go to **Data** > **Domino Datasets**.
2. Open the Dataset you want to download files from.
3. Navigate to the directory where your files are located.
4. Either:
* Click on the vertical dots next to the file or folder you want to download. Click **Download**. If you are downloading a folder, the downloaded file will be a ZIP or TAR archive, which can be toggled via the `com.cerebro.domino.dataset.batchDownloadArchiveFormat` configuration record key. Otherwise, the file downloads directly.
* Click on the checkboxes to the left of the files and directories you want to download, and then click **Download Selected Items**. If you are downloading a folder or multiple files, the downloaded file will be a ZIP file (default) or TAR archive, which can be toggled via the `com.cerebro.domino.dataset.batchDownloadArchiveFormat` configuration record key. Otherwise, the file downloads directly.
`download` will download the latest copy of your files from the cloud into your current project folder. If you have made changes that conflict with changes in the cloud, you will see both versions of the conflicting file side-by-side.
There are two reasons files in the cloud might change: first, your collaborators on a Project might make changes; second, you might have executed a run that produced new output files.
Example
```shell theme={null}
domino download
```
To download the output files of the given run, please see the [Download files with the CLI](/cloud/reference/cli/download-files-with-the-cli) page.
If you don't have the CLI installed, see [Install the Domino Command Line (CLI)](/cloud/reference/cli/install-the-cli) for instructions.
## Modify Datasets
You can always modify the contents of a Dataset or rename the Dataset.
Always create a snapshot before modifying the contents of a Dataset so that you can always return to the previous version of the data.
### Rename a Dataset
You can change the name of a Dataset.
1. In the navigation pane, click **Data**.
2. Click **Domino Datasets**.
3. Click the Dataset to rename.
4. Go to **More Actions > Rename Dataset**.
5. Enter a **New Name** and click **Rename**.
### Delete a Dataset
If you no longer need the entire Dataset, you can mark it for deletion. When you mark a Dataset for deletion, it removes the Dataset and its associated snapshots from the originating Project and from all projects that it was shared with. Domino executions will not be able to use the Dataset. A Domino administrator must perform the final deletion.
1. In the navigation pane, click **Data**.
2. Click **Domino Datasets**.
3. Click the name of the Dataset to delete.
4. Go to **More Actions** > Click **Delete Dataset**.
5. Click **Delete Dataset** to confirm that you want to mark the Dataset for deletion. Your administrator will permanently [delete the Dataset](/cloud/admin/data-administration/datasets#delete-datasets-and-snapshots).
### Add or remove files
You can add or delete files in a Dataset using the Domino UI. With the CLI, you can add all the files in a folder to a Dataset.
In the navigation pane, click **Data**, then click the name of the Dataset to change.
* To add files, click **Upload files**.
* To delete files, select the files to delete, then click **Delete Selected Items**.
* To rename the Dataset, click **Rename Dataset**, enter the new name, then click **Rename**.
Before deleting a file with a special character like a backslash () in its name, you need to rename it first. You can use a tilde (\~) or colon (:) anywhere in a filename, except at the beginning. If the file that you want to delete has a tilde or colon at the beginning of its name, rename it.
Upload all the files in a folder from your local machine to an existing dataset.
This command overwrites existing files unless you use the `‑‑fileUploadSetting` option.
Syntax:
```shell theme={null}
domino [--fileUploadSetting Ignore|Overwrite|Rename] [--targetRelativePath ] //
```
The optional `fileUploadSetting` flag handles path collisions:
* `Ignore`: If a file already exists in the Dataset, ignore the new file.
* `Overwrite`: If a file already exists in the Dataset, overwrite the existing file with the new file.
* `Rename`: If a file already exists in the Dataset, append `_1` to the uploaded filename. For example, if `/Users/myUser/data/file.txt` already exists then the newly-uploaded file becomes `/Users/myUser/data/file_1.txt`.
The optional `targetRelativePath` flag enables uploading to a subdirectory in the Dataset:
* ``: This is the path, relative to the root directory of the Dataset, where files will be uploaded. Note that other users with access to the Dataset can alter the file structure, which may require you to modify the destination path accordingly.
If `targetRelativePath` is not specified, files will be uploaded to the root directory of the Dataset.
`fileUploadSetting`, `targetRelativePath`, and their values are case-sensitive.
Example:
```shell theme={null}
domino upload-dataset --fileUploadSetting Overwrite --targetRelativePath Experiments/Run1/Analysis jsmith/global-predictions/global-data /Users/myUser/data
```
### Rename files and folders
You can change the name of the latest version of a file or folder in a Dataset. Domino also does not rename files or folders in snapshots.
You must update references to the original file or folder. If you don't, your Project might not work. For example, you might see inconsistencies in text files and documentation.
1. Go to a Project that uses a Dataset.
2. In the navigation pane, click **Data**.
3. To rename the file or folder, go to the end of the row and click the three vertical dots.
4. Click **Rename**.
5. In the Rename window, enter the **New Name** and click **Rename**.
## Schedule Jobs to update a Dataset
If you have data in an external source from which you want to periodically fetch and load into Domino, you can set up [scheduled jobs](/cloud/platform-capabilities/core-concepts/jobs/schedule-a-job) to write to Datasets.
Suppose you have data stored in an [external Data Source](/cloud/platform-capabilities/features/monitoring/4-set-up-model-monitor/2-connect-a-data-source) that is periodically updated. If you wanted to fetch the latest state of that file once a week and load it into a Domino Dataset, you could set up a scheduled Run:
1. Create a Dataset to store the data from the external source.
2. Write a script that fetches the data and writes it to the Dataset.
3. Create a scheduled Job to run your script with the new Dataset configuration.
The following is a detailed example showing how to fetch a large, dynamic data file from a [private S3 bucket](/cloud/platform-capabilities/core-concepts/data/data-source-connectors/connect-to-generic-s3) with a scheduled Run once a week.
4. Create a Dataset to hold the file. This example shows the Dataset named `fetched-from-s3`.
 For this example, assume the S3 bucket is named `my_bucket` and the file you want is named `some_data.csv`. You can set up your script like this:
fetch-data.py
```shell theme={null}
import boto3
import io
# Create new S3 client
client = boto3.client('s3')
# Download some_data.csv from my_bucket and write to latest-S3 output mount
file = client.download_file('my_bucket',
'some_data.csv',
'/domino/datasets/fetched-from-s3/some_data.csv')
```
5. Set up a [scheduled Job](/cloud/platform-capabilities/core-concepts/jobs/schedule-a-job) that executes this script once a week with the correct Dataset configuration.
## Next steps
* [Find a Dataset's path](/cloud/platform-capabilities/core-concepts/data/datasets/use-datasets-and-snapshots)
* [Create and manage Dataset snapshots](/cloud/platform-capabilities/core-concepts/data/datasets/version-data-with-snapshots)
* [Manage large Datasets](/cloud/platform-capabilities/core-concepts/data/datasets/manage-large-data)
* [Share a Dataset](/cloud/platform-capabilities/core-concepts/data/sharing-and-security/share-datasets)
For this example, assume the S3 bucket is named `my_bucket` and the file you want is named `some_data.csv`. You can set up your script like this:
fetch-data.py
```shell theme={null}
import boto3
import io
# Create new S3 client
client = boto3.client('s3')
# Download some_data.csv from my_bucket and write to latest-S3 output mount
file = client.download_file('my_bucket',
'some_data.csv',
'/domino/datasets/fetched-from-s3/some_data.csv')
```
5. Set up a [scheduled Job](/cloud/platform-capabilities/core-concepts/jobs/schedule-a-job) that executes this script once a week with the correct Dataset configuration.
## Next steps
* [Find a Dataset's path](/cloud/platform-capabilities/core-concepts/data/datasets/use-datasets-and-snapshots)
* [Create and manage Dataset snapshots](/cloud/platform-capabilities/core-concepts/data/datasets/version-data-with-snapshots)
* [Manage large Datasets](/cloud/platform-capabilities/core-concepts/data/datasets/manage-large-data)
* [Share a Dataset](/cloud/platform-capabilities/core-concepts/data/sharing-and-security/share-datasets)