> ## Documentation Index
> Fetch the complete documentation index at: https://docs.domino.ai/llms.txt
> Use this file to discover all available pages before exploring further.
# Create NetApp Volumes from Domino or a project
NetApp Volumes are created within an existing filesystem. You can create new NetApp Volumes within a specific project or from globally accessible data.
 ## Create a NetApp Volume from Domino
When you create a new volume from Domino’s home page, you must manually [add the volume to a project](/cloud/platform-capabilities/core-concepts/data/netapp-volumes/add-remove-netapp-volumes).
1. Open **Domino** to create a NetApp Volume.
2. From the toolbar, click **Data** > **NetApp Volumes**.
3. Click **Add NetApp Volume** > **Create Volume**.
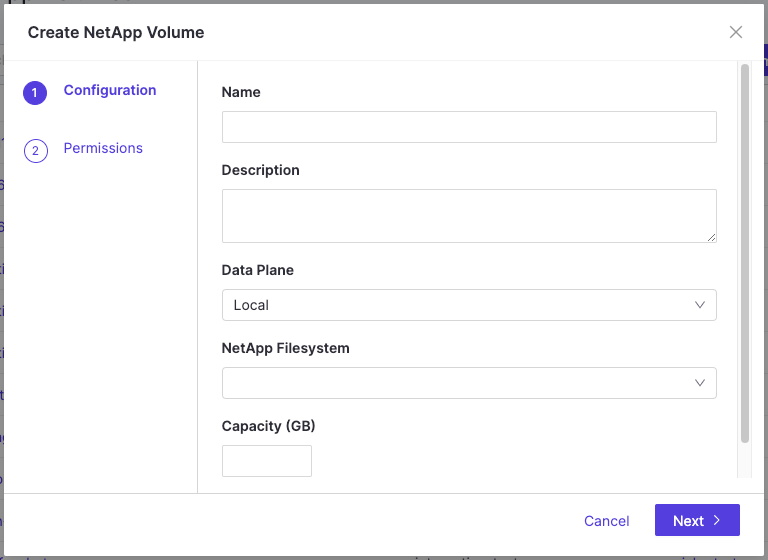
4. Enter the following details in the **Create NetApp Volume** window:
1. **Name:** Enter a name for the volume. Names must contain only letters, numbers, underscores, and hyphens.
2. **Description:** Enter a brief description of the volume.
3. **Data Plane:** Choose a data plane from the menu.
4. **NetApp Filesystem:** Choose a filesystem from the menu.
5. **Capacity:** Specify the maximum capacity of the volume.
5. Click **Next**.
6. [Add users or organizations](#add-users-or-organizations-to-netapp-volumes) to your volume and assign their roles if needed.
7. Click **Finish**.
## Create a NetApp Volume from a project
When you create a new volume within a project, it will automatically be added to that project.
1. Open the **Project** where you want to create a NetApp Volume.
2. From the left panel, click **Data** > **NetApp Volumes**.
3. Click **Add NetApp Volume** > **Create Volume**.
4. Enter the following details in the **Create NetApp Volume** window:
1. **Name:** Enter a name for the volume. Names must contain only letters, numbers, underscores, and hyphens.
2. **Description:** Enter a brief description of the volume.
3. **Data Plane:** Choose a data plane from the menu.
4. **NetApp Filesystem:** Choose a filesystem from the menu.
5. **Capacity:** Specify the maximum capacity of the volume.
5. Click **Next**.
6. [Add users or organizations](#add-users-or-organizations-to-netapp-volumes) to your volume and assign their roles if needed.
7. Click **Finish**.
## Add users or organizations to NetApp Volumes
There are different Roles preconfigured for use with your NetApp Volumes. If you are added to a volume and your assigned role is:
* **Reader:** You can view files and snapshots, and manage NetApp Volumes in projects as read-only.
* **Editor:** You can manage NetApp volumes by updating them, mounting them, marking them for deletion, or restoring them. You can also create and delete snapshots and manage users.
* **Owner:** You have all the capabilities of an Editor and the ability to update Volume grants.
## Create a NetApp Volume from Domino
When you create a new volume from Domino’s home page, you must manually [add the volume to a project](/cloud/platform-capabilities/core-concepts/data/netapp-volumes/add-remove-netapp-volumes).
1. Open **Domino** to create a NetApp Volume.
2. From the toolbar, click **Data** > **NetApp Volumes**.
3. Click **Add NetApp Volume** > **Create Volume**.
4. Enter the following details in the **Create NetApp Volume** window:
1. **Name:** Enter a name for the volume. Names must contain only letters, numbers, underscores, and hyphens.
2. **Description:** Enter a brief description of the volume.
3. **Data Plane:** Choose a data plane from the menu.
4. **NetApp Filesystem:** Choose a filesystem from the menu.
5. **Capacity:** Specify the maximum capacity of the volume.
5. Click **Next**.
6. [Add users or organizations](#add-users-or-organizations-to-netapp-volumes) to your volume and assign their roles if needed.
7. Click **Finish**.
## Create a NetApp Volume from a project
When you create a new volume within a project, it will automatically be added to that project.
1. Open the **Project** where you want to create a NetApp Volume.
2. From the left panel, click **Data** > **NetApp Volumes**.
3. Click **Add NetApp Volume** > **Create Volume**.
4. Enter the following details in the **Create NetApp Volume** window:
1. **Name:** Enter a name for the volume. Names must contain only letters, numbers, underscores, and hyphens.
2. **Description:** Enter a brief description of the volume.
3. **Data Plane:** Choose a data plane from the menu.
4. **NetApp Filesystem:** Choose a filesystem from the menu.
5. **Capacity:** Specify the maximum capacity of the volume.
5. Click **Next**.
6. [Add users or organizations](#add-users-or-organizations-to-netapp-volumes) to your volume and assign their roles if needed.
7. Click **Finish**.
## Add users or organizations to NetApp Volumes
There are different Roles preconfigured for use with your NetApp Volumes. If you are added to a volume and your assigned role is:
* **Reader:** You can view files and snapshots, and manage NetApp Volumes in projects as read-only.
* **Editor:** You can manage NetApp volumes by updating them, mounting them, marking them for deletion, or restoring them. You can also create and delete snapshots and manage users.
* **Owner:** You have all the capabilities of an Editor and the ability to update Volume grants.
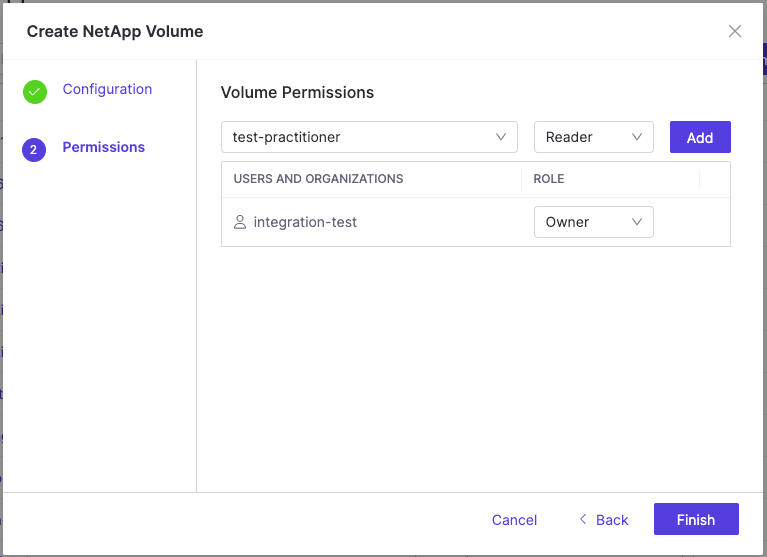 To add users and set permissions for individuals or organizations, on the **Volume Permissions** screen:
1. Type a few characters to select a user or organization from the menu.
2. Select a **Role** for that user from the menu and click **Add**.
3. Repeat steps 1-2 to add as many users or organizations as needed.
4. Once you have added users, click **Finish**.
## Manage users on a NetApp Volume
You can add, remove, or update the roles of users later if needed:
1. Open the **Project** with the NetApp Volume where you want to manage user roles.
2. From the left panel, click **Data** > **NetApp Volumes**.
3. Find the volume in the NetApp Volumes list.
4. Click the three dots to the right and select **Edit permissions**.
5. You can manage users by:
1. Removing users by clicking the delete icon.
2. Adding new users and assigning them roles.
3. Changing user roles as needed.
6. Once finished, click **Save permissions**.
## Next steps
* [Add or remove NetApp Volumes from a project](/cloud/platform-capabilities/core-concepts/data/netapp-volumes/add-remove-netapp-volumes) shows you how to use the different roles that are preconfigured for use with your NetApp Volumes.
* [View or edit details of a NetApp Volume](/cloud/platform-capabilities/core-concepts/data/netapp-volumes/view-and-edit-netapp-volumes) teaches you about viewing lists of NetApp Volumes, and editing the descriptions and permissions of them (only if you are the **Owner** or **Editor** of that NetApp Volume).
* [Request deletion of a NetApp Volume](/cloud/platform-capabilities/core-concepts/data/netapp-volumes/add-remove-netapp-volumes#delete-a-netapp-volume) shows you why and how to request that an admin deletes a NetApp Volume.
To add users and set permissions for individuals or organizations, on the **Volume Permissions** screen:
1. Type a few characters to select a user or organization from the menu.
2. Select a **Role** for that user from the menu and click **Add**.
3. Repeat steps 1-2 to add as many users or organizations as needed.
4. Once you have added users, click **Finish**.
## Manage users on a NetApp Volume
You can add, remove, or update the roles of users later if needed:
1. Open the **Project** with the NetApp Volume where you want to manage user roles.
2. From the left panel, click **Data** > **NetApp Volumes**.
3. Find the volume in the NetApp Volumes list.
4. Click the three dots to the right and select **Edit permissions**.
5. You can manage users by:
1. Removing users by clicking the delete icon.
2. Adding new users and assigning them roles.
3. Changing user roles as needed.
6. Once finished, click **Save permissions**.
## Next steps
* [Add or remove NetApp Volumes from a project](/cloud/platform-capabilities/core-concepts/data/netapp-volumes/add-remove-netapp-volumes) shows you how to use the different roles that are preconfigured for use with your NetApp Volumes.
* [View or edit details of a NetApp Volume](/cloud/platform-capabilities/core-concepts/data/netapp-volumes/view-and-edit-netapp-volumes) teaches you about viewing lists of NetApp Volumes, and editing the descriptions and permissions of them (only if you are the **Owner** or **Editor** of that NetApp Volume).
* [Request deletion of a NetApp Volume](/cloud/platform-capabilities/core-concepts/data/netapp-volumes/add-remove-netapp-volumes#delete-a-netapp-volume) shows you why and how to request that an admin deletes a NetApp Volume.