> ## Documentation Index
> Fetch the complete documentation index at: https://docs.domino.ai/llms.txt
> Use this file to discover all available pages before exploring further.
# Create Projects
> Start a Domino Project from scratch, from a template, or from existing work, and set up the Git credentials that Project creation needs.
## Overview
You can create a Project from scratch, from a Project template, or from existing work by copying or forking another Project. Starting from existing work is often fastest: [search your Domino deployment](/cloud/platform-capabilities/features/collaboration/domino-search) for Projects you can build on, and check the tabs on your **Project's** home page for Projects where you are a collaborator and Projects that Domino recommends.
## How it works
* You choose the [Project type](/cloud/platform-capabilities/core-concepts/projects/index#project-types) when you create the Project: select a Git provider for a Git-based Project, or **Domino (local hosting)** for a Domino File System (DFS) Project.
* Git-based Projects with private repositories need Git credentials stored in your Domino account so Domino can authenticate with your Git provider; public repositories don't. Domino supports HTTPS and SSH connections for both.
* Project templates are supported for Git-based Projects only.
## Add Git credentials
If you are connecting a private repository, want to write commits back to the remote, or use SSH, add Git credentials to your Domino account first. Domino stores SSH private keys, personal access tokens (PATs), and usernames with passwords.
Use an SSH private key when the repository URI has the form:
```
@:/.git
```
Set up SSH access with your Git service first: [GitHub](https://help.github.com/articles/connecting-to-github-with-ssh/), [GitLab](https://docs.gitlab.com/ee/user/ssh.html), or [Bitbucket](https://confluence.atlassian.com/bitbucket/set-up-an-ssh-key-728138079.html).
1. Copy your entire private key, including the `-----BEGIN OPENSSH PRIVATE KEY-----` and `-----END OPENSSH PRIVATE KEY-----` header and footer. If you used the standard name and location, the key is in `~/.ssh/id_rsa`.
2. In Domino, go to **Account** > **Account Settings** > **Git Credentials** and click **+ Add Git Credentials**.
3. Choose the Git service provider, name the credential, and select **Private SSH Key** as the access type.
4. Paste the private key. If the key requires a passphrase, enter it.
5. Click **Add Credentials**.
If your GitHub organization requires single sign-on (SSO), you must [authorize the SSH key for SSO](https://help.github.com/articles/authorizing-an-ssh-key-for-use-with-a-saml-single-sign-on-organization/) before Domino can access private repositories.
Use a PAT when the repository URI has the form:
```
https:////.git
```
Create the token with your Git service first:
* [GitHub PATs](https://help.github.com/articles/creating-a-personal-access-token-for-the-command-line/): grant at least the `repo` and `read:user` scopes. To create a repository from Domino, also grant `api` access. Organizations that require SSO must [authorize the PAT for SSO](https://help.github.com/articles/authorizing-an-ssh-key-for-use-with-a-saml-single-sign-on-organization/).
* [GitLab PATs](https://docs.gitlab.com/ee/user/profile/personal_access_tokens.html): grant at least the `read_api` and `write_repo` scopes. To create a repository from Domino, also grant `api` access.
* Bitbucket over HTTPS requires a [Bitbucket app password](https://confluence.atlassian.com/bitbucket/app-passwords-828781300.html) instead of a PAT.
Then add the token to Domino:
1. Go to **Account** > **Account Settings** > **Git Credentials** and click **+ Add Git Credentials**.
2. Choose the Git service provider, name the credential, and select **Personal access token (PAT)** as the access type.
3. Paste the token and click **Add Credentials**.
For other Git service providers, including AWS CodeCommit and Azure DevOps, Domino supports authentication with an app username and password.
## Create a Project
 1. **Start the Project wizard**:\
In the navigation pane, click **Develop** > **Projects**, then click **Create Project**.
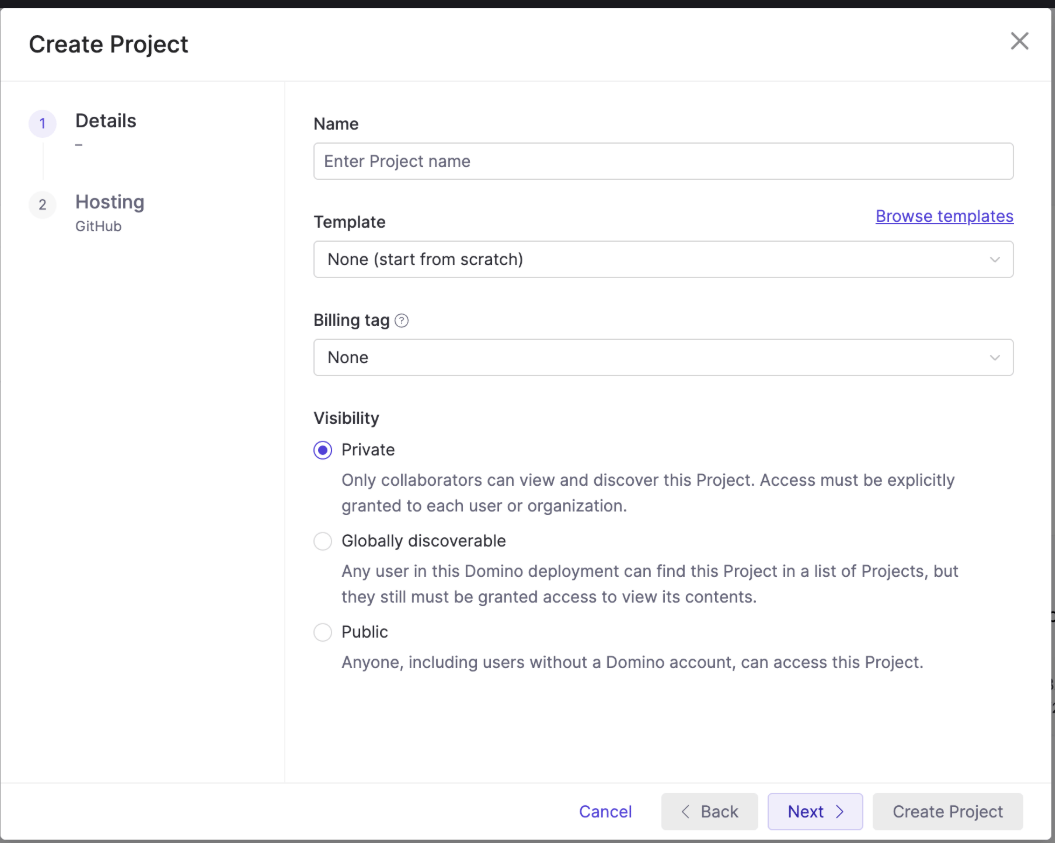
2. **Name and configure the Project**:\
Enter a Project name, select a Project template or **None (start from scratch)**, set the Project's **Visibility**, and click **Next**.
3. **Choose where the code lives**:\
Select your Git provider for a Git-based Project, or **Domino (local hosting)** for a DFS Project.
4. **Connect the repository (Git-based only)**:\
Select your credentials; click **+ Add credentials** if none are listed. Then point Domino at the repository: with SSH credentials, enter the Git repository URL; with PAT credentials, you can also have Domino create the repository or pick one from your provider.
5. **Create the Project**:\
Click **Create**. The Project is ready for you to add files and start work.
If the repository contains files larger than 2 GB, Domino still creates the Git-based Project, but workspace setup can fail. In that case, consider a DFS Project. Use [git-sizer](https://github.com/github/git-sizer) to check the total repository size and the size of individual files.
Project owners can set a default Git branch in [Project settings](/cloud/platform-capabilities/core-concepts/projects/project-settings). The selected branch auto-fills across the Project and can be changed anytime.
## Create a Project from a template
Project templates let you start from a working prototype instead of from scratch, which speeds up setup and spreads your organization's standards. Templates marked **official** are approved by an admin or librarian.
For templates stored in GitHub or GitHub Enterprise, the code repository must be marked as a [template repository](https://docs.github.com/en/repositories/creating-and-managing-repositories/creating-a-template-repository) before Projects can be created from it.
1. On the **Projects** page, open the **Templates** tab. Filter by **Official templates** to see approved ones.
2. Click the template you want to start from.
3. Choose where to store the code:
* **New repository**: Domino creates a repository and copies the template code into it.
* **Existing repository (empty)**: Domino copies the template code into the repository. A `README.md` is overwritten; any other existing file makes the operation fail.
* **Existing repository (with code)**: Domino includes only the template's Project assets and does not copy code files.
## Create a template
To turn one of your Projects into a template:
1. Open the Project and click **Create Template**. For GitHub and GitHub Enterprise, the button only appears if the Project's code repository is a [template repository](https://docs.github.com/en/repositories/creating-and-managing-repositories/creating-a-template-repository).
2. Enter a template name, an optional description, and the access level.
3. Select the assets to copy into the template, and optionally set a default billing tag, default Environment, and default Hardware Tier. Activities, reviews, Workspaces, Jobs, Experiments, and comments can't be copied into a template.
4. Choose where to store the template's code files: the provider, credentials (only PAT credentials are supported), and the repository. An existing repository must be empty; a `README.md` is overwritten, and any other file makes the operation fail.
5. Create the template.
To mark a template as official, open the **Templates** tab, hover over the template, click **Edit Details**, and check **Mark this as an official template**. Only an admin or librarian can set this flag; once a template is official, practitioners can no longer modify or delete it.
## Related
* [Manage Projects](/cloud/platform-capabilities/core-concepts/projects/manage-projects): copy or fork an existing Project instead of creating one.
* [Project settings](/cloud/platform-capabilities/core-concepts/projects/project-settings): defaults for hardware, Environments, and access.
* [Git-based Projects](/cloud/platform-capabilities/core-concepts/projects/git-based-projects): how code syncs after you create the Project.
1. **Start the Project wizard**:\
In the navigation pane, click **Develop** > **Projects**, then click **Create Project**.
2. **Name and configure the Project**:\
Enter a Project name, select a Project template or **None (start from scratch)**, set the Project's **Visibility**, and click **Next**.
3. **Choose where the code lives**:\
Select your Git provider for a Git-based Project, or **Domino (local hosting)** for a DFS Project.
4. **Connect the repository (Git-based only)**:\
Select your credentials; click **+ Add credentials** if none are listed. Then point Domino at the repository: with SSH credentials, enter the Git repository URL; with PAT credentials, you can also have Domino create the repository or pick one from your provider.
5. **Create the Project**:\
Click **Create**. The Project is ready for you to add files and start work.
If the repository contains files larger than 2 GB, Domino still creates the Git-based Project, but workspace setup can fail. In that case, consider a DFS Project. Use [git-sizer](https://github.com/github/git-sizer) to check the total repository size and the size of individual files.
Project owners can set a default Git branch in [Project settings](/cloud/platform-capabilities/core-concepts/projects/project-settings). The selected branch auto-fills across the Project and can be changed anytime.
## Create a Project from a template
Project templates let you start from a working prototype instead of from scratch, which speeds up setup and spreads your organization's standards. Templates marked **official** are approved by an admin or librarian.
For templates stored in GitHub or GitHub Enterprise, the code repository must be marked as a [template repository](https://docs.github.com/en/repositories/creating-and-managing-repositories/creating-a-template-repository) before Projects can be created from it.
1. On the **Projects** page, open the **Templates** tab. Filter by **Official templates** to see approved ones.
2. Click the template you want to start from.
3. Choose where to store the code:
* **New repository**: Domino creates a repository and copies the template code into it.
* **Existing repository (empty)**: Domino copies the template code into the repository. A `README.md` is overwritten; any other existing file makes the operation fail.
* **Existing repository (with code)**: Domino includes only the template's Project assets and does not copy code files.
## Create a template
To turn one of your Projects into a template:
1. Open the Project and click **Create Template**. For GitHub and GitHub Enterprise, the button only appears if the Project's code repository is a [template repository](https://docs.github.com/en/repositories/creating-and-managing-repositories/creating-a-template-repository).
2. Enter a template name, an optional description, and the access level.
3. Select the assets to copy into the template, and optionally set a default billing tag, default Environment, and default Hardware Tier. Activities, reviews, Workspaces, Jobs, Experiments, and comments can't be copied into a template.
4. Choose where to store the template's code files: the provider, credentials (only PAT credentials are supported), and the repository. An existing repository must be empty; a `README.md` is overwritten, and any other file makes the operation fail.
5. Create the template.
To mark a template as official, open the **Templates** tab, hover over the template, click **Edit Details**, and check **Mark this as an official template**. Only an admin or librarian can set this flag; once a template is official, practitioners can no longer modify or delete it.
## Related
* [Manage Projects](/cloud/platform-capabilities/core-concepts/projects/manage-projects): copy or fork an existing Project instead of creating one.
* [Project settings](/cloud/platform-capabilities/core-concepts/projects/project-settings): defaults for hardware, Environments, and access.
* [Git-based Projects](/cloud/platform-capabilities/core-concepts/projects/git-based-projects): how code syncs after you create the Project.