

Prerequisites
Before you begin, make sure you have:- Access to a Domino environment.
- A Domino user account (or the ability to create one using Sign up).
- A GitHub account that you can use for the setup.
- Permissions in GitHub to create personal access tokens.
Step 1: Log into Domino
To start, you need to sign in to your Domino environment. This is where you’ll connect your account to GitHub.- Go to your Domino environment URL in a browser.
- Enter your assigned username and password.
- If you do not have credentials, click Sign up to create an account.
Step 2: Create a GitHub Personal Access Token (PAT)
Next, you’ll generate a personal access token in GitHub. This token acts as a secure key that Domino uses to talk to your GitHub account.- In a separate browser tab, log into GitHub.
- Click your profile icon in the top-right corner and click Settings.
- In the left-hand menu, select Developer settings.
- Select Personal access tokens > Tokens (classic).
- Click Generate new token > Generate new token (classic).
Step 3: Configure the PAT
When you create the token, you’ll decide which permissions it should have. For a quick setup, granting all scopes is easiest. If you prefer, you can limit scopes to just repo and workflow, which are enough for Domino to work properly.- Add a brief description in the Note field.
- Choose an expiry for the token.
- Select the scopes you want the token to have.
- Click Generate token.
- Copy the token and save it in a secure text file on your local machine.
Step 4: Add GitHub credentials to Domino
With your token ready, the next step is to tell Domino about it. You’ll add the token as part of your account credentials.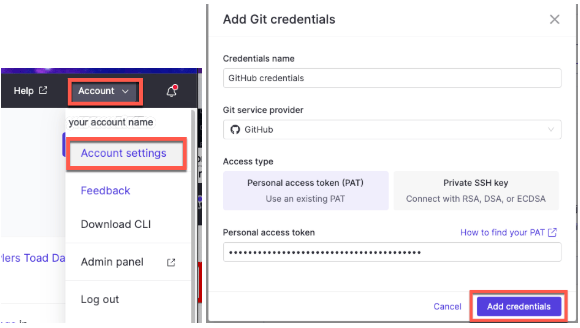
- Return to Domino.
- Click Account in the top-right corner and select Account Settings.
- From the Account Settings panel, select Git Credentials.
- Click Add Git credentials.
- Enter the required fields, including the PAT you generated.
- Click Add credentials.
Step 5: Test the integration
It’s time to make sure everything works. You’ll do this by creating a test project in Domino and linking it to a newly created GitHub repository.- In Domino, go to the Home screen.
- Click Create Project.
-
Enter a project name, such as
test. - In the Code section, select Git Service Provider as the code hosting service.
-
From the Service Provider dropdown, select GitHub.
- Your GitHub credentials are automatically selected in the Git Credentials dropdown if you added them earlier.
- Select the Owner/Organization where the new GitHub repository is created
- Enter a Repository Name.
- Choose the Repository Visibility setting (Public or Private).
- Click Create.
Step 6: Verify the setup
Once the project is created, Domino has created a repository in GitHub that is now linked to the project. This confirms that your credentials and token are working correctly. If the PAT is configured properly, Domino does the following:- Creates a new Domino project.
- Creates a new GitHub repository.
- Links the two together.
Troubleshooting
Sometimes the setup doesn’t go smoothly. If you run into issues, here are a few common things to check:-
Invalid or expired token
- Make sure you copied the entire PAT when you generated it.
- If the token has expired, generate a new one and update your Domino Git Credentials.
-
Missing scopes
- If repository creation fails, verify that your PAT includes at least the repo and workflow scopes.
- For evaluation setups, selecting all scopes avoids scope-related errors.
-
Incorrect credentials in Domino
- Open Account Settings > Git Credentials.
- Confirm that the saved username matches your GitHub account and the token is correct.
-
Network or access restrictions
- Verify that your Domino environment can reach github.com.
- If using an enterprise firewall or VPN, confirm that GitHub is not being blocked.
Next steps
- Use Git-based projects or import Git repositories to use in your Workspace.