

- Amazon EFS
- Azure File Storage
- Google Cloud Filestore
Create and register Dataset storage
Here are some things to keep in mind when creating Dataset Storages:- Admins cannot create a Dataset Storage on the local data plane because there is usually only one, which is associated with the Domino shared store. Multiple Dataset Storages can only exist in the local data plane if a multi-storage account is set up in that data plane.
- Dataset Storages can only be edited if no Datasets are currently using them, to avoid disrupting ongoing dataset work.
- Admins can edit the name, underlying volume, and the is default field.
Create Dataset storage
Prerequisite: If your Kubernetes cluster is not configured to automatically create a Persistent Volume (VC) when a Persistent Volume Claim (PVC) is used, you must set up a Kubernetes PV and PVC in the cluster first. You’ll need to add a few things to the PVS specification:-
Add the label
dominodatalab.com/dataset-storage: <driver>: -
Add the namespace used in your data plane (usually compute):
-
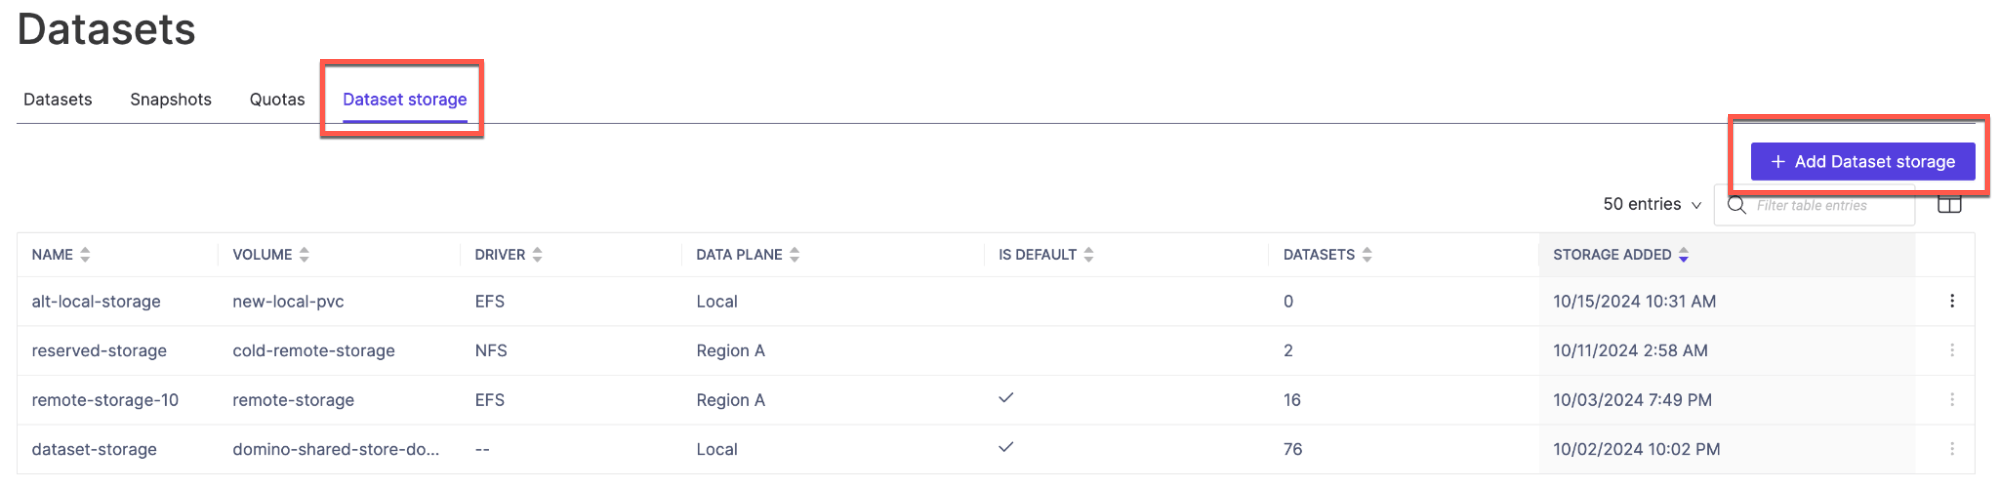
Next, click the Add Dataset Storage button and enter this information:
- Name: specify a name for the Dataset Storage.
- Data Plane: select the data plane you want to use.
- Volume: choose the PVC name from the dropdown.
Register Dataset storage
You’ll need to register your newly created Dataset Storages before users can access it. To register a Dataset Storage:- Go to the Admin UI and select Datasets.
- Click Dataset Storage.
Configurations
The configurations outlined below are set in the config map of a service on remote data planes and impact the datasets located there. These configurations serve as a redundancy measure to ensure that temporary files or files marked for deletion are eventually cleaned up, even if the original process that created them fails to do so. Note: Making the grace period settings too short could result in files being deleted while they are still in use.- cleanDownloadDirsPeriod: Temporary files generated during the download process are regularly cleared.
- cleanDeleteDirsGracePeriod: Frequency files that are scheduled for deletion have been cleared.
- cleanDownloadDirsGracePeriod: Grace period before deleting any temporary files related to the download process.
- cleanDeleteDirsGracePeriod: Grace period before deleting any temporary files related to the delete process.
Associate Data Planes with Datasets
Nexus now includes the Domino Datasets feature, allowing users to create and manage Datasets from remote data planes and using the local data plane. Remote Datasets work just like local ones and support file operations such as snap-shotting, uploading, and downloading. They also have the same permissions that users expect. Users must first obtain data plane permission and the relevant dataset permissions to access remote datasets. We are introducing the concept of Dataset Storage, which refers to the underlying storage that supports a collection of Datasets. Administrators can register, configure, and unregister these Dataset Storages, enabling users to select the Dataset Storage that supports their Datasets. When upgrading to a new release that includes Dataset Storage, the Domino shared storage, and any other storage set up for multi-storage accounts, are linked to the corresponding Dataset Storage.Data Planes
Local data planes, found within the compute namespace in the same cluster as the control plane, are responsible for handling compute operations, such as running a Workspace in the cluster. Remote data planes are the compute planes for other clusters and can connect to the central control plane. Users receive visual feedback on which data plane a Dataset is located in. They can also filter by data plane when creating a dataset or mounting one for an app or launcher. Shared Datasets are logical links that make data accessible within a project, they don’t physically move or copy data. The underlying data stays in its original data plane. Because of this, users can only access Datasets from one data plane at a time, whether through the UI or executions.Dataset storage
Dataset Storage refers to a method of managing storage in Kubernetes. It works with PersistentVolumeClaim and PersistentVolume (PVC/PV) to provide the storage needed for Datasets. Here are some essential things to know about how dataset storage functions in Domino:- Each dataset storage is mapped 1:1 to a corresponding PVC/PV pair.
- A particular dataset storage can be associated with anywhere from zero to many Datasets.
- A data plane can have anywhere from zero to many dataset storages.
- Dataset storage can be in the local data plane or in any remote data plane that supports datasets in Nexus.
Monitor Dataset usage
From the Admin application, go to Manage resources > Datasets. The Datasets page shows information for Datasets and Snapshot such as the following:- Total storage size used by all stored Datasets/Snapshots.
- The size of all storage used by Datasets/Snapshots marked for deletion.
- A table of all Datasets/Snapshots from the history of the deployment. You can sort the table by status, size, and the name of the containing Project/Dataset.
Set limits on Dataset usage
If you want to limit the storage consumed in Datasets, please reach out to Domino Support. If a Dataset reaches one of these limits and a user starts an execution with a Dataset configuration that can output a new Snapshot, they receive an error message. Before additional Snapshots can be written, you must delete old snapshots or increase the limit. You can authorize individual projects to ignore these limits.- Go to the project whose limits you want to ignore.
- Click Settings. In the Hardware & Environment tab, select the Ignore Dataset Limits checkbox.
Delete Datasets and snapshots
You (an administrator) can delete entire Datasets or individual Snapshots. Domino recommends the following process for Dataset and Snapshot deletion.- The user who owns the Dataset marks it for deletion, excluding it from any new executions that start. Non-administrator users can never permanently delete a Dataset or Snapshots.
- You (the administrator) then delete the Dataset or Snapshot, if appropriate.
- Go to Admin > Manage resources > Datasets.
- Click the Datasets tab or the Snapshots tab.
-
At the end of the row for the item to delete, click the three vertical dots and then click Delete.
If you confirm the action, the system permanently deletes the item. If the action was initiated by mistake, you can still recover a dataset or snapshot before the delete grace period (
com.cerebro.domino.dataset.graceTimeForDeletion) expires.
The delete confirmation identifies the projects using a given Dataset or Snapshot. If you delete Datasets that are used by several projects, it can be disruptive because users no longer have access to this data. Consider notifying users when you think the impact of the deletion might be significant.
Set up multiple storage accounts
When your storage account is filling up, you can configure an additional storage location where Domino can store all future datasets and snapshots. Updates to existing datasets and snapshots are made in their original storage location, while new datasets and snapshots are stored in the secondary location. You can do this again if the secondary storage location also fills up.We recommend reaching out to your Domino field team to understand whether this solution is appropriate for your scenario.
Set up new storage account & Kubernetes resources
-
Create a new storage account.
This can be in the cloud or anywhere, as long as it can be registered as a Kubernetes Persistent Volume resource, and made accessible to Domino deployments (namely
nucleus-*andrun-*). - Create the appropriate PV/PVC pairs for the new storage account in the Domino cluster. Two pairs of PV/PVC should be created in this step: one in the platform and one in the compute namespace. The content of the PV/PVC varies according to your choice of storage.
- Make the PV/PVC accessible to other resources within the cluster. The newly created PV/PVC must be accessible by pods in the platform and compute namespace. Depending on your choice of storage, this can mean creating appropriate Kubernetes secrets for the new storage, editing the storages network policies to authorize write-access, and so on.
-
Edit the Kubernetes
nucleus-*deployments to mount the newly registered PV at a specificmountPoint. -
Once the pods have restarted, test that the PV can be accessed correctly:
-
Execute inside one of the
nucleus-frontendpods. -
Navigate to the specified
mountPoint. - Try to write a test file.
-
Execute inside one of the
Enable multi storage in the Domino UI
Start this procedure only after successfully completing step 5 above. At this point, you should have a new storage account that is accessible to Domino via its own PV/PVC pairs. To instruct Domino to write every future dataset and snapshot in the new storage account, follow the below steps:-
Go to Admin > Platform settings > Configuration records, and add the following key/value pair in the
commonnamespace:-
com.cerebro.domino.datacache.pvc.names- This is a comma-separated list of all compute-PVC names used for dataset/snapshot storage at Domino. If you only added one additional storage account, this list should contain two PVCs: the original one and the newly created one. -
com.cerebro.domino.datacache.pvc.originalName- The compute-PVC name corresponding to the original Domino storage (this defaults to the first PVC in the comma-separated list of step 1). -
com.cerebro.domino.datacache.pvc.primaryName- The compute-PVC name of the volume in which you would like to store every next dataset and snapshot. -
com.cerebro.domino.datacache.pvc.<COMPUTE-PVC-NAME>.mountPoint- Configure this for each PVC name specified in step 1; it is the mount point at which the PVC is mounted in thenucleus-*deployments.
All the PersistentVolumeClaims (PVC) specified in the configuration records settings above must correspond to the claim names in the*-computenamespace. -
- Restart the necessary services as specified at the top of the Configuration records page.
-
Test that all dataset-related features work properly in the new storage account:
- Create a dataset and uploading data to it.
- Take a snapshot.
- Download data from a dataset/snapshot.
- Delete a dataset/snapshot.
- Mount datasets/snapshots to executions.
Contact Domino Support if the dataset-related features are not working properly, as you may need to adjust your settings.
Preserve changes to Kubernetes deployments throughout upgrades
To preserve the changes made to thenucleus-* deployments and ensure that multi-storage support continues to work properly after a Domino upgrade, you must add the following specs to the custom agent.yaml, inside the nucleus > chart_values section:
Datasets workflow updates
Here are the general updates for the user interface that apply to all Datasets in version 6.0.0 and the cloud, following the August release.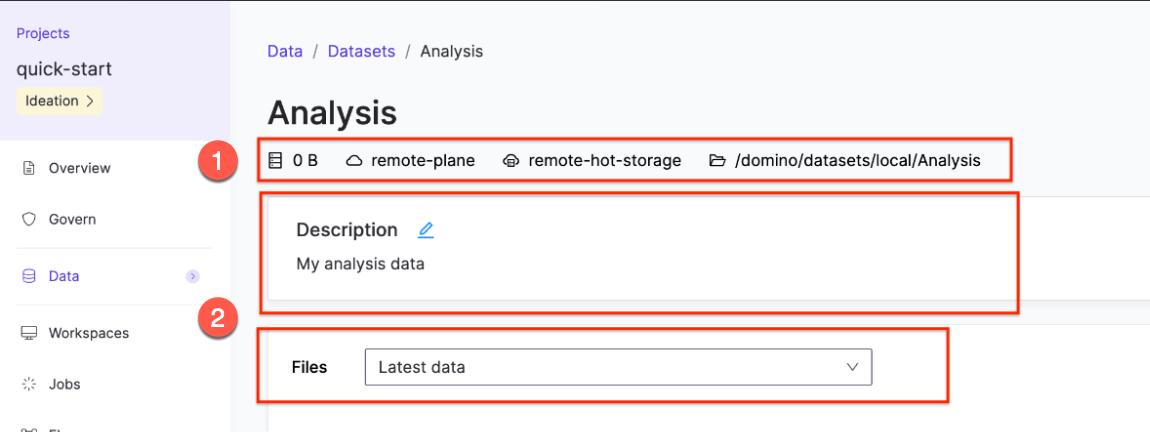
-
New Icons: The Datasets page now shows new icons to display information from left to right:
- Dataset size: total of both read-only and read-write snapshots
- Data plane: origin of that Dataset
- Storage amount: used by the Dataset
- Directory: location of the Dataset
-
Description and Files: there are a few updates to the functionality of these fields:
- Description: Field is now in a separate white panel to make it more transparent.
- Files: The dropdown to switch between snapshots has been renamed to refer to files from the latest snapshot data.
- Dropdown bar: the width has been reduced to take up less space.
Other UI updates
In addition to new icons and improvements, there is a new dropdown to select a data plane along with the corresponding Dataset Storage for the following:- Jobs
- Scheduled Jobs
- Workspaces
- Apps
- Launchers