

Data engineering in Domino
Before you can load the files into Snowflake, you need to download and adapt them to the format that would work for its data-loading functions. This document will guide you on how to prepare your data through the following steps:- Download the dataset files.
- Adapt them to a CSV or another character-delimited file (because commas don’t work in all situations).
- Upload the file into Snowflake using the SnowSQL tool.
- Use SnowSQL to load the files into database tables.
Big data in Domino: Domino Datasets
When you want to download a large file in the hundreds of megabyte size range or larger, or have a vast number of data files to process, Domino recommends that you use your project’s Dataset facility instead of files. Besides a clean separation between your code and data, Datasets also allow Domino to optimize file storage and file sharing, and create an easy way to load data into your Environment. Since the first file is at least 11GB, use a Domino Dataset.-
Log into Domino and create a new Project called
Snowflake-Quickstart. - Open a new Workspace, normally the Domino default Environment with Python, and choose JupyterLab as your IDE.
- Click Launch. A new browser tab will open and your Workspace will start loading. After a minute or two – depending on the availability of resources in your Domino Environment – the Workspace will open and display a Launcher page.
- In the Other section, click on the Terminal shortcut to start a terminal. This will allow you to access and manipulate data files using Linux’s built-in file processing tools.
-
Since you are downloading large amounts of data, you need to store the data in a Domino Dataset. Domino’s Datasets reside in a special directory. Switch to that directory for the time being:
-
Use the
wgetcommand to download the dataset files: -
Unzip the large
superghcnd_full_*file using thegunzipcommand:Replace<date>with the specific date shown in the filename. Depending on the Domino instance you are using, this extraction can take a while. You can add an ampersand (&) to the end of the line to run the command in the background.
Format the file
While the main data file is a ‘proper’ CSV file, these metadata files use size-delimited fields (column width as measured in the number of characters). For example:|) as the delimiter (the vertical bar is a Unix operand), it will make do for this example Project. Since Snowflake does not support field size-based data ingestion, you need to use regular expressions and classic Unix utilities, such as sed and tr, to modify this file to add a delimiter. Sed is a stream editor, i.e. it reads chunks, normally lines, and can modify each line independent of the next. In general, sed works in a nifty way when using (truly basic) regular expressions:
sed as follows:
. (any character), then replace the twelfth character with a vertical bar (|).
These directives are repeated throughout the line, separated by semicolons, to place vertical bar characters to delimit the fields based on the number of characters in the line. The outcome looks like this:
Collect a data subset
Western Europe has consistently collected weather data over the last 70 years or so for Germany (mostly West Germany), Italy, France, Spain, United Kingdom, Portugal, The Netherlands, Belgium, Switzerland, and Austria. Therefore, datasets as big as 100GB are reasonable in the real world. However, you can extract a subset of this data (with weather information for Western Europe) of around 2GB to simplify matters. Since each entry in the dataset represents one data item per weather station, it starts with the weather station’s ID. That ID starts with the country code, so you can filter the dataset to return only the information you need for these countries.-
Use the
sedtool to find the identifying country codes then extract the data from the big dataset you unzipped.-
One way is to look for one country, get the country code, and extract its data from the full dataset into a file.
Which will return the code for The Netherlands:
-
Alternatively, you can abbreviate it to this:
The result:
-
One way is to look for one country, get the country code, and extract its data from the full dataset into a file.
-
Next, you can extract the data from the dataset for one country like this:
To break it down:
-
-n– Suppresses the output. -
/^NL.*– Returns lines starting with (^) NL, followed by any number of characters. -
/p– Prints the line. -
> netherlands_data.csv– Redirects the output to a new CSV file.
-
-
You can combine all these statements for all the countries in all the lines into one command using the codes you extracted:
-
Use an identical approach on the weather stations and inventory files:
Load the data into Snowflake
The data is loaded into Snowflake through staging, which refers to either uploading the data to a special area in your Snowflake account or having Snowflake pull your data from an AWS or Azure data store. In this tutorial, you will follow the local file-to-stage route. To upload the data and work with Snowflake directly, Snowflake offers a powerful command-line tool, called SnowSQL.Connect to the Environment
Domino offers a Snowflake-optimized Environment that has the tool preinstalled. To connect to this Environment, you need your account ID, username, and password, along with the names of your warehouse, database, and schema (which is oftenPUBLIC). Once connected, you will get an interface to your very own cloud database.
-
The fastest way to connect is via command-line options such as the following:
Note that in Domino, you may first need to delete the
.snowsql/logfile using: - Once connected, enter your password when prompted.
Create the schema
Going forward, all steps are executed in SnowSQL.
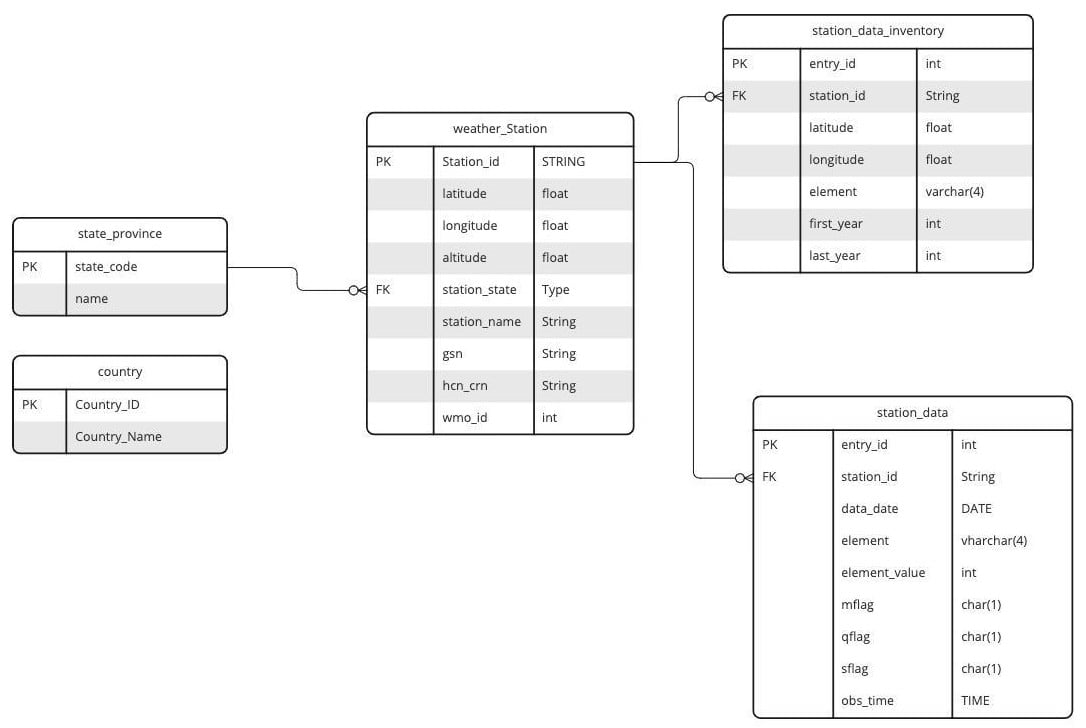
-
Below is the corresponding SQL code to create the tables. Run this script, command by command, in SnowSQL:
-
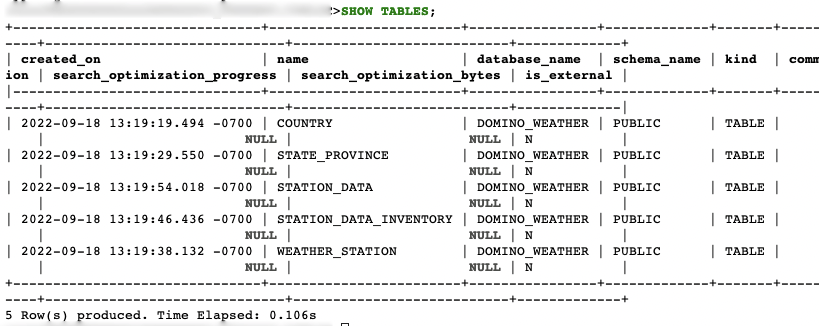
To see the tables, run the following command:
Upload and stage the data
Create a file format object
The following steps are based on Snowflake’s own SnowSQL data loading tutorial. To upload the data you wrangled in the previous steps:-
Create a file format object – this helps guide Snowflake on how to read your file and map it into your database tables. Although the file type is still CSV (comma-separated values), remember to specify
|as the field delimiter. For example: -
Create another file format for the main data file, which uses commas as delimiters:
Create the staging area
Create the stage (i.e. the holding area for uploaded files) and add the file format specification to it (the other file format will be used later):weather_csv_stage to hold your uploaded data.
Upload the data files
-
Upload the files from Domino. Make sure you adjust the command to the correct directory for your dataset:
The result should look like this:

-
You can also list the files you uploaded using the following command:
-
Upload your Western European data file:
This might take a while, but eventually, the result should look something like this:

Copy data files into tables
-
Use the
COPY INTOcommand to load the data into the Snowflake database tables. Start with the smaller files and ensure foreign key constraints are documented, as Snowflake does not enforce referential integrity:These are relatively straight-forward and should result in something like this: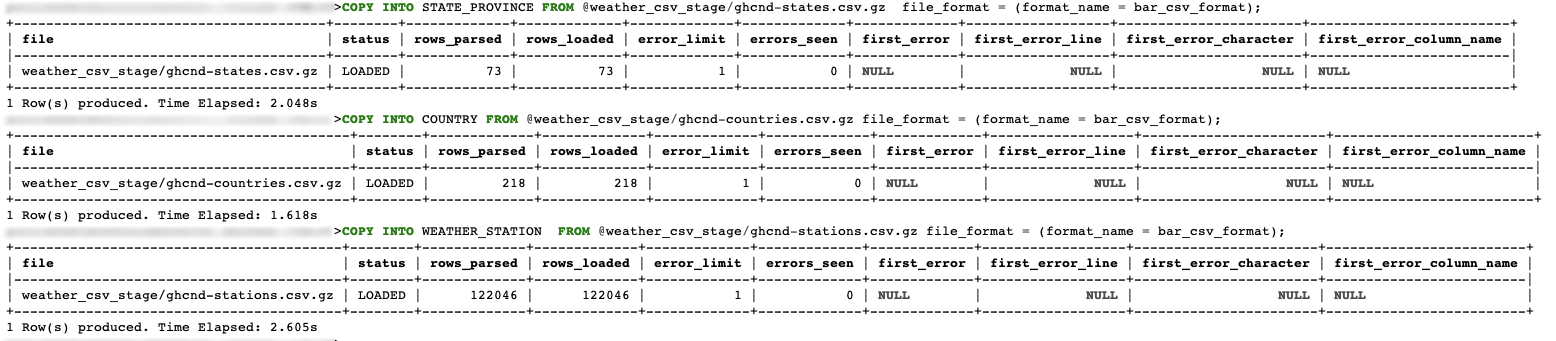
-
The station data inventory is slightly more complex. You are using an artificial identity field as the primary key, which requires that you load data from the CSV file into specific columns. This is done with a subquery, for example:
The query will result in hundreds of thousands of rows being loaded. Snowflake will show you how many rows were ready in the result. Note the use of the
ON_ERROR = CONTINUEbehavior in the query - you can tolerate missing a small number of rows as these are very large data files that can result in errors. -
Finally, load the Western Europe dataset in a similar fashion:
You should have approximately 120 million rows of data.
-
To demonstrate the speed at which Snowflake executes queries, try running the following query to count how many unique station IDs exist in this large table: