

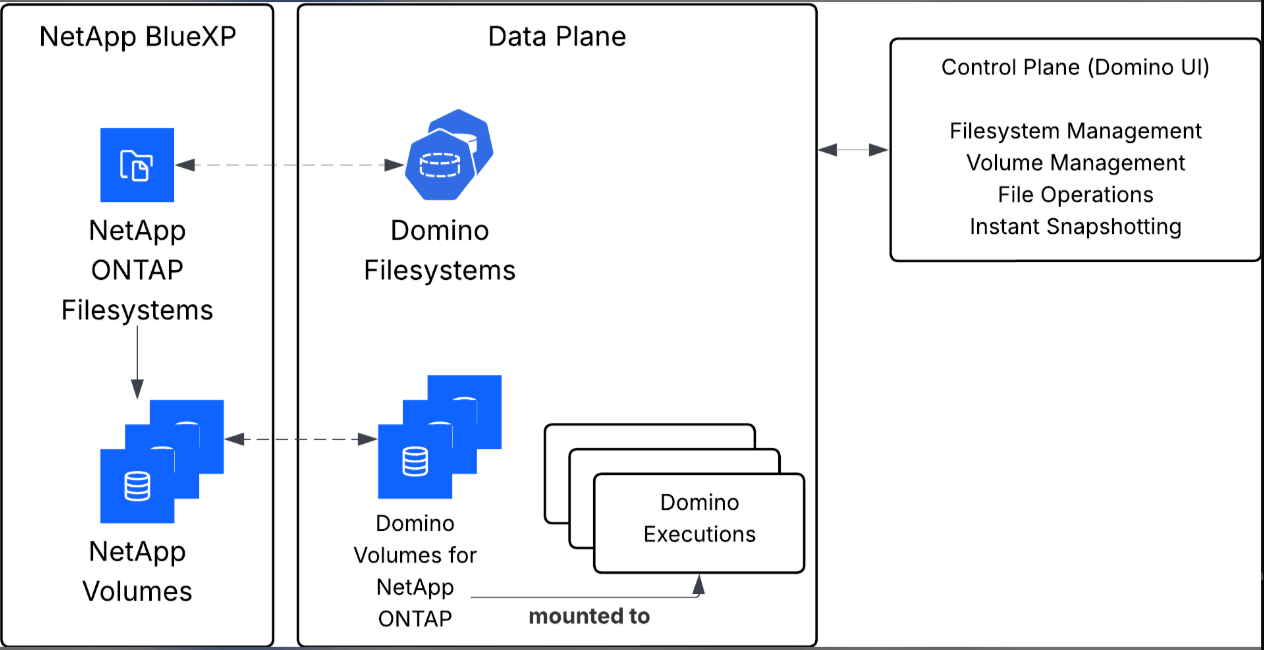
How ONTAP filesystems work in Domino
NetApp Volumes live inside ONTAP filesystems. A NetApp ONTAP filesystem defines where NetApp Volumes live by linking a Data Plane and a storage class to a named storage container. That binding gives you:- Clear visibility into where each NetApp Volume is stored.
- Support for multiple accounts and Data Planes, which matters because NetApp Volume counts are capped per account.
- A deletion flow that moves a NetApp Volume to cold storage instead of destroying it, so retention policies are enforceable and accidental data loss is less likely.
Prerequisites
Set up NetApp Volumes
1
Configure Kubernetes for Domino
A Kubernetes Apply all three:
Role and RoleBinding let the microservice authenticate and communicate with Trident, and a NetworkPolicy allows the right Kubernetes resources to reach Trident.2
Configure the Trident backend
The Apply it, then check that the backend is bound and online:A storage class then lets users dynamically provision NetApp Volumes on that backend:
TridentBackendConfig (TBC) custom resource tells Trident how to connect to your FSx for NetApp ONTAP filesystem. Create trident-backend.yaml, replacing the placeholders with the details from your Terraform output:svm: the name of the Storage Virtual Machine (SVM).fsxFilesystemID: the ID of the filesystem.apiRegion: the AWS region where your FSx filesystem is deployed.credentials.name: thecreds_secret_arnfor the SVM.
3
Create the root PVC
The filesystem you created in Amazon FSx or NetApp Cloud ONTAP includes a root ONTAP volume at the path Apply it and confirm that the returned message indicates Your Domino deployment is now configured to use NetApp Volumes.
/, the base on which all other NetApp Volumes are mounted. Domino reaches it through a Kubernetes PersistentVolumeClaim (PVC) that imports it.STATUS - Success:Register an ONTAP filesystem
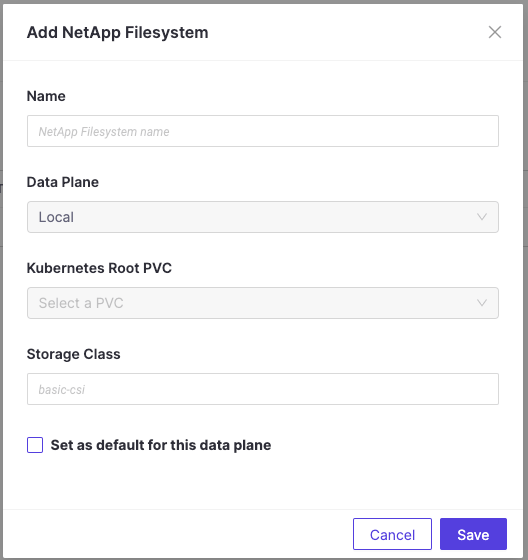
Registering a filesystem is what makes the storage usable from Domino. After that, the same area of the Admin application lets you view, audit, and manage individual NetApp Volumes.- In the Admin panel, go to Manage Resources > NetApp Volumes, then select the ONTAP tab.
- Click Add Filesystem.
-
Provide the following:
- Name: 1 to 250 characters, which can include letters, digits, underscores, hyphens, and spaces.
- Data Plane: select from existing Data Planes. This defines where the data resides.
- Kubernetes Root PVC: the name of the root PVC, which must exist in the selected Data Plane.
- Storage Class: the Kubernetes storage class name that uses Trident as the provisioner.
- Click Save.
Review NetApp Volumes
Go to Admin panel > Manage Resources > NetApp Volumes, then select the Volumes tab to see every configured NetApp Volume and its key details.Related
- Create NetApp Volumes covers what practitioners do once a filesystem is registered.
- Domino Volumes API manages NetApp Volumes programmatically.
- External Data Volumes mount storage that Domino does not manage, distinct from NetApp Volumes.