

Create a Data Source
1
Open the Data Source wizard
Go to Manage Resources > Data Sources, then click Connect to External Data.
2
Configure the connection
Select your Data Source, then enter the configuration details for accessing it. The details vary depending on the Data Source type.
3
Select the credential type
End users cannot access or extract Service Account credentials, nor can they manage user-level permissions on such Data Sources. Domino stores Data Source credentials in the Domino secret store, which is backed by HashiCorp Vault.
OAuth authentication is not supported for Service Accounts. The Data Source itself does not distinguish end users, because the same credentials authenticate every query.
4
Enter and test the credentials
Enter your credentials for Data Source authentication, then click Test Credentials to verify that authentication works, or click Skip for Now to continue.
5
Set access and finish
Select whether Everyone can use this Data Source or just Specific users or organizations, then click Finish Setup.
Authentication methods
Data Sources support multiple authentication methods to meet different security requirements. Domino manages authentication configuration for cloud deployments, so you can focus on connecting to your data. Authentication methods vary by Data Source, including support for credentials, OAuth, key pair, and certificate authentication. Contact Domino Support to enable additional authentication methods for your Data Sources or remove existing ones.IAM authentication for AWS Data Sources
You can enable users to create Data Sources that authenticate with AWS Identity and Access Management (IAM) for these Data Source types:IAM-authenticated connections can be used only to execute Jobs and Workspaces. Other execution types, such as scheduled Jobs and Domino endpoints, require basic authentication.
OAuth for Snowflake
OAuth-backed Snowflake Data Sources authenticate and query Snowflake with a JSON Web Token (JWT). Once it is set up, users can select OAuth when they create a Snowflake Data Source. When an OAuth-configured Snowflake Data Source is queried in a Domino execution, thedominodatalab-data library uses the Domino JWT token to authenticate against the underlying Snowflake database. No extra user action is needed.
Setup has two halves. First, an External OAuth Security Integration in your Snowflake account dictates what values Snowflake expects the token to carry. Second, Keycloak mappers propagate those values into the Domino JWT access token.
OAuth is not supported for Service Accounts. OAuth-authenticated connections can be used for any execution type except Domino endpoints.
Because authentication depends on the Domino JWT token propagating the correct values in the context of an execution, you cannot verify successful authentication when you create a Data Source. The green checkmark that appears when you create a Data Source does not guarantee that authentication succeeds. To confirm successful value propagation in a Domino JWT token, use the
dominodatalab-data library to query data from an OAuth Data Source in a Domino execution, such as a Workspace.Configure the Snowflake security integration
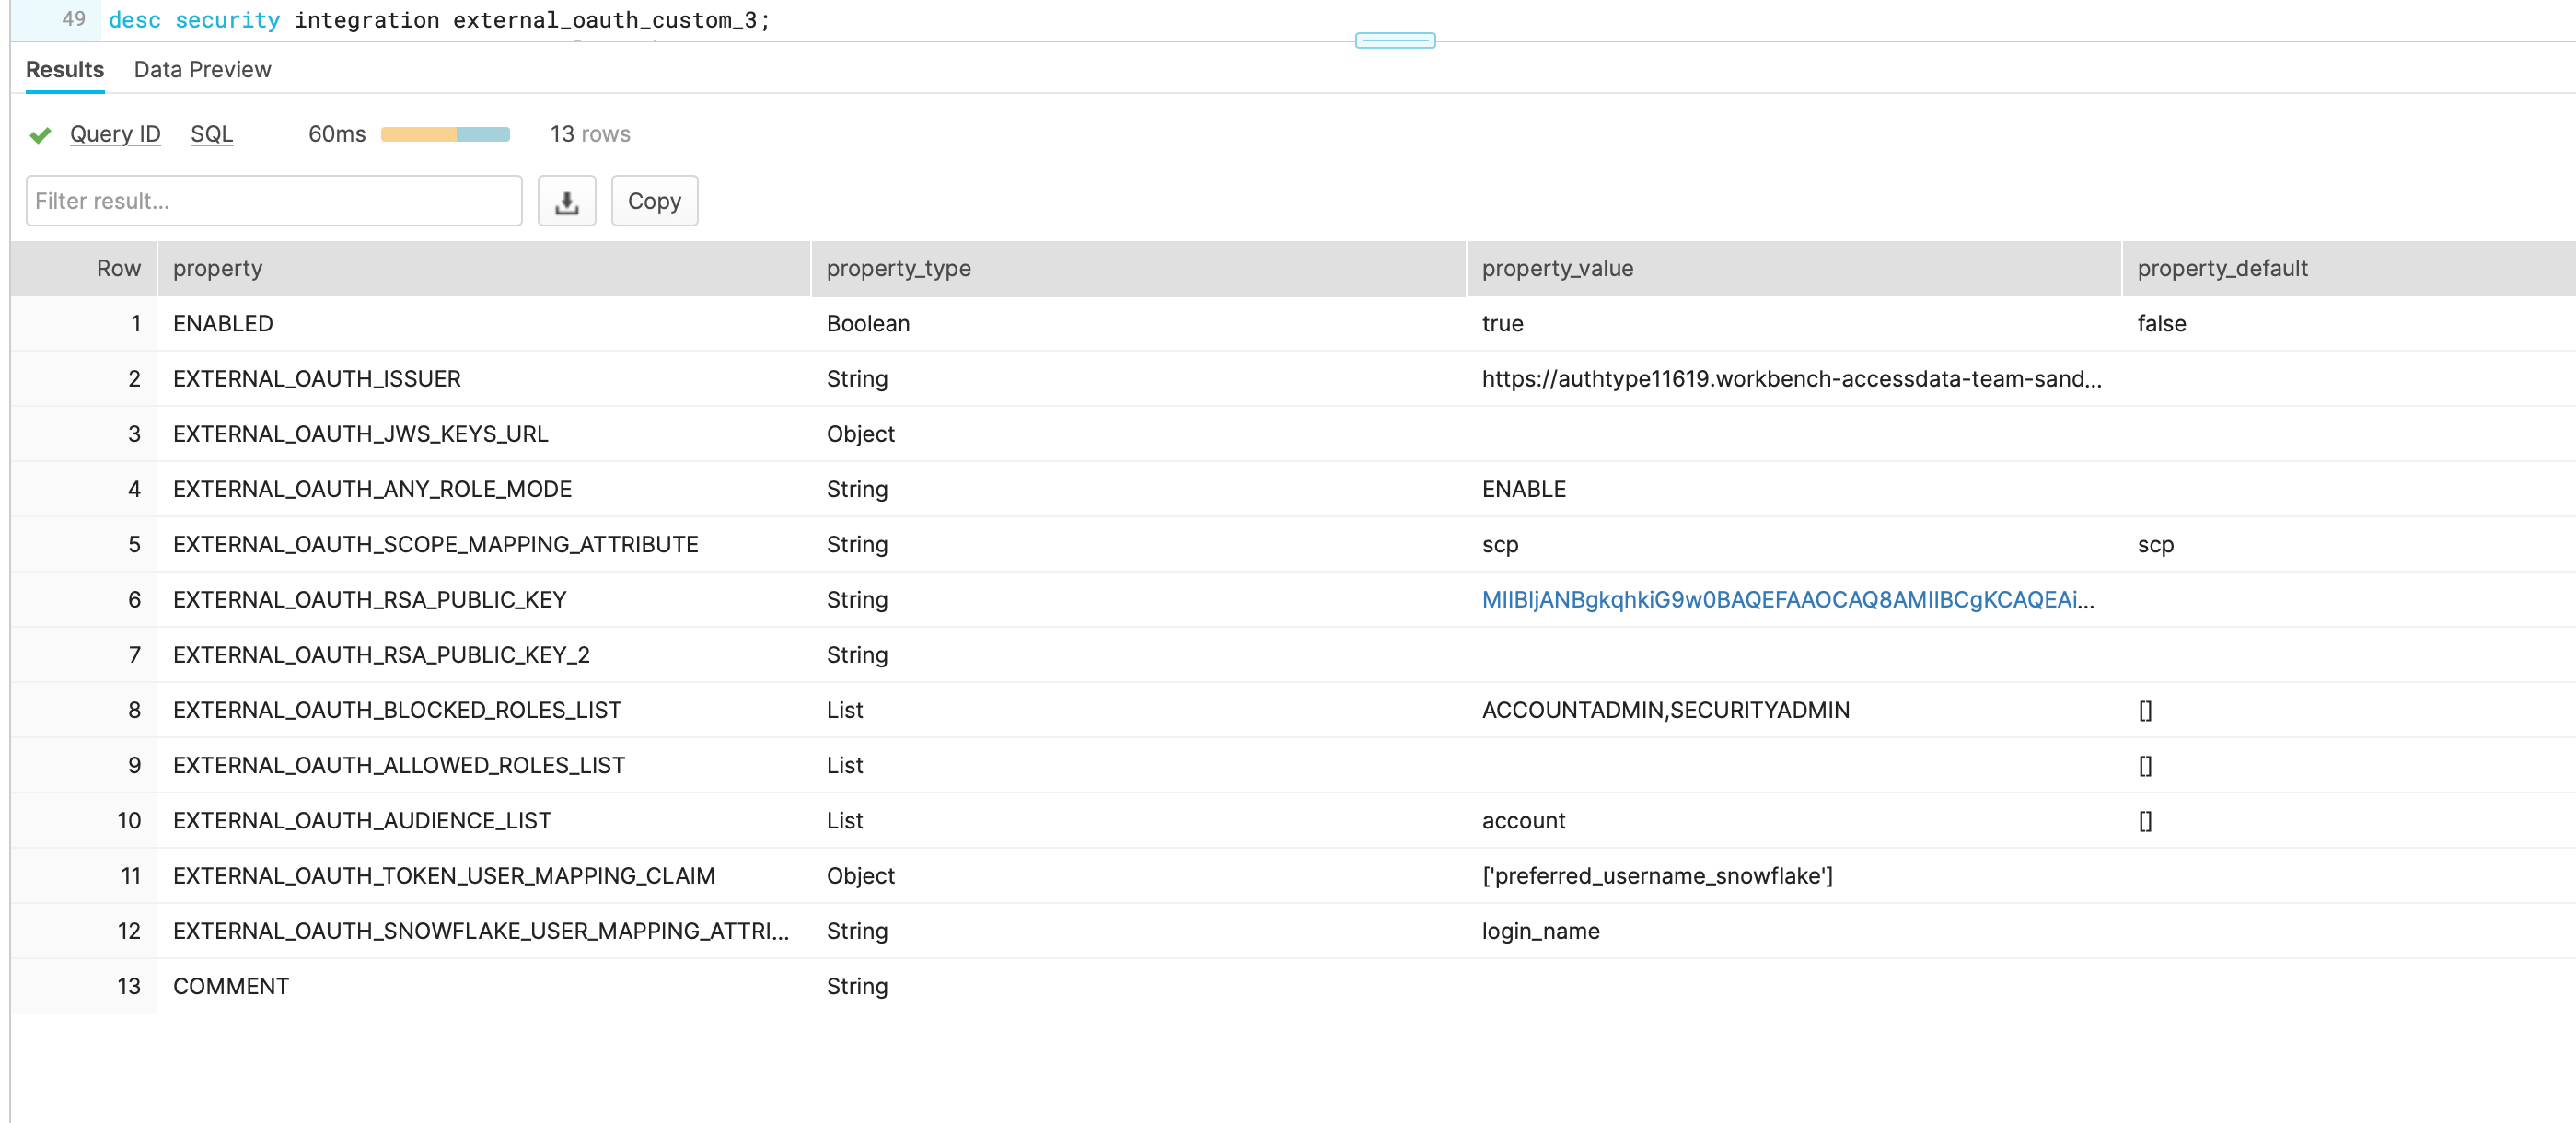
To set up an External OAuth Security Integration in Snowflake, see the Snowflake external OAuth documentation. Get familiar with the Snowflake terminology and the values that Snowflake needs in the token; correct spelling of the values is critical. The following is a sample command to create a base security integration that allows all account roles to authenticate. Use it as a starting point for a configuration that fits your security needs.-
external_oauth_issuerin Keycloak’s Realm Settings > OpenID Endpoint Configuration > Issuer -
external_oauth_rsa_public_keyin Keycloak’s Realm Settings > Keys > Public Key from RS256
desc security integration <external_oauth_name>) should look similar to the following:
Configure Keycloak
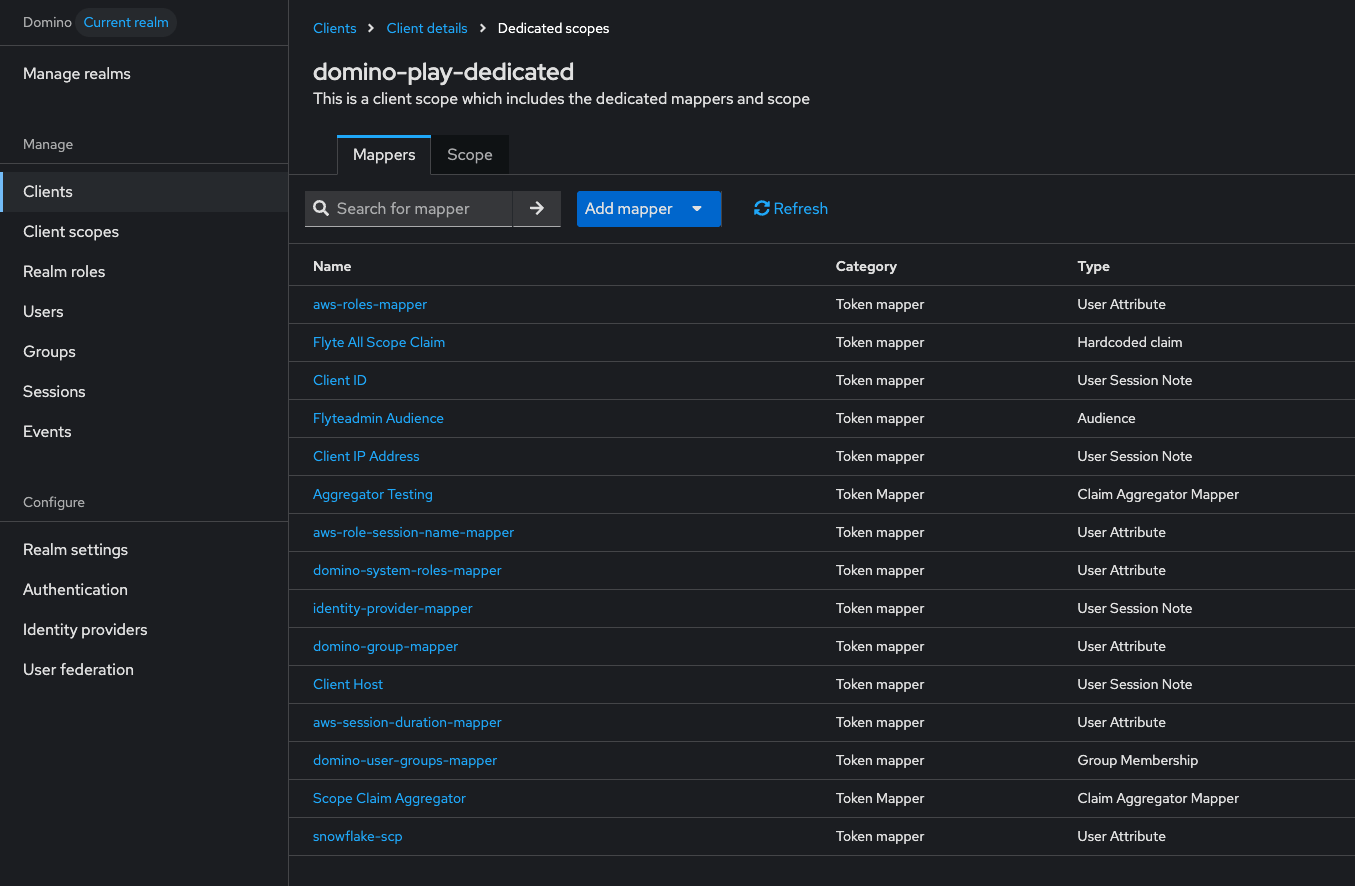
Keycloak passes the values that the Snowflake security integration expects by way of mappers in thedomino-play client. Each mapper is set to add to access token, which creates a key-value entry in the Domino JWT token keyed on Token Claim Name.
The value depends on the mapper type. A hardcoded-claim mapper takes a value that propagates equally to all users. A user-attribute mapper takes a User Attribute name, reads that attribute from each Keycloak user, and propagates its value, so you can vary the token per user.
1
Open the Keycloak client scopes
Go to the Keycloak admin console at 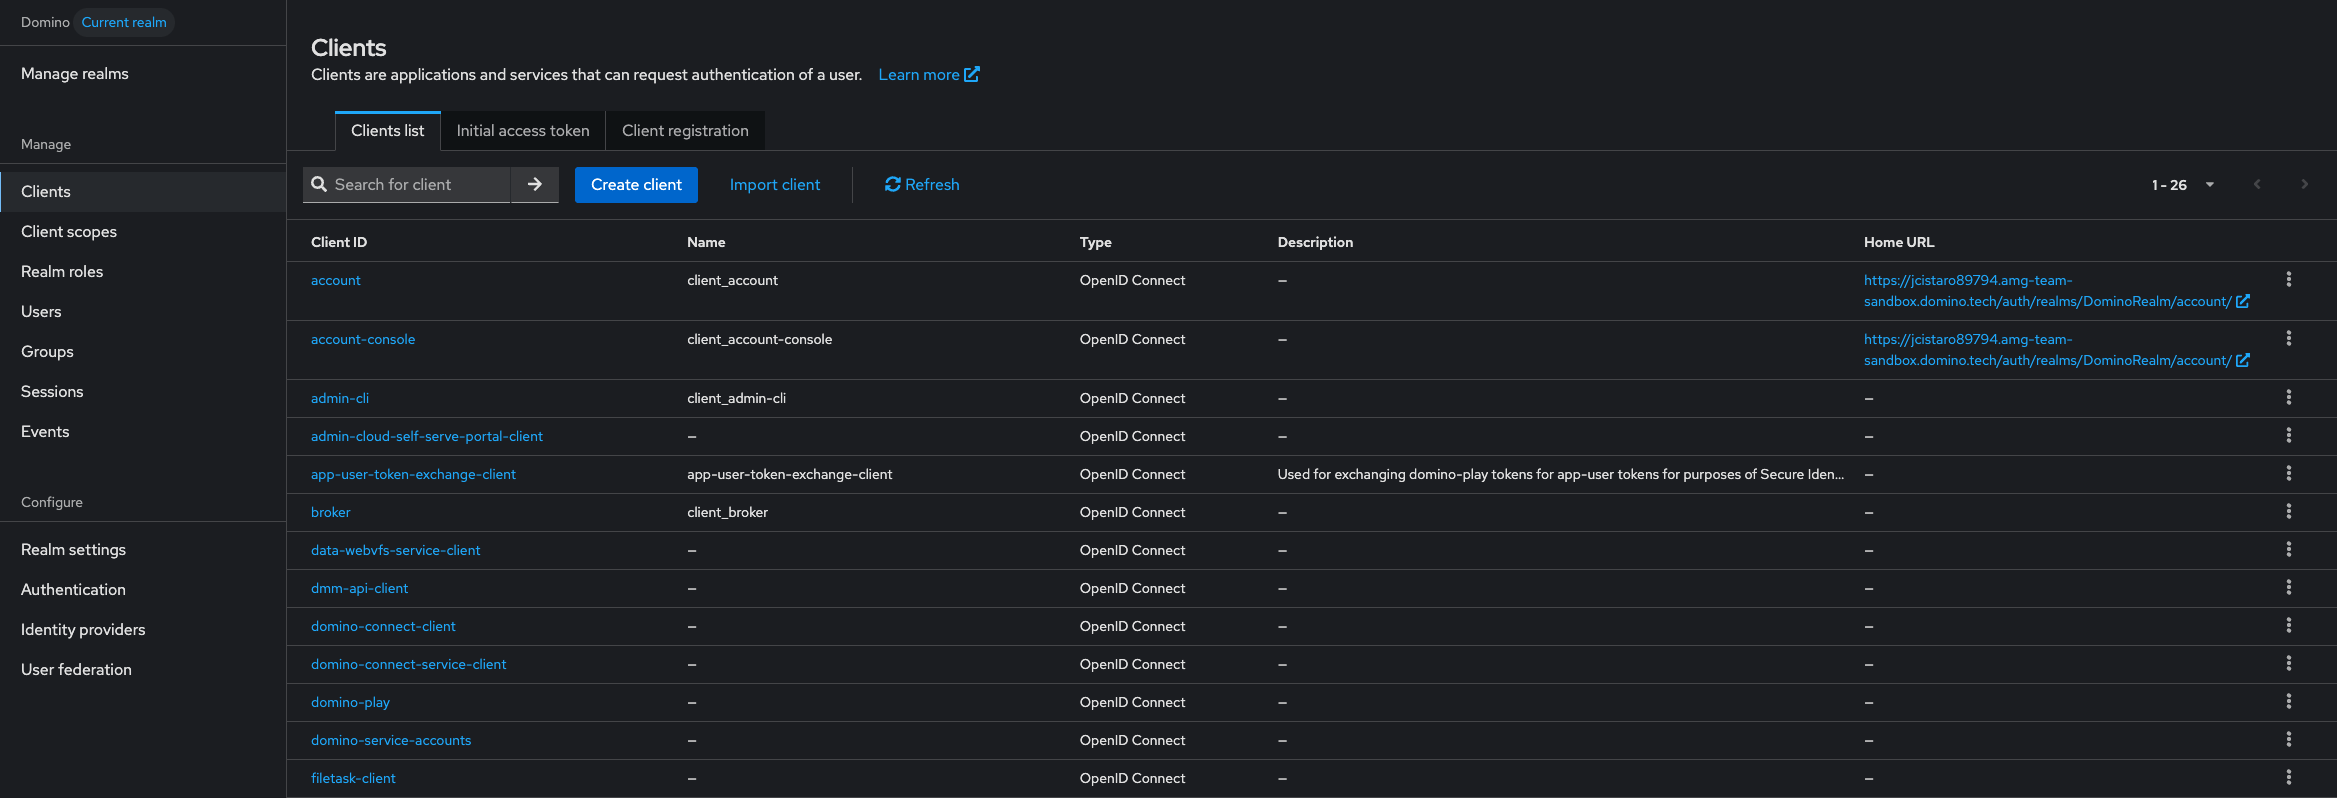
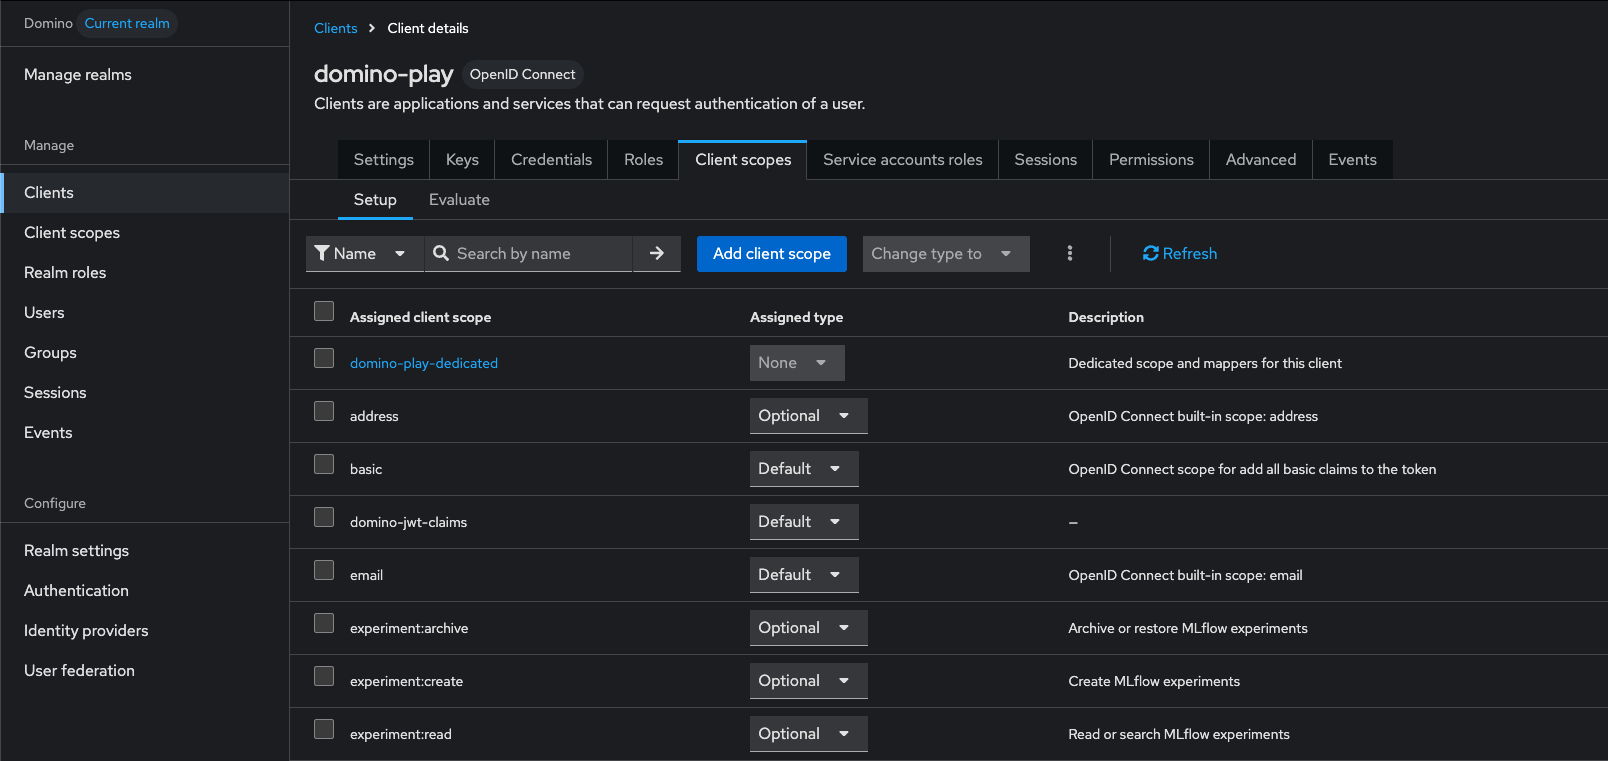
https://<domino-domain>/auth/, then click Domino Realm > Clients.2
Add the mappers
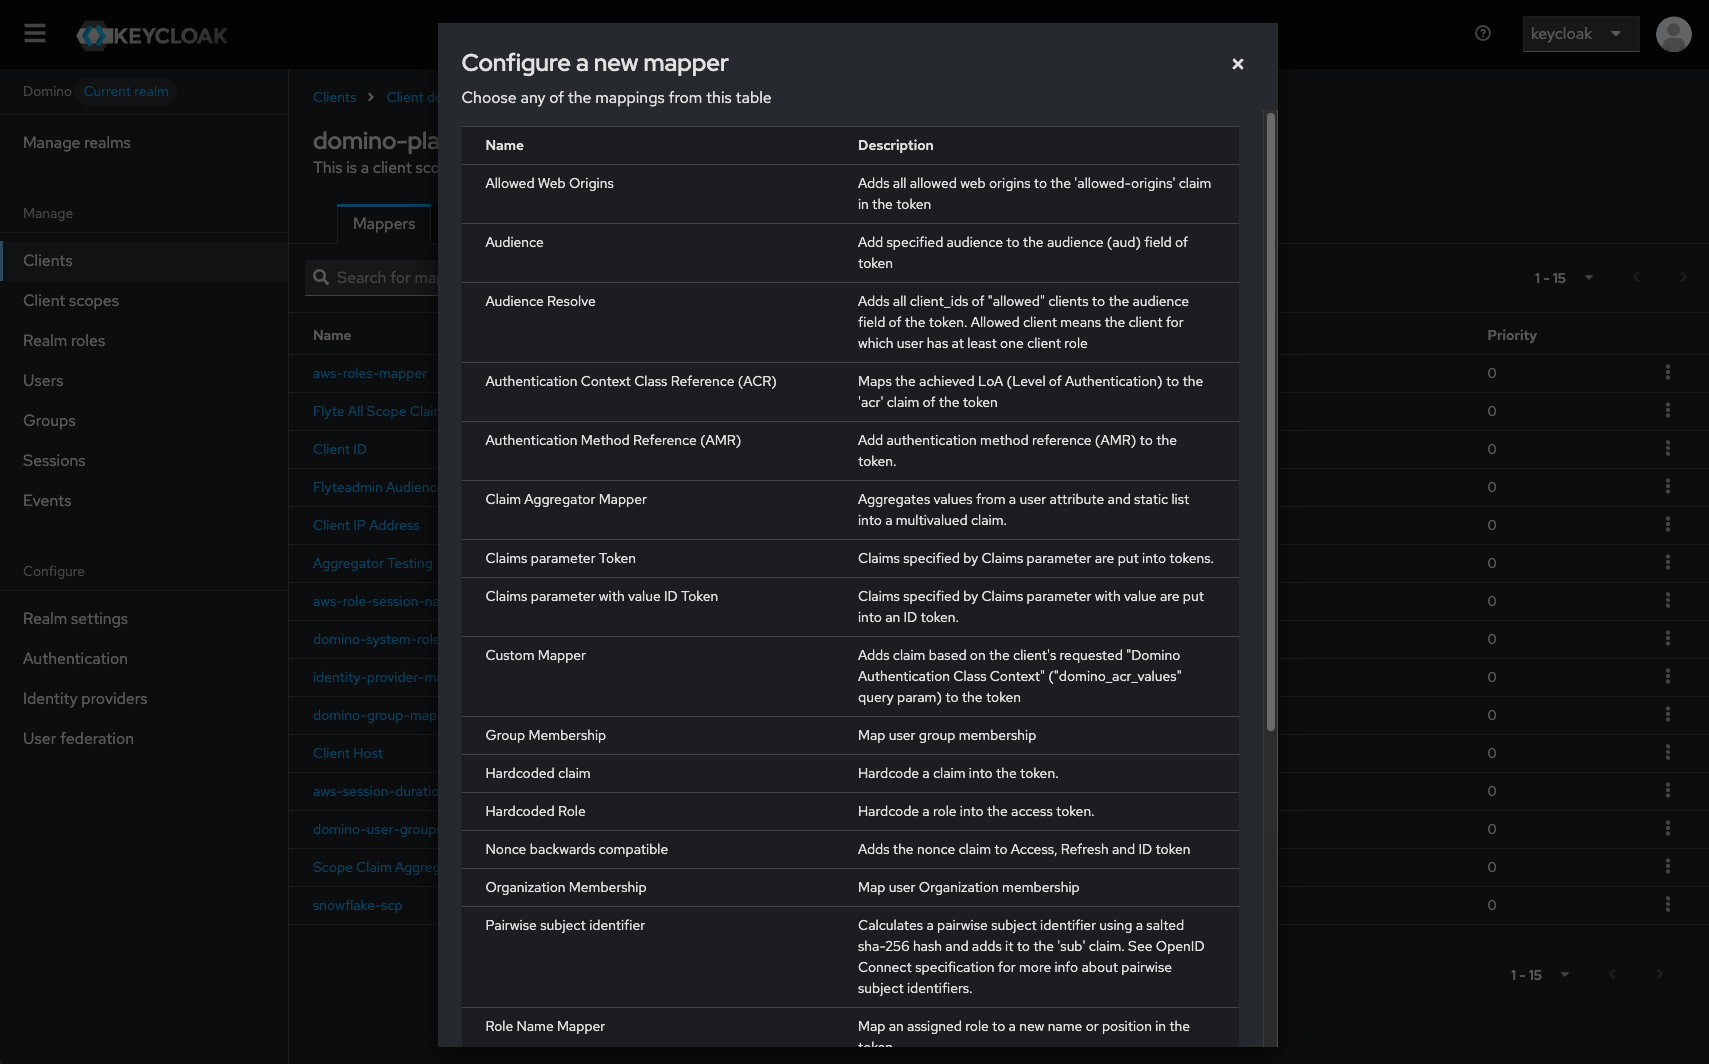
Click Mappers > Add mapper > By configuration, choose a mapper from the listed mappings, and configure it.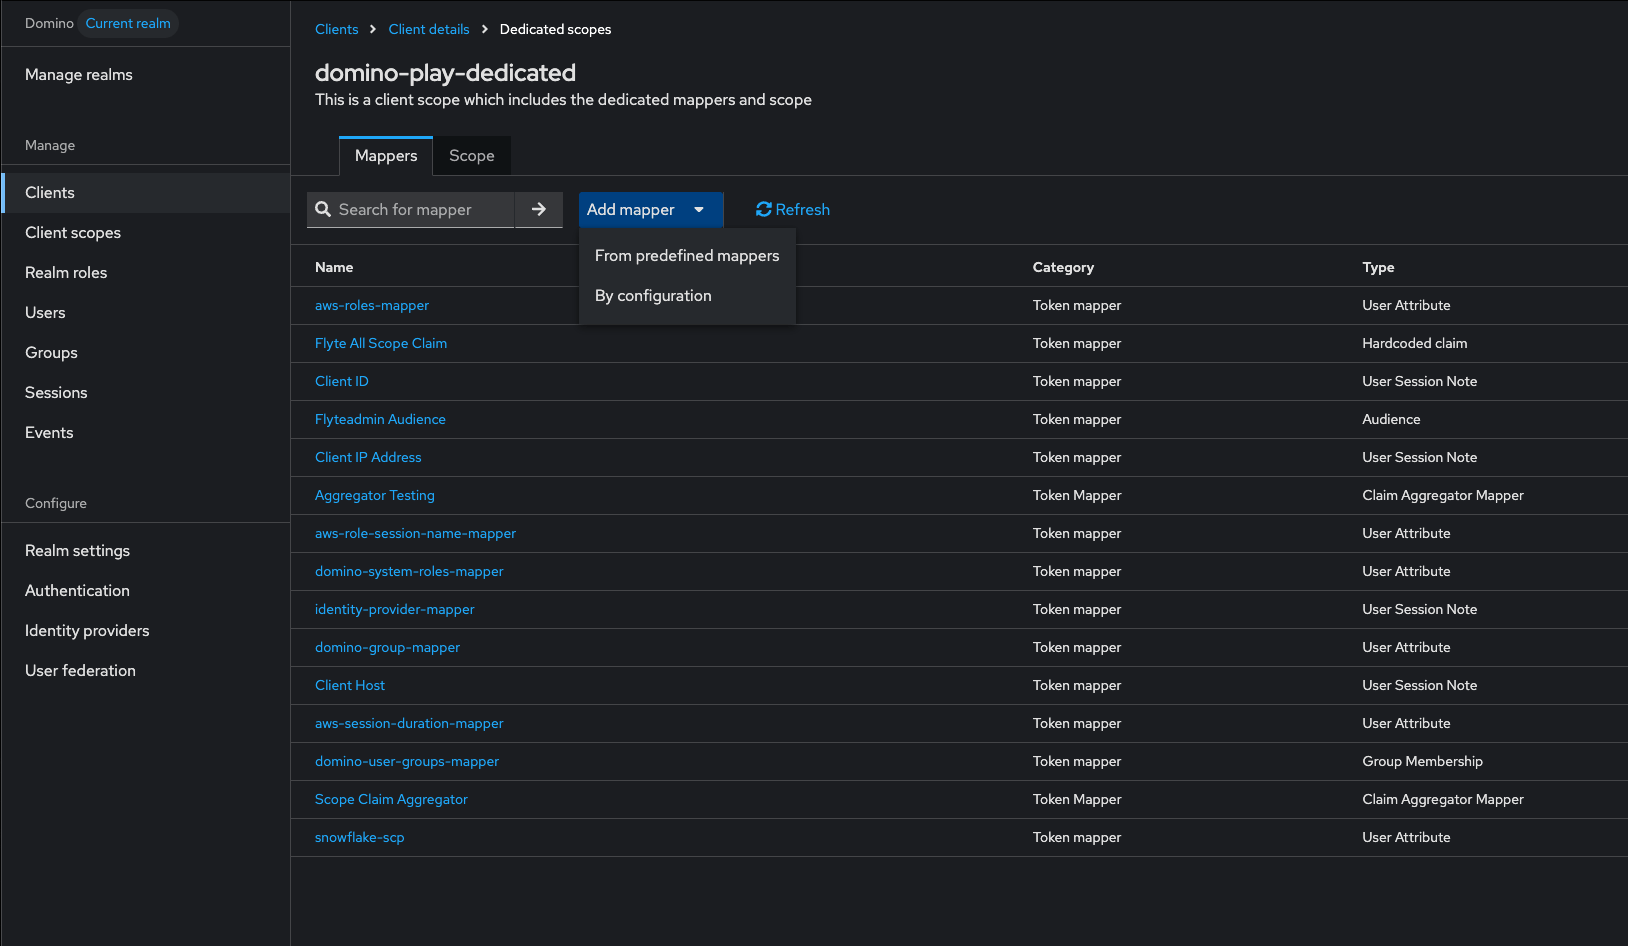
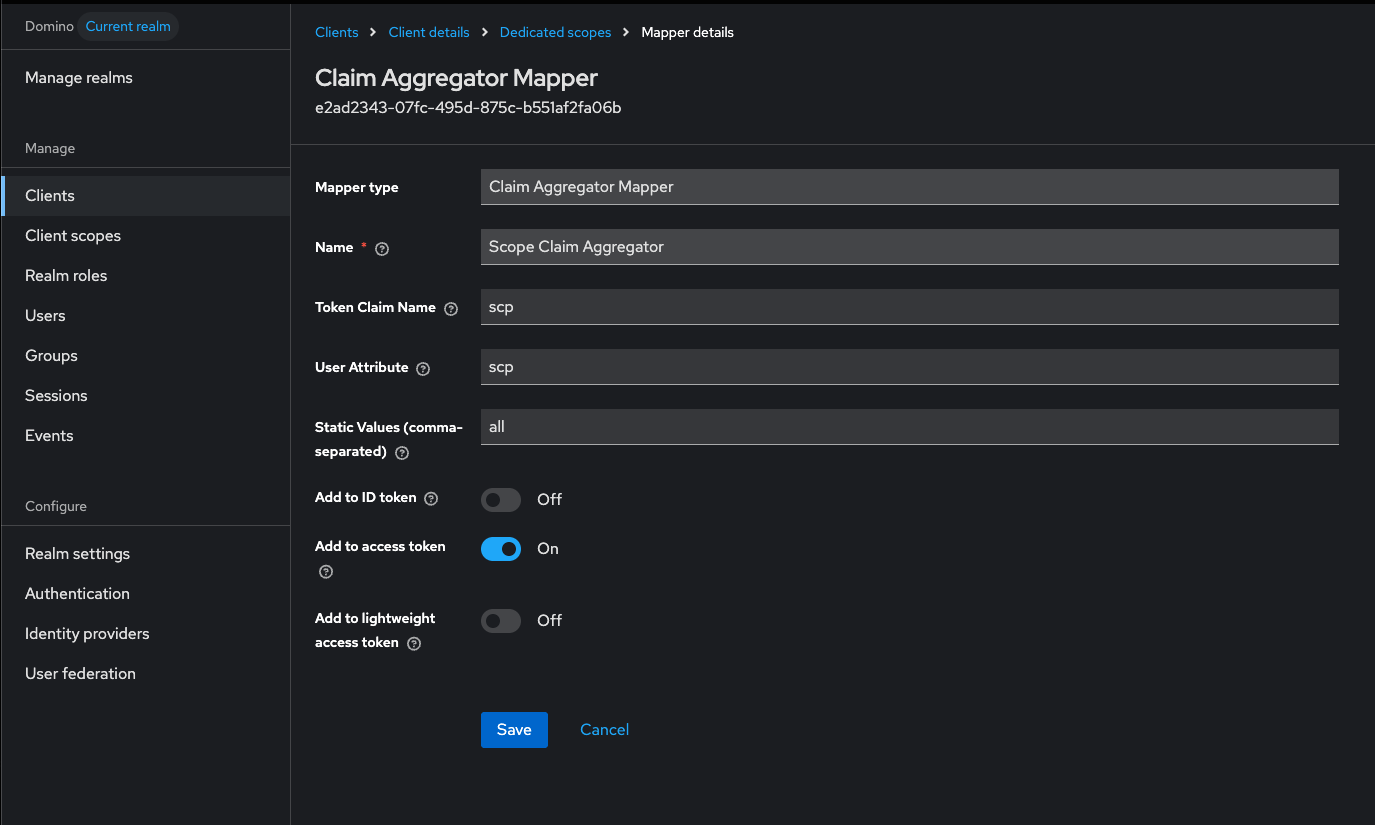
scp claim, use the prepopulated Scope Claim Aggregator mapper. You can write your mappers differently, as long as they conform to the requirements of the Snowflake security integration.Keycloak propagates the values the mappers produce into the JWT token that authenticates against the External OAuth Security Integration you created in Snowflake.3
Add the user attributes
If you added a mapper that requires a user attribute, add that attribute at Users > View All Users > 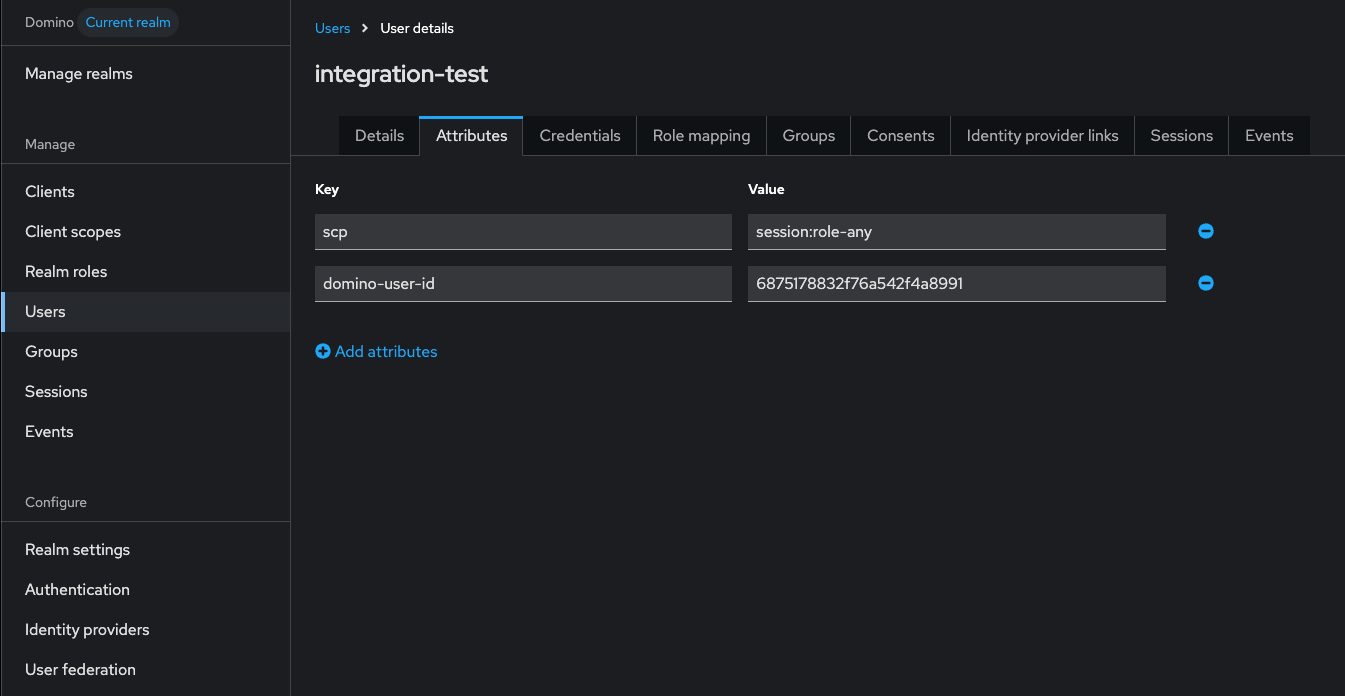
<user ID> > Attributes. You can automate this to create further roles and mappers.4
Enable OAuth for Snowflake in Domino
Go to Platform settings > Configuration records, click Advanced settings, then click Add Record. Enter the
com.cerebro.domino.datasource.SnowflakeConfig.enabledAuthTypes key with the comma-separated values OAuth and KeyPair. Order matters: the first value becomes the default authentication method for all users. Click Create.Keycloak mapper reference
SCP
SCP
Issuer
Issuer
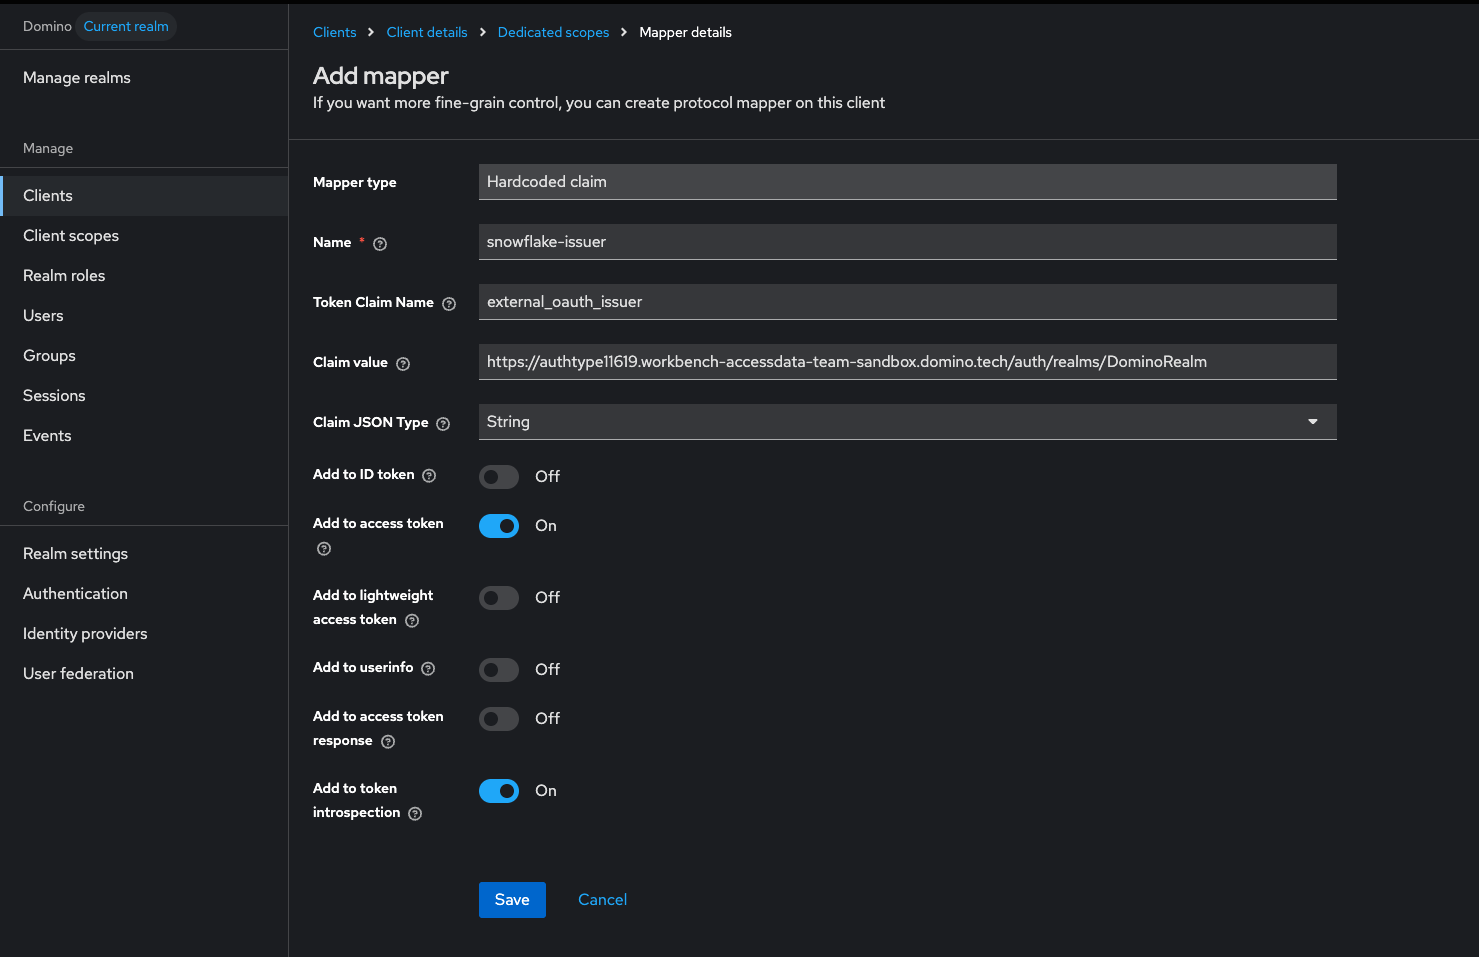
Audience
Audience
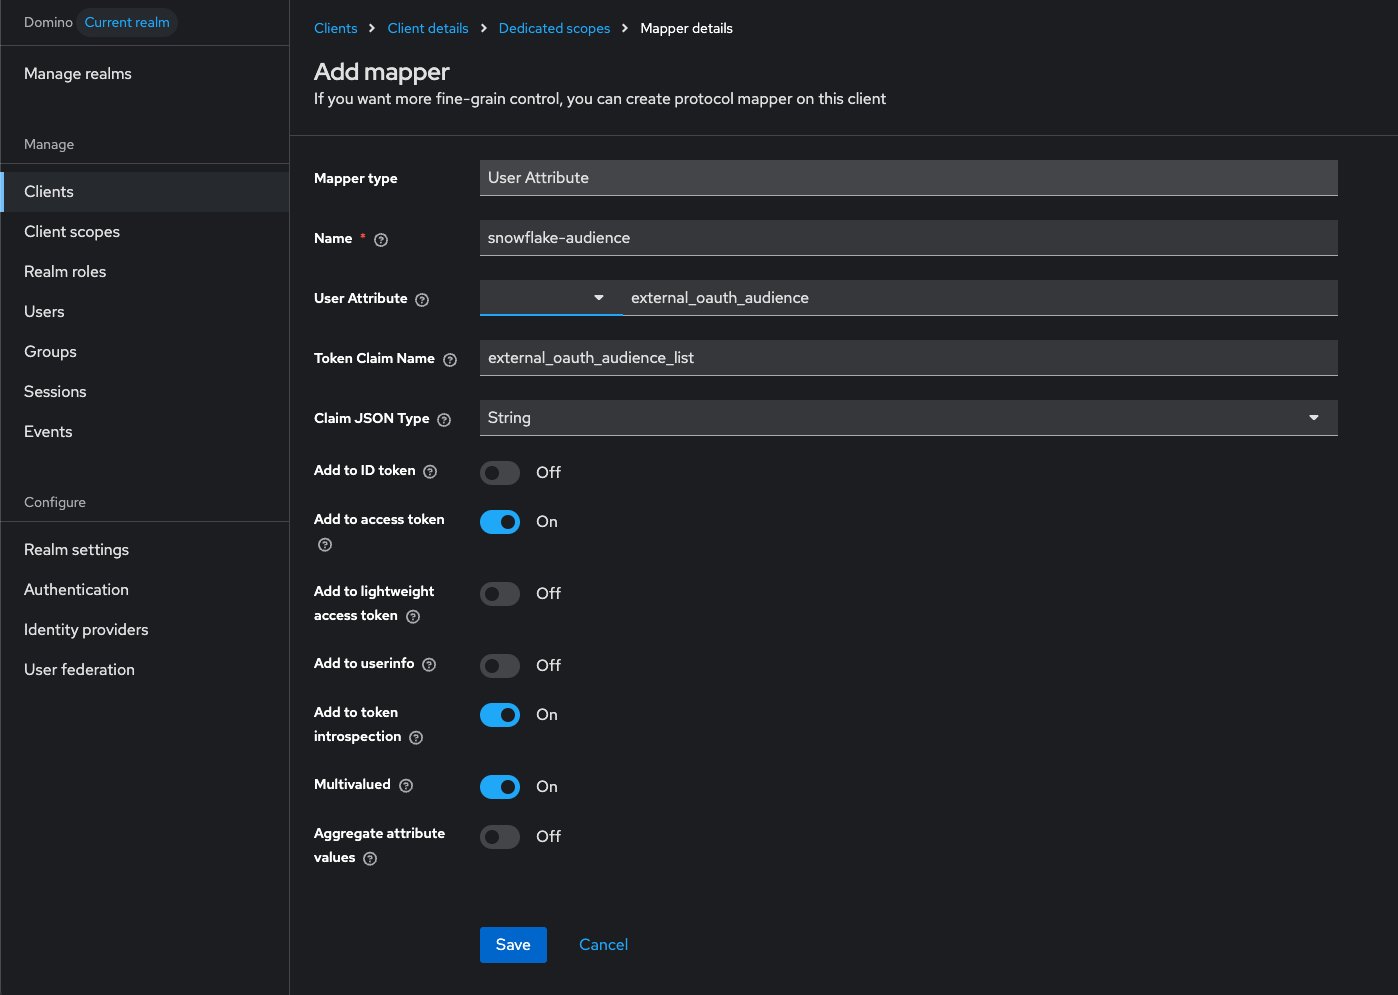
User mapping
User mapping
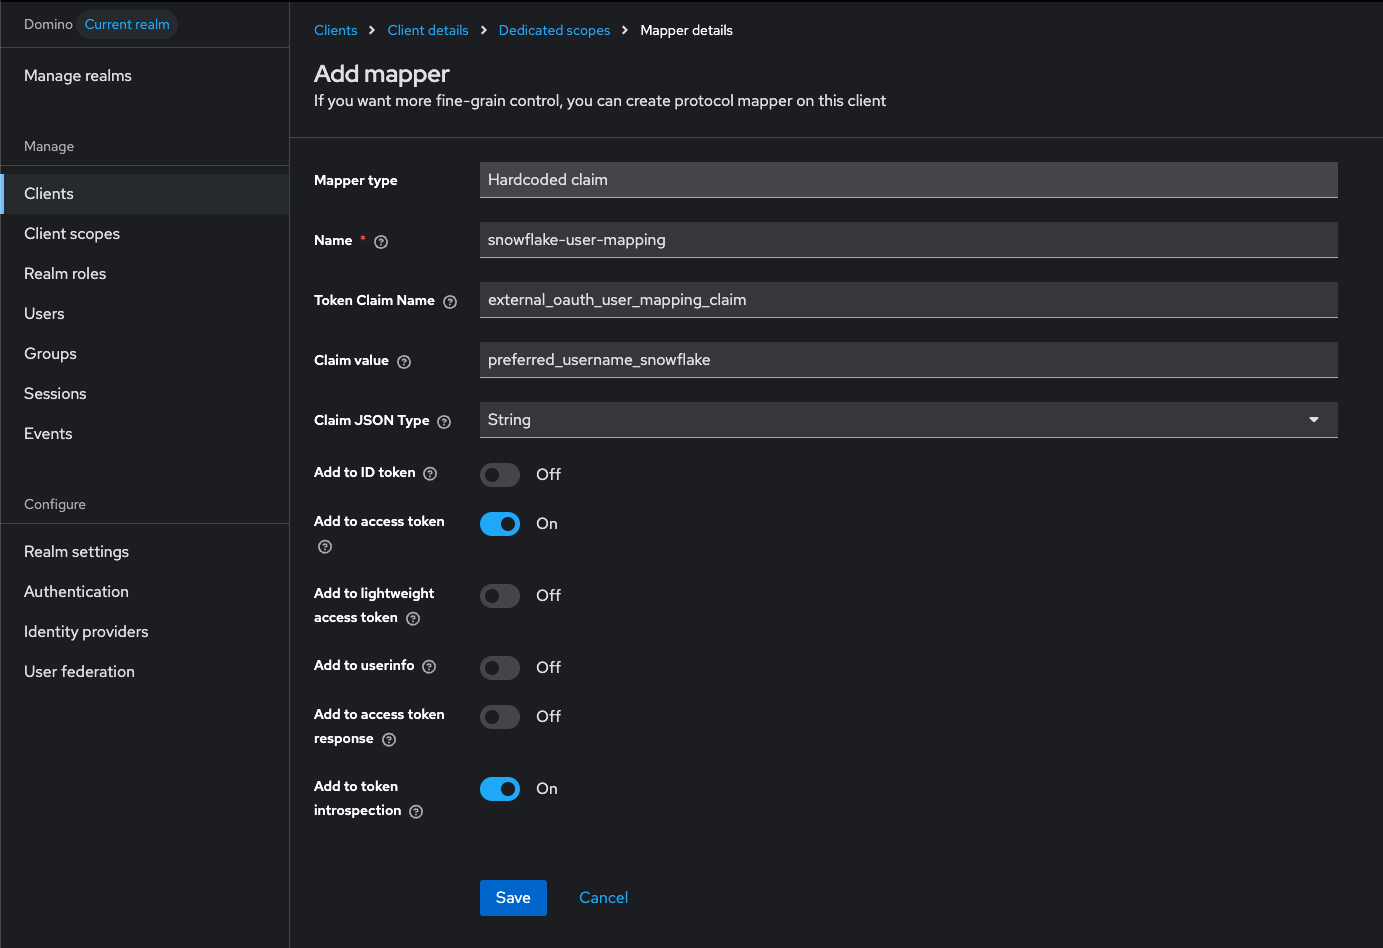
Preferred username
Preferred username
This mapper pairs with the security integration above, which sets
external_oauth_token_user_mapping_claim='preferred_username_snowflake' and so instructs Snowflake to read the value of the preferred_username_snowflake key.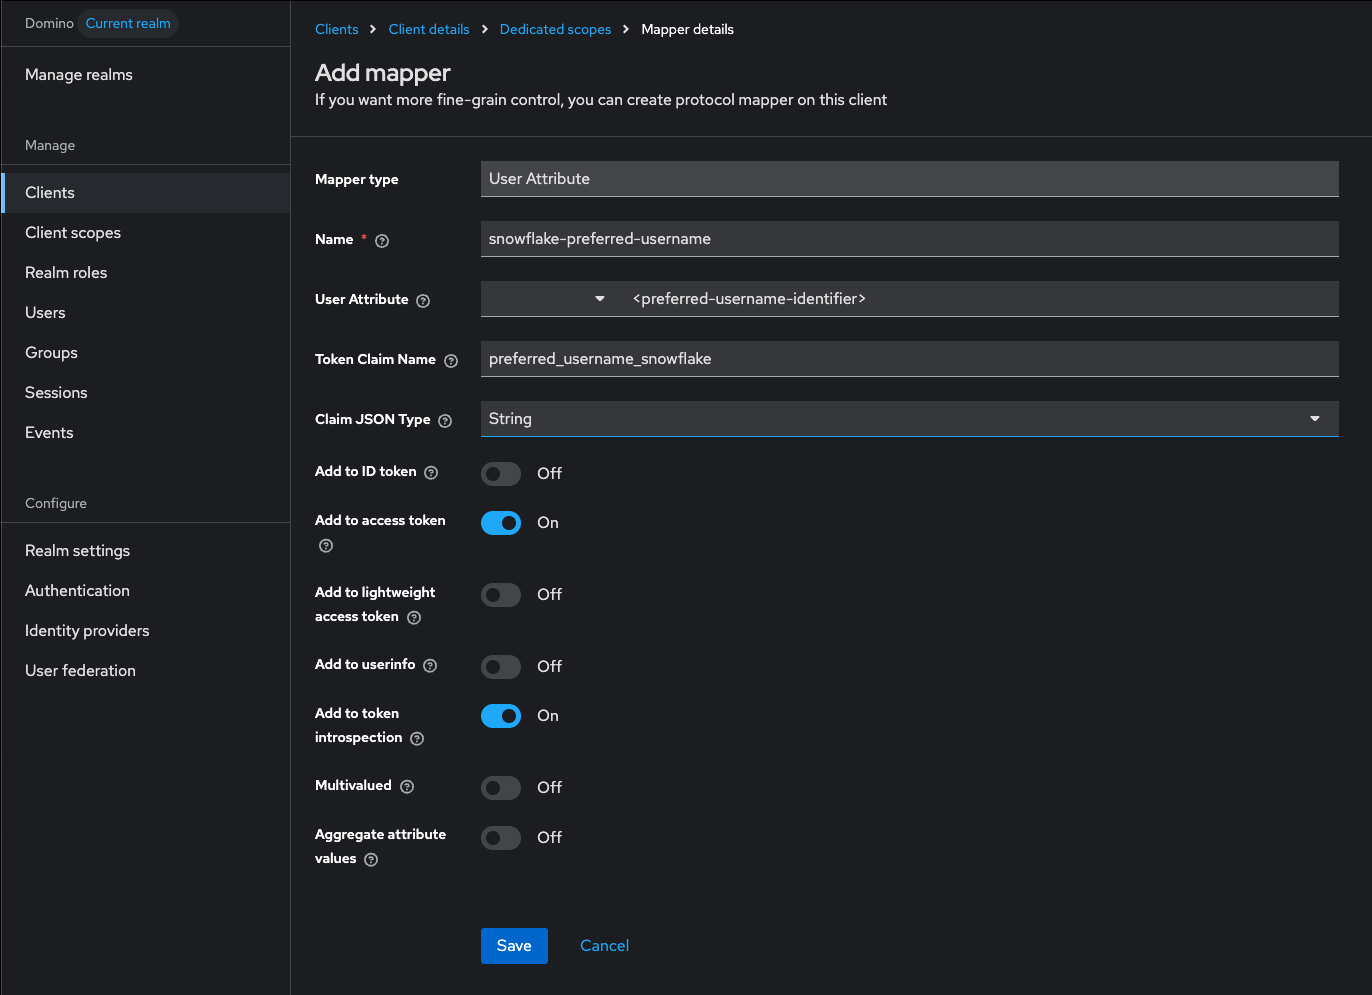
RSA public key value
RSA public key value
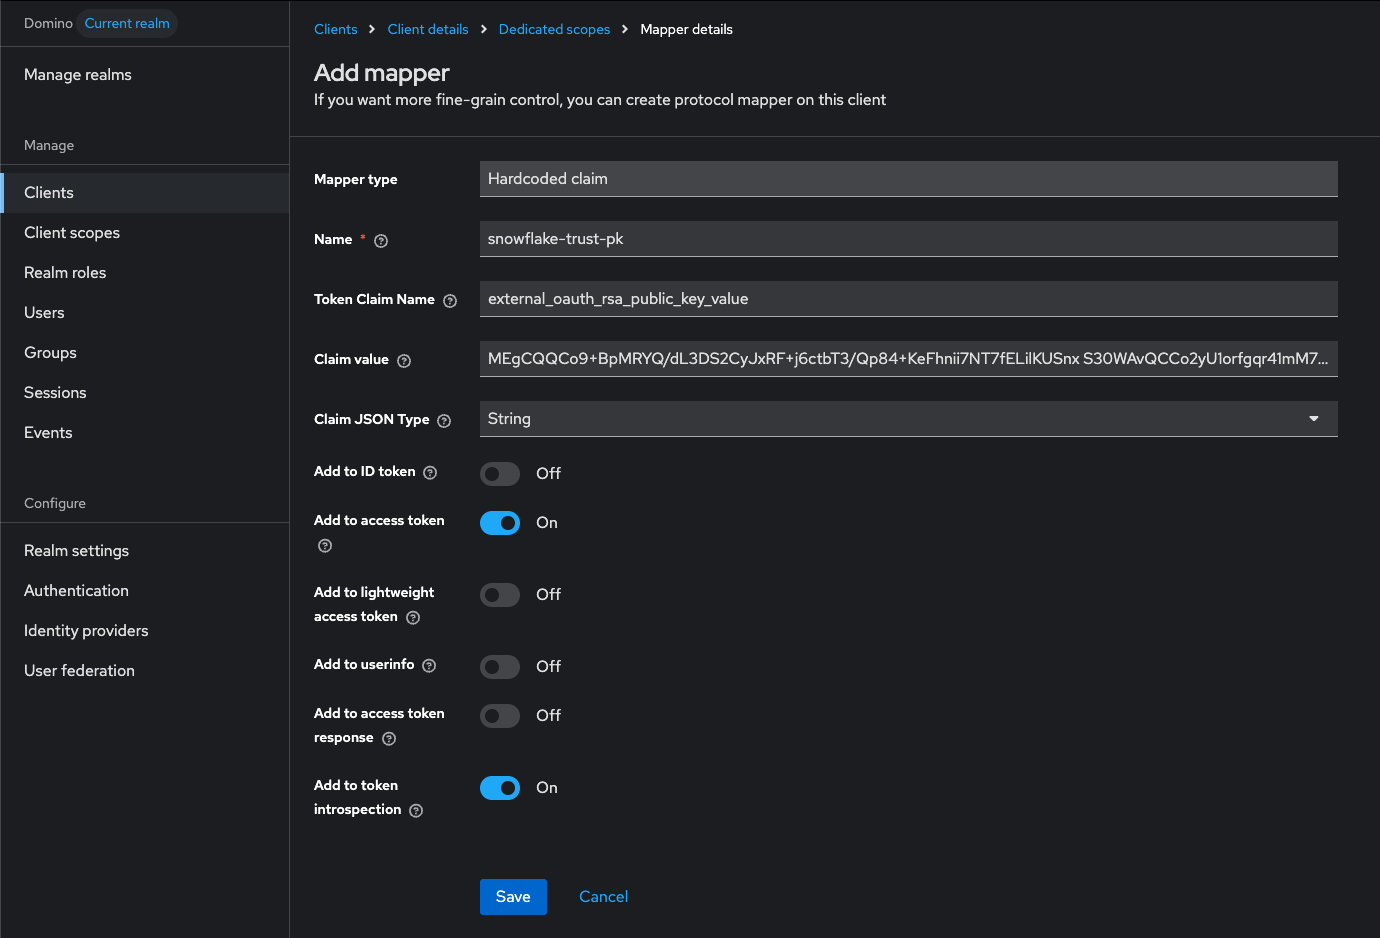
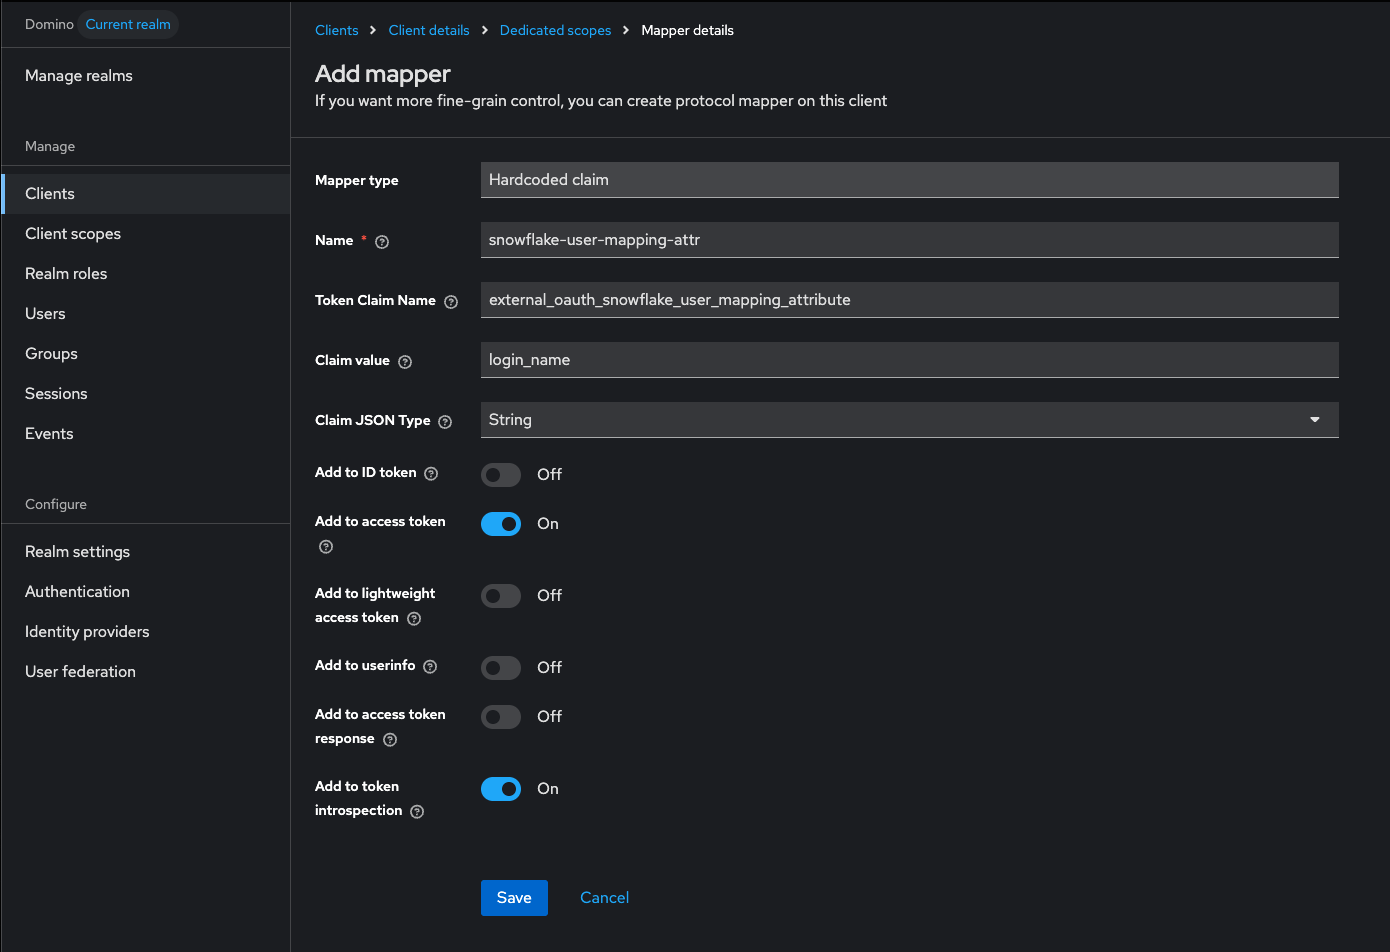
Snowflake user mapping attribute
Snowflake user mapping attribute
Test the OAuth configuration
The user attributesSCP, external_oauth_audience_list, and preferred_username_snowflake must be present in the Domino user JWT token. There are two ways to inject them:
- Locally in Keycloak, for quick testing. Add the user attributes manually under the Keycloak user.
-
Through SAML attributes, for enterprise-level implementations. Passing the user attributes from the identity provider as SAML attributes is the recommended approach. When SAML attributes include the user attributes, additional mappers extract them and make them available to the
domino-playclient.
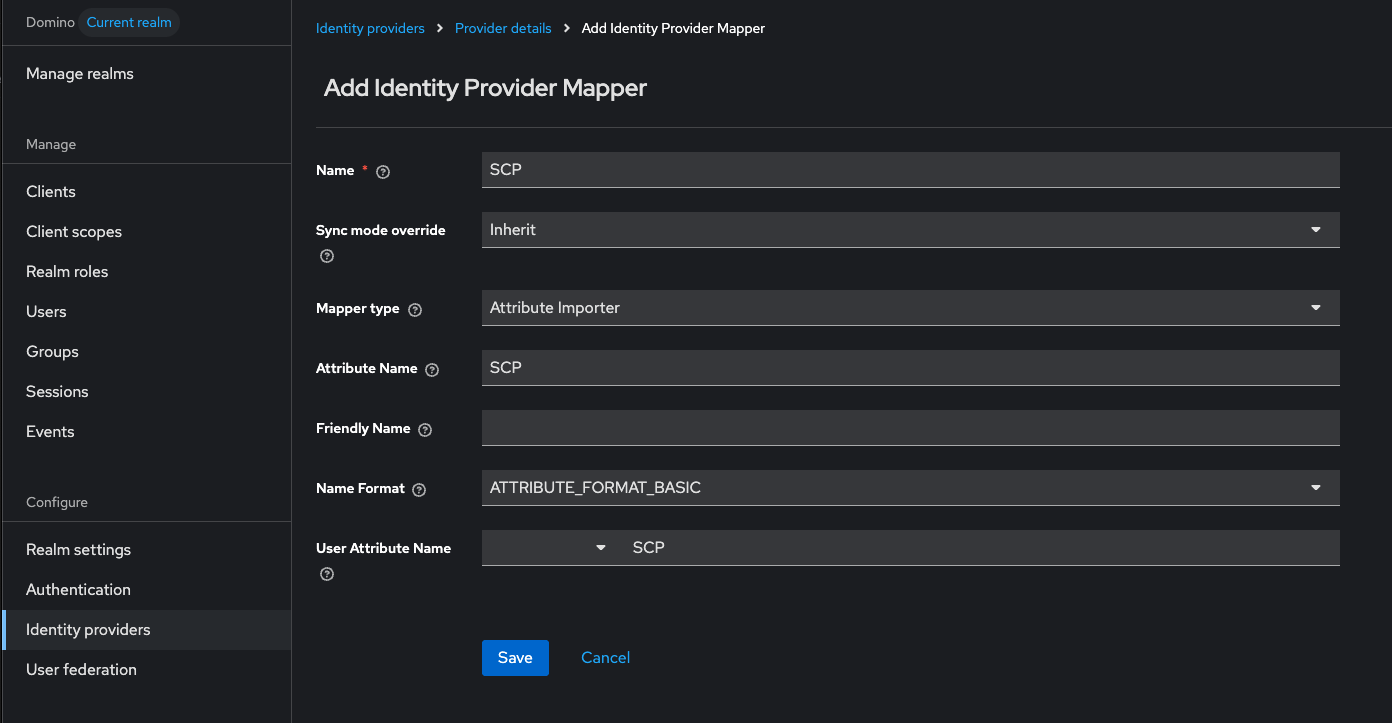
- Go to Domino realm > Identity providers > Identity provider > Mappers.
-
For Mapper type, select
Attribute importer. -
In Attribute Name and User Attribute Name, add the user attributes to pass to the
domino-playclient, for exampleSCP,external_oauth_audience_list, andpreferred_username_snowflake.
OAuth as the authentication type, open an execution, and query data from the registered Data Source.
Starburst-powered Data Sources
Starburst-powered Data Sources cover MongoDB, Palantir Foundry, tabular S3 with AWS Glue, Starburst JDBC, and Teradata. Only an admin can create them, because each one needs a restart of the Starburst cluster in Domino. For additional support in working with Starburst, contact your Domino representative.Enable Starburst
To enable Starburst-powered Data Sources in your Domino instance, add the following block todomino.yaml and agent.yaml.
Create a Starburst-powered Data Source
Every type starts at Manage Resources > Data Sources > Connect to External Data and ends with a cluster restart. Expand the type you are configuring for the fields it asks for.MongoDB
MongoDB
Create a Data Source for MongoDB that your Domino users can access.Prerequisites:
- Starburst is enabled in the deployment. See Enable Starburst.
- Network connectivity between MongoDB and your Domino deployment.
- Domino has enabled this feature. If you do not see this Data Source type in your deployment, contact your Customer Success Manager.
- Go to Manage Resources > Data Sources.
- Click Connect to External Data.
- In the New Data Source window, select MongoDB.
- Enter your MongoDB hostname or IP address.
- Optional: Enter the Port.
- Enter a Name and Description for this Data Source.
- Click Next twice.
- Enter your MongoDB credentials.
- Click Next.
- Select whether Everyone can access this Data Source or just Specific users or organizations.
- Click Finish Setup. Domino alerts you to restart the cluster.
- Click Click here to trigger a restart, then click Restart Cluster to confirm. The restart takes approximately 5 to 10 minutes. When it completes, Domino users can use the MongoDB Data Source.
Palantir Foundry
Palantir Foundry
Create a Data Source for Palantir Foundry that your Domino users can access.Prerequisites:
- Starburst is enabled in the deployment. See Enable Starburst.
- Network connectivity between Palantir and your Domino deployment.
- Domino has enabled this feature. If you do not see this Data Source type in your deployment, contact your Customer Success Manager.
- Go to Manage Resources > Data Sources.
- Click Connect to External Data.
- In the New Data Source window, select Palantir.
- Enter a Name, Description, and the Palantir hostname or IP address. Optionally, enter the Port.
- Select Individual or Service Account as the credential type.
-
Select Client Credentials or OAuth Token for authenticating to Palantir.
Individual credentials can only use OAuth Tokens to authenticate.
- Enter your Palantir credentials.
- Select whether Everyone can access this Data Source or just Specific users or organizations.
- Domino alerts you to restart the cluster. Click Click here to trigger a restart > Restart Cluster. The restart takes approximately 5 to 10 minutes. When it completes, Domino users can use the Palantir Data Source.
- Go to your Palantir instance.
- Go to Control Panel > Third-party applications. An existing Domino integration appears here.
- Next to the Domino integration, select Actions > Manage application to find your client ID.
Tabular S3 with AWS Glue
Tabular S3 with AWS Glue
Only Service Accounts are supported for tabular S3 with AWS Glue.Prerequisites:
- Starburst is enabled in the deployment. See Enable Starburst.
- Network connectivity between S3 and your Domino deployment.
- Domino has enabled this feature. If you do not see this Data Source type in your deployment, contact your Customer Success Manager.
- Go to Manage Resources > Data Sources.
- Click Connect to External Data.
- In the New Data Source window, select Tabular S3 with AWS Glue.
- Enter your S3 account ID, database, and region.
- Enter a name for this Data Source.
- Click Next. In the Credential Type screen, Service Account is preselected. Individual accounts are not supported for this Data Source type.
- Click Next.
- Enter your S3 service account access key ID and secret access key.
- Click Next.
- Select whether Everyone can access this Data Source or just Specific users or organizations.
- Click Finish Setup. Domino alerts you to restart the cluster.
- Click Click here to trigger a restart, then click Restart Cluster to confirm. The restart takes approximately 5 to 10 minutes.
Starburst JDBC
Starburst JDBC
Starburst JDBC extends Domino Data Sources to any Starburst-JDBC data entity. IBM DB2, IBM Netezza, and SAP HANA are enabled by default.Prerequisites:
- Starburst is enabled in the deployment. See Enable Starburst.
- Network connectivity between the data platform and your Domino deployment.
- Go to Manage Resources > Data Sources.
- Click Connect to External Data.
- Select the data entity you want to connect to under Powered by Starburst JDBC.
- Enter the connection parameters.
- Enter the Data Source Name and, optionally, a Description that explains the purpose of the Data Source to others.
- Select the credential type.
- Optionally, enter your credentials. You can enter these later.
- Click Next.
- Select whether Everyone can access this Data Source or just Specific users or organizations.
- Click Finish Setup. Domino alerts you to restart the cluster and provides a link to trigger it.
Teradata
Teradata
Create a Data Source for Teradata that your Domino users can access.Prerequisites:
- Starburst is enabled in the deployment. See Enable Starburst.
- Network connectivity between Teradata and your Domino deployment.
- Domino has enabled this feature. If you do not see this Data Source type in your deployment, contact your Customer Success Manager.
- Go to Manage Resources > Data Sources.
- Click Connect to External Data.
- In the New Data Source window, select Teradata.
- Enter your Teradata hostname or IP address.
- Enter a name for this Data Source.
- Click Next.
- Select the credential type.
- Optionally, enter your Teradata credentials. You can enter these later.
- Click Next.
- Select whether Everyone can access this Data Source or just Specific users or organizations.
- Click Finish Setup. Domino alerts you to restart the cluster.
- Click Click here to trigger a restart, then click Restart Cluster to confirm. The restart takes approximately 5 to 10 minutes.
Users must specify the database name in their queries, as in this example where
td_demo is the database name and yellow_cab is the table name:Add Starburst JDBC data entities
Not every JDBC-powered data entity is available by default. You can enable ClickHouse, Druid, Greenplum, MariaDB, Ignite, SingleStore (MemSQL), Synapse, Vertica, and the generic JDBC capability that Starburst provides.You may need to contact your Customer Success engineer for assistance to add some additional JDBC data entities.
- Go to Admin > Platform settings > Configuration records.
-
Add or edit the
com.cerebro.domino.datasource.starburstJdbc.enabledConnectorsconfig option. -
Add a comma-separated list of data-entity names as the value:
- Restart the Domino services to apply the new setting, following the prompt on the admin page.
Restart the Starburst cluster
Restart the Starburst cluster in Domino after actions including, but not limited to:- Creating a Data Source
- Updating a Data Source configuration
- Updating credentials

Starburst limitations
- Your Domino representative must enable this feature. If you do not see these Data Source types in your deployment, contact your Customer Success engineer.
- In a hybrid deployment, Starburst-powered Data Sources are only available from the local Data Plane.
Data Plane accessibility
Data Planes in a Domino Nexus hybrid deployment have caveats around which of them can reach a Data Source.
You can disable adding a Data Source in remote Workspaces. For more information, please reach out to Domino Support.
Related
- External Data Volumes mount remote file systems into executions instead of querying them.
- Data Source connectors covers what practitioners do with a Data Source once you create it.
- Monitor Data Source logs audits Data Source activity.
- Domino Datasets are where practitioners land data pulled from a Data Source.